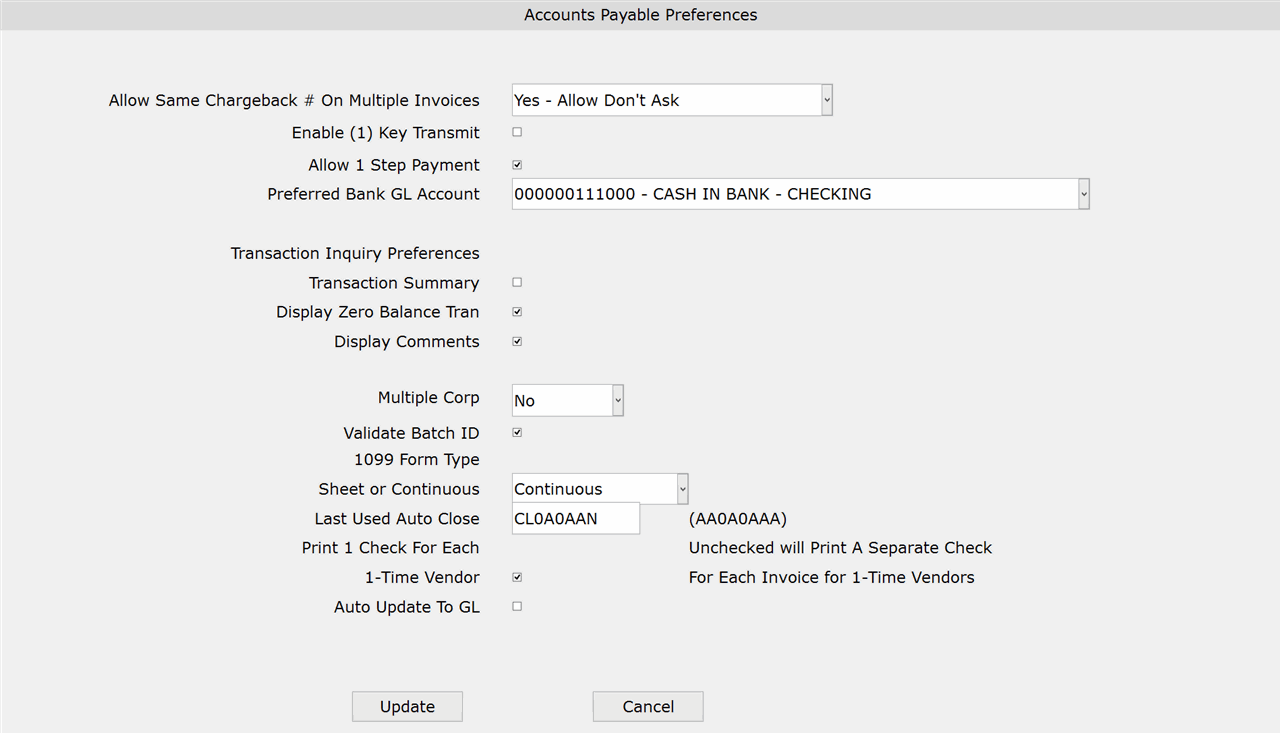
How To: Setting Up A/P General Preferences (11-90-01)
Overview
This tutorial describes how to set up or change General Preferences for Accounts Payable (11-90-01).
Step-by-Step
- From the ‘Preferred Bank GL Account’ drop-down list, select the bank account you want to set up or change.
- Complete the fields as described below.
- Click ‘Update’ to save the changes.
- Click ‘Cancel’ to close without saving the changes.
This preference applies when the user enters multiple invoices for a vendor using the same chargeback number, in Invoice Entry (11-01).
Select ‘Yes – Allow Don’t Ask’ to allow the same chargeback number to be entered for multiple invoices without prompting for approval first.
Select ‘No – Don’t Allow Don’t’ Ask to not allow the same chargeback number to be entered on multiple invoices. Attempting to do so will display an error message and you will not be able to continue without changing the chargeback number.
Select ‘Ask – Ask to Allow’ to require approval (at a prompt) before allowing the same chargeback number to be entered for multiple invoices.
NOTE: DM invoices do not follow this rule.
If unchecked, the Tab or Enter key will be required after entry to record the keystrokes made.
NOTE: In Transaction Maintenance, one key transmit will not currently work for numbers. When maintaining a transaction, you must enter the number and Tab.
Uncheck the checkbox if invoices must be entered before being paid.
NOTE: If the following preferences are changed while a vendor account is accessed, you will need to exit the vendor account and re-access it before the changes are applied.
If unchecked, detailed information for a vendor’s transactions appears on the printed report.
Select Yes if you are maintaining separate A/P Control Accounts.
Select No if there is only one A/P control account.
Select Report if you are using the 4th character of the Vendor Code to define different corporations.
If unchecked, the system accepts any Batch ID.
Select Sheet to print 1099 forms on a laser printer.
Select Continuous to print 1099 forms on a dot matrix printer.
Uncheck the box to process all one-time vendor invoices as separate checks. The system will uncheck the checkbox as the default if this preference is left blank.
If the box is unchecked, you must run the Audit/Update selections to update invoices and checks.
