How To: Making a Layaway Payment (ML)
Overview
This tutorial describes how to apply a payment to an order that a customer has placed on layaway.
Video
Tip: Use the controls on the video player to watch in Full Screen mode, adjust the quality, or watch on YouTube.
Step-by-Step
Scenario: A customer bought a piece of merchandise last week and wants to make a payment towards the purchase.
- In the Type of Sale field, select ML–Apply Payment from the drop-down menu.
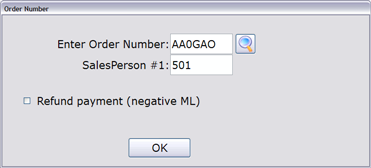
- Press Tab, Enter or click in a different field and the Order Number box appears.
- In the Order Number field, enter the order that the layaway payment will be applied to.
- To perform an order number search, click the Search button.
- In the Salesperson #1 field, accept or modify the salesperson processing this transaction. The entry from the ‘SalesPerson #1’ field in the Header Block appears by default.
- Click OK or press Enter to move to the Tender Entry window.
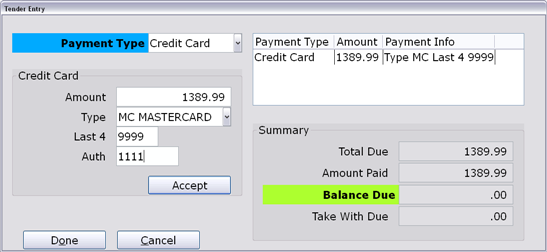
- In the Tender Entry window, select the Payment Type from drop-down menu.
- Accept or modify the amount for the selected payment type.
- For information on how to split a payment/refund between multiple payment types, please see the “Entering Payment Information.”
- Enter the required information for the payment type.
- Click Accept and the payment appears on the right side of the window.
- When you finish entering all payment information, click Done.
- Depending on how your Invoice Preferences (02-18-01, Field 8) are set up, one of the following now occurs:
- The invoice is automatically printed
- Invoice print is automatically skipped
- You can choose to print or not print the invoice


