How To: Cancelling an Order (CO)
Overview
This tutorial describes how to cancel a DD/SO transaction. A CO is used to cancel an existing order that has not yet been delivered (Order Status is 0).
NOTE: You cannot process a CO transaction on a Point-of-Sale terminal.
Video
Tip: Use the controls on the video player to watch in Full Screen mode, adjust the quality, or watch on YouTube.
Step-by-Step
Scenario: A customer has ordered a piece of merchandise to be delivered. Your store cannot get the desired item so he decides to cancel.
- Select CO–Cancel Order from the Type of Sale drop-down menu.
- After selecting CO–Cancel Order, you can press Tab, press Enter or click in a different field and the Order Number box appears.
- Enter the Order number that needs to be cancelled.
- Click the Search button to perform an order number search.
- Pressing Enter with no entry in the field takes you back to the POS screen.
- Click OK.
- The Cancel Order Amounts box appears. You will see unapplied deposits and unshipped order totals along with a list of all items on the order.
- By default, all items on the order are selected for cancellation. Uncheck the box in the Cancel column for any item the customer still wants.
- Click Accept.
- If this is not the correct order, click Cancel.
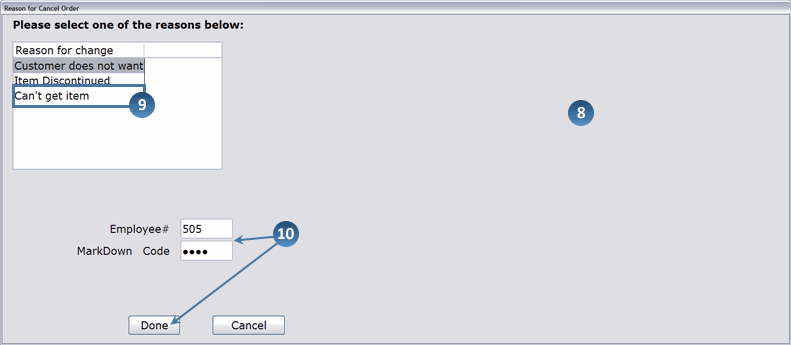
- If Reason Codes are set up and activated on your system for Cancel Orders, the above screen appears.
If Reason Codes are not set up and activated on your system, skip to step 11.
- Select a reason for the order cancellation.
- The reason codes that appear on this screen are set up in the Order Maintenance Reasons selection (02-08-90-04).
- The fields that now appear on the screen vary depending on how the reason codes are set up. Enter the required information (Employee Number, Markdown Code, etc) and click Done.
- The Tender Entry box appears. Select the refund method from the Payment Type drop-down menu.
- Accept or modify the pre-prompted amount. Since money is being refunded, it appears as a negative number.
- Enter the required information for the payment type.
- Click the Accept button, and the payment appears on the right side of the window.
- Verify that the Balance is ‘.00.’
- Click Done.
- Depending on how your Invoice Preferences (02-18-01, Field 8) are set up, one of the following now occurs:
- The invoice is automatically printed
- Invoice print is automatically skipped
- You can choose to print or not print the invoice


