How To: Creating a Loaner Transaction (LP)
Overview
This tutorial describes how to create a Loaner Processing transaction using the ‘LP’ transaction type in POS Entry (02-02) This is the first step of the loaner process.
Step-by-Step
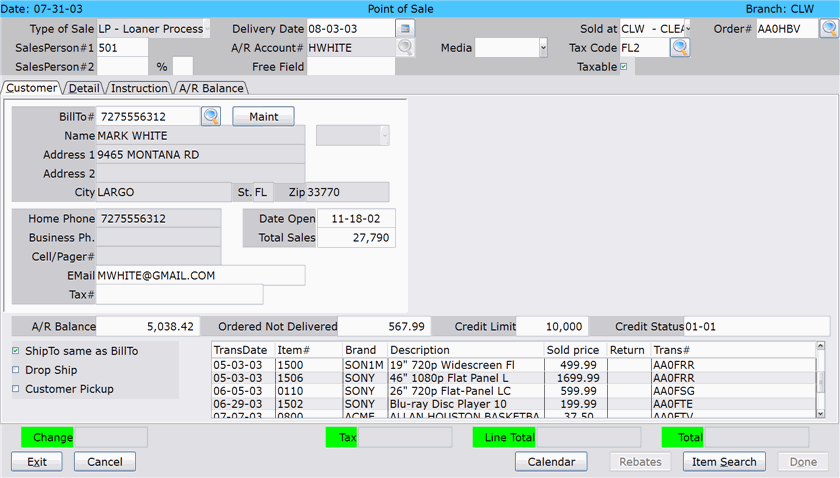
- In the ‘Type of Sale’ field, select ‘LP–Loaner Processing’ from the drop-down menu.
- In the ‘Salesperson #1’ field, enter the Employee ID of the person processing the loaner transaction.
- Enter the customer’s desired delivery date in the ‘Delivery Date’ field or select it from the calendar.
- If Centralized Delivery is licensed, the system will allow you to schedule the actual route at the end of transaction entry process.
- If the customer does not want to specify a delivery date at this time, enter a dummy value (i.e. ‘999999’).
- To avoid committing the inventory, enter a “?” in this field.
- In the ‘A/R Account’ field, enter a valid A/R account number for the customer. A loaner transaction must be charged to an Open A/R Account. You will not be able to leave the header block of the POS screen without entering a valid A/R Account number.
- Loaner transactions cannot be charged to A/R Installment accounts, temporary accounts, credit memo accounts, or gift certificate accounts.
- The account information appears below. Click the ‘Detail’ tab.
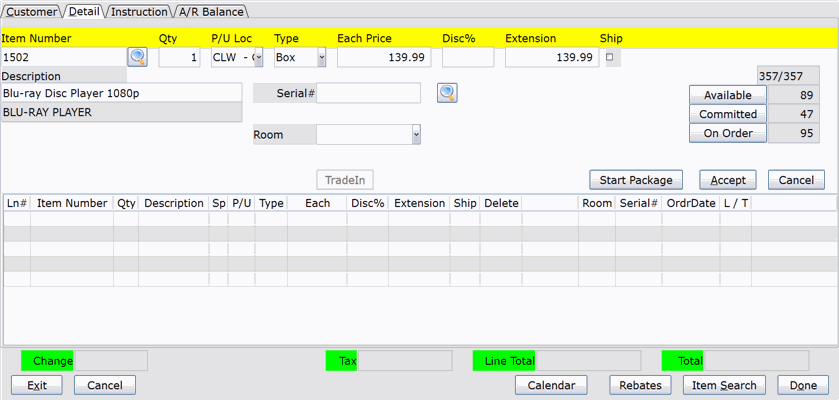
- In the ‘Item Number’ field, enter the item that is being loaned to the customer. The corresponding item information appears.
- To search for an item number, click the Search icon.
- In the ‘Quantity’ field, accept or modify the quantity that is being loaned to the customer.
- Press Tab to move through the ‘P/U Loc’, ‘Type’, ‘Each Price’, ‘Disc%’, ‘Extension’ and ‘Ship’ fields, or press Enter to skip them.
NOTE: If the customer wants to take the item home today, check the ‘Ship’ box. The line will appear as ‘On Loan’ when viewed in Order Maintenance.
- If necessary, enter a serial number for the item in the ‘Serial Number’ field.
- Click ‘Accept’ to add the item(s) to the transaction.
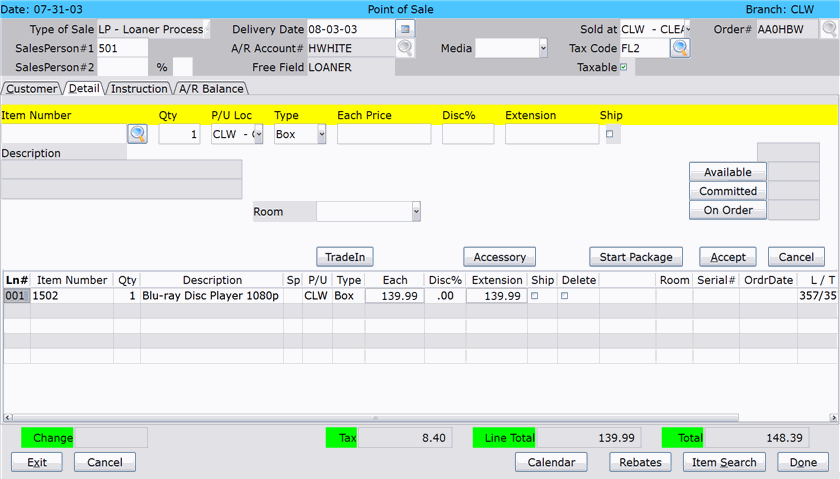
- The item appears in the box at the bottom of the screen. Repeat steps 6-10 until all items are added to the transaction.
- Click ‘Done’ to move to the Tender Entry screen.
- You can also enter “-” in the ‘Item Number’ field and press Enter to move to the Tender Entry screen.
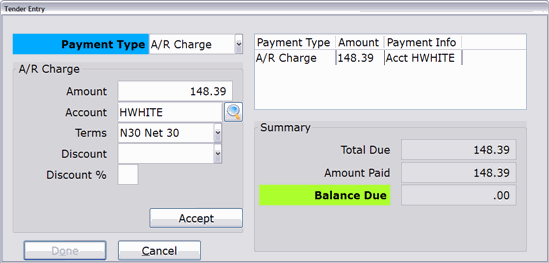
- The Tender Entry screen appears. Since loaner transactions must be charged to an A/R Account, the payment type defaults to ‘A/R Charge’ and cannot be changed.
- Verify that the amount and A/R Account are correct. You can change them if necessary.
- Specify the terms of the purchase and enter the discount information (optional).
- Click ‘Accept’ and the payment appears on the right side of the window. For more information on the Tender Entry screen, please see the ‘Entering Payment Information’ section of the Point of Sale documentation.
- When you are finished entering the payment information, click ‘Done.’
- If you have the Centralized Delivery application licensed, the Scheduler appears. Please refer to your company’s delivery procedures to complete this part of the transaction.
- Depending on your how your Invoice Preferences (02-18-16) are set up, one of the following now occurs:
- The invoice is automatically printed
- Invoice print is automatically skipped
- You can choose whether or not to print the invoice
- The item quantity is committed and the transaction moves to Order Processing. Additionally, ‘Loaner’ is added to the ‘Free’ field of the order. Complete the next step in the loaner process to release the item(s) to the customer.


