How To: Using the Advanced Scheduler (21-25)
Overview
This tutorial describes how to use The Advanced Scheduler.
Video
Tip: Use the controls on the video player to watch in Full Screen mode, adjust the quality, or watch on YouTube.
Step-by-Step
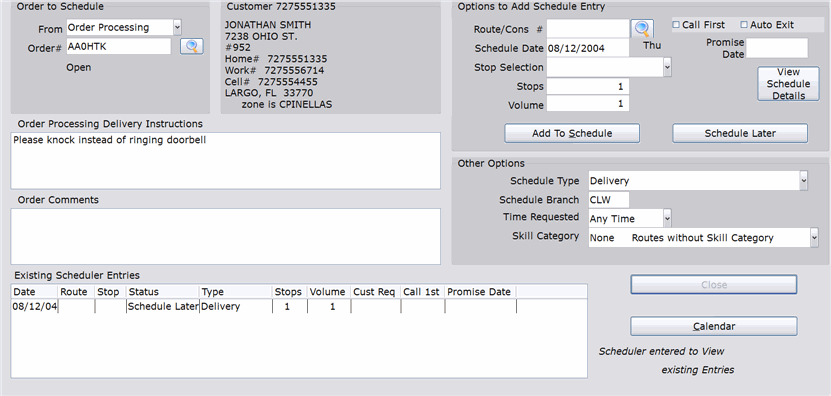
- In the ‘From’ drop-down box in the ‘Order to Schedule’ box:
- Select ‘Order Processing’ if you are scheduling an order from Order Processing.
- Select ‘Work Order’ if you are scheduling a work order from Service.
- Select ‘Centralized Delivery’ if you are scheduling a Miscellaneous Stop (21-22).
NOTE: When you are accessing the Scheduler from POS Entry, Order Processing or Service, the respective application name automatically prompts in this field.
- Enter the order number in the ‘Order#’ field.
NOTE: When you are accessing the Scheduler from Order Processing or Service, the order number/work order number automatically appears in this field.
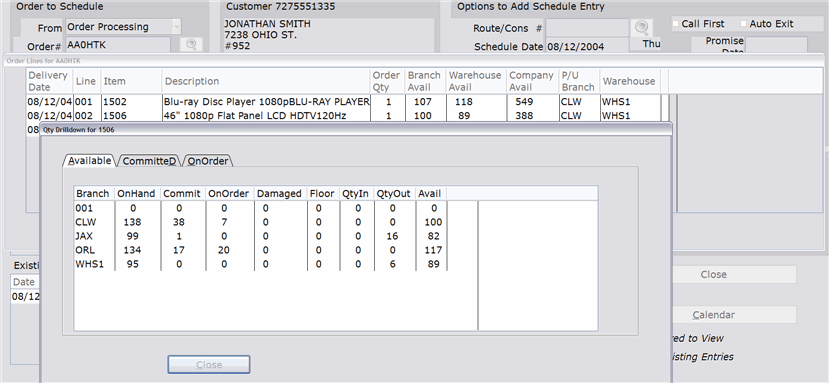
- For Order Processing orders only, once the order appears, click the Search icon to view the lines on the order. Then click an individual item to view the Available, OnOrder, and Committed quantities at all branches.
- The customer information appears in the ‘Customer’ box to the right of the ‘Order to Schedule’ box. If you are using zones, the zone for the customer’s zip code appears at the bottom of this box.
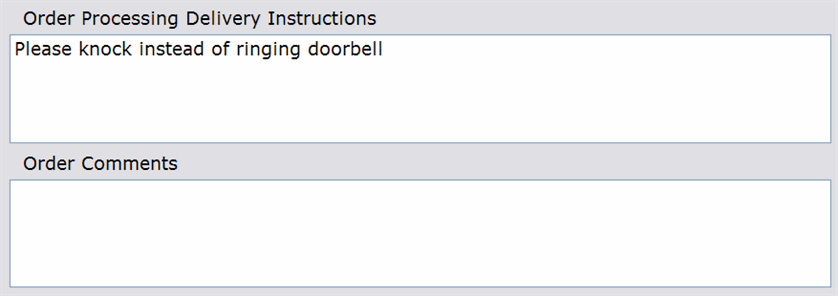
- If this is an Order Processing order, any Special Instructions for the order appear in the ‘Order Processing Delivery Instructions’ box.
- Use the ‘Order Comments’ box to add Centralized Delivery comments to the order. These comments can only be edited on this screen.
- If the order was previously scheduled or ‘Scheduled Later’, an entry will appear in the ‘Existing Schedule Entries’ box. By clicking on the entry, you can delete or reschedule it. However, if you just add a new entry (in the upper right corner of the screen), it will replace the existing one.
- Any completed deliveries/service/pickups also appear in the ‘Existing Schedule Entries’ box, with ‘Completed’ appearing in the ‘Status’ column. See the Field Definitions section for more information.
- The route specifications for the order appear in the ‘Other Options’ box. The default options that display are determined by the source of the order (Order Processing, Work Order, Centralized Delivery) and your Centralized Delivery preferences. However, each of these fields can be modified:
- In the ‘Schedule Type’ field, verify that the route type (Delivery, In-Home Service, Bay Service, etc.) for this schedule is correct. Orders from Order Processing default to ‘Delivery,’ orders from Service default to ‘In-Home Service,’ and orders from Centralized Delivery default to the route type specified for the miscellaneous stop. Use the first three preferences on the Scheduler tab of CD Preferences (21-90-01) to allow Delivery and Pickup schedule types to use In-Home Service Routes and to allow Pickup schedule types to use Delivery routes. For more information, please see the Preferences section of this document.
- In the ‘Schedule Branch’ field, verify that the delivery/service branch is correct. The delivery/service branch from the original order/work order appears by default.
- The ‘Time Requested’ field is used to specify customer’s time preferences (if any). If you are using ‘1st AM/1st PM/Late,’ use this field to select the requested by the customer for the delivery/service. If the customer has no preferences, select ‘Any Time.’ The Scheduler will use this information when suggesting a route.
- If you are using skills, click the ‘Skill Category’ drop-down list to select the required skill for this schedule. The Scheduler will only suggest and allow routes that have the selected skill assigned to it.
- In the ‘Stops’ (or ‘Minutes’) field, accept or modify the pre-prompted time (stops or minutes) required for this delivery/service.
- If you are using the Volume/Cubic feature, accept or modify the volume required for this delivery/service in the ‘Volume’ (or ‘Cubic’) field.
IMPORTANT: The following instructions describe how to select a route, date, and stop one field at a time. However, you can select the date, route and stop at the same time by using the Calendar feature. Please refer to the ‘Using the Standard Calendar’ and ‘Using the Quik Calendar’ tutorials for instructions.
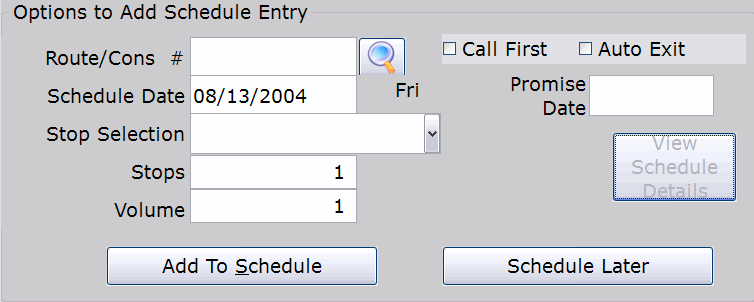
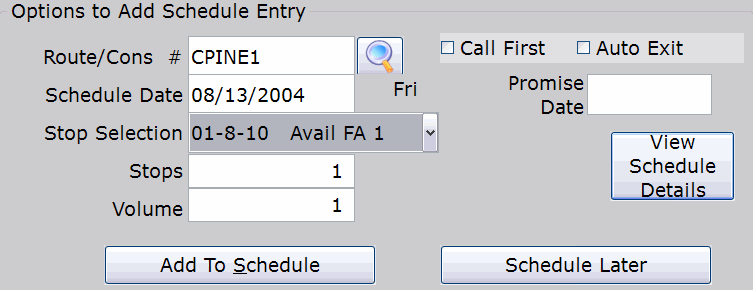
- In the ‘Options to Add Schedule Entry’ box at the top of the screen, accept or modify the date in the ‘Schedule Date’ field.
- If you have an OP Cut-Off time and/or a Service Cut-Off time set up in CD preferences, the Scheduler will take those preferences into account when pre-prompting a date.
- In the ‘Route/Cons #’ field, if the system automatically suggests a route or consolidated schedule (‘Auto Suggest 1st available schedule’ preference is set to Y) that is acceptable to your company and the customer, move to the ‘Stop Selections’ field (Step 8 of this tutorial). If no route/consolidated schedule is suggested, press enter while in the field (the field must be blank) and the first available route will appear. You can also click the Search icon to the right of the field to find a route (as described below).
If the system suggests a route or consolidated schedule that is not acceptable, click the Search icon to the right of the field. A new window opens, which displays all available routes that meet the schedule criteria (Schedule Type, Branch, Zone/Zipcode, Skill Category). Click on a route/consolidated schedule to select it.
NOTE: You can select the route and stop at the same time by clicking the View Schedule Details button. A new window opens, showing all routes and their stops that meet the schedule criteria. Click a Route/Stop and that information is automatically prompted in the appropriate fields on the Scheduler. If you choose this option, skip to Step 9 of this tutorial.
- In the ‘Stop Selection’ field, accept or modify the pre-prompted stop for this delivery/ service.
- If this is an actual route, when you click the drop-down menu you will see the stop number, followed by the stop name and the available time left for the stop. If the stop is designated as a ‘1st AM,’ ‘1st PM,’ or ‘Late’ stop, ‘FA,’ ‘FP,’ or ‘LT’ will also display, respectively.
- If this a consolidated schedule, you will see the total available time for all routes assigned to the consolidated schedule. If you are using First AM/First PM/Late stops, the times will be broken down for each of those timeslots.
- If the driver/technician should call the customer before arriving, check the ‘Call First’ box. The routing manifest will remind the driver/technician to contact the customer before arriving for delivery/service.
- If you need to enter a promise date for service or a miscellaneous stop, enter it in the ‘Promise Date’ field. This field is not used for Order Processing orders.
- Check the ‘Auto Exit’ box and the Scheduler will automatically exit after the ‘Add to Schedule’ or ‘Schedule Later’ button is clicked (you will not need to click the Close button). The setting will be retained for this terminal until it is changed.
- Click the Add to Schedule button.
- If you decide that you want to schedule the order at another time, click the ‘Schedule Later’ button. The order will appear in the Unscheduled Details selection (21-23).
- Enter the Employee Number of the person scheduling this delivery/service.
- The scheduled delivery/service appears in the ‘Existing Schedule Entries’ box.
- If the ‘Auto Exit’ button is checked, the selection will exit. If it is not, click Close to exit the Scheduler.
