How To: Using the Quik Scheduler (21-25)
Overview
The Quik Scheduler is only used in POS Entry, Order Processing and Service, based on your preferences. The Scheduler selection accessed through the Centralized Delivery menu always uses the Advanced Scheduler.
NOTE: If the Advanced button appears on the Quik Scheduler, you can click it at any time to view the Advanced Scheduler.
Video
Tip: Use the controls on the video player to watch in Full Screen mode, adjust the quality, or watch on YouTube.
Step-by-Step
- Access the Quik Scheduler from POS, Order Processing, or Service.
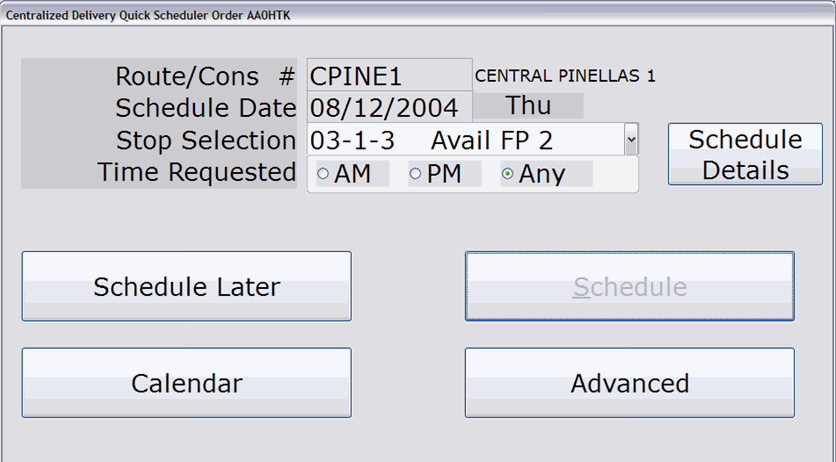
- Using branch information, zone/zip code settings, route availability, and required skills for the order (if applicable), the Quick Scheduler will automatically suggest a schedule for you. You can change the date (using the calendar), stop selection, and 1st AM/1st PM/Late preferences (if applicable), but the route cannot be changed.
- If the date selected by the system is not acceptable to the customer, use the Calendar to select a new date, along with a stop for the delivery/service. Please refer to the ‘Using the Quik Calendar’ for details.
If the date selected by the system is acceptable to the customer, skip to Step 5 of this tutorial.
- Accept or modify the pre-prompted stop for this delivery/ service in the ‘Stop Selection’ field.
- When you click the drop-down menu, you will see the stop number, followed by the stop name and the available time left for the stop. If the stop is designated as a ‘1st AM,’ ‘1st PM,’ or ‘Late’ stop, ‘FA,’ ‘FP,’ or ‘LT’ will also display, respectively.
NOTE: You can select also select the stop by clicking the Schedule Details button. A new window opens, showing all stops for the date. Click a stop and that information is automatically prompted in the appropriate fields on the Scheduler. If you choose this option, skip to Step 6 of this tutorial.
- If you are using 1st AM/1st PM/Late stops, and the customer requests one of these stops, specify it in the ‘Time Requested’ field.
If you are not using 1st AM/1st PM/Late stops, skip to Step 6 of this tutorial.
- Click the Schedule button.
- If you decide that you want to schedule the order at another time, click the ‘Schedule Later’ button. The order will appear in the Unscheduled Details selection (21-23).
