How To: Finding a Schedule (21-32)
Overview
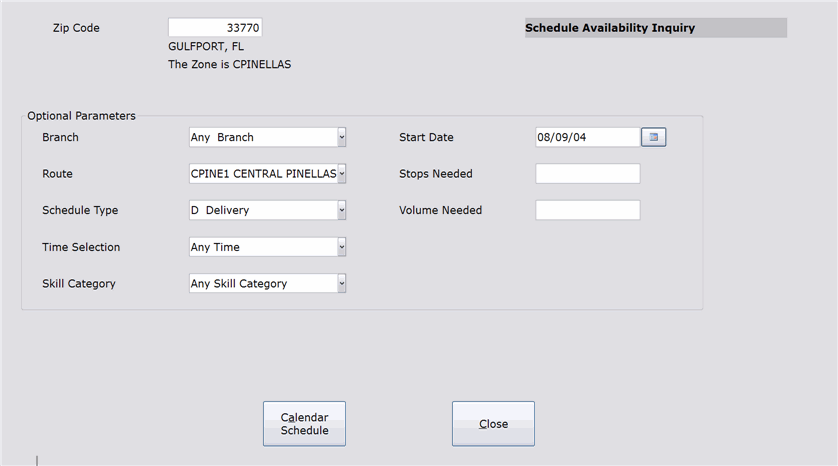
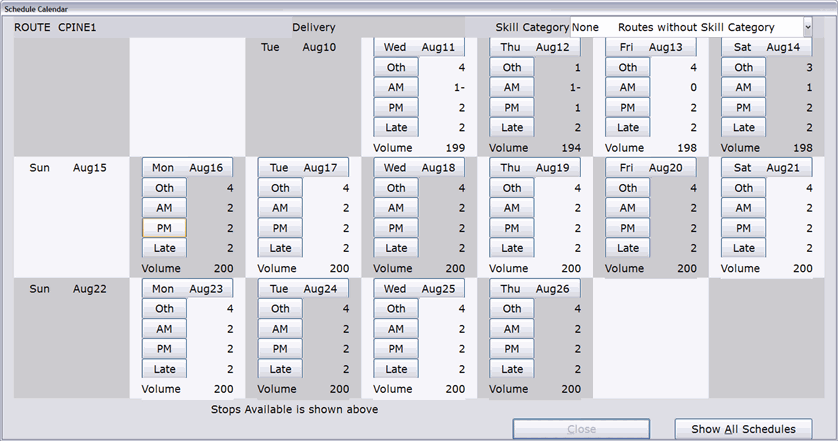
This selection is used to find available schedule(s) based on a number of search criteria. After specifying the search criteria and clicking the Calendar Schedule button, the system will open a calendar that displays schedules meeting the criteria that you specified.
Step-by-Step
- Make a selection for each of the following fields.
NOTE: ‘Zip Code,’ ‘Stops Needed,’ and ‘Volume Needed’ can be left blank.
- Routes that operate in the entered zip code
- Routes that operate in a zone that has this zip code assigned to it
- Routes that have no zip code/zone assigned.
The following routes will be included in the inquiry:
NOTE: If a branch is assigned to a route in the specified zone/zip code, the route will only display in the inquiry if that branch is selected from the ‘Branch’ field or if you select that route in the ‘Route’ field.
NOTE: If you are inquiring on Delivery or In-Home Service Schedule Types, this field cannot be left blank.
NOTE: If a route has a branch assigned to it, that route will only be included in the inquiry if that specific branch is selected in this field (or that route is selected in the ‘Route’ field).
The route selected in this field overrides the zip code entered at the top of the screen.
For example, we have a route named ‘CPINE1’ that operates in a different zip code/zone from the one entered in the ‘Zip Code’ field. However, if we select ‘CPINE1’ in this field, it will appear first when the calendar inquiry is accessed. But if you click the Show All Schedules button, ‘CPINE1’ will not appear in that list because those routes are based on the entered zip code.
NOTE: If you select ‘Delivery’ or ‘In-Home Service’ you must also specify a zip code at the top of the screen.
NOTE: If you are not using First AM/First PM/Late stops, this field does not appear on the screen.
NOTE: If you are not using Skill Categories, this field does not appear on the screen.
(or Minutes Needed)
NOTE: If you are not using Volume, this field does not appear on the screen.
- Click the Calendar Schedule button. The calendar opens in a new window. For instructions on using the calendar, please view the ‘Using the Standard Calendar’ and/or ‘Using the Quik Calendar’ tutorials. Remember that no schedules are selected through this selection. It is for inquiry purposes only.

