How To: Selling Take With Merchandise (TW)
Overview
This tutorial describes how to sell merchandise to a customer that will be taken with them immediately.
Video
Tip: Use the controls on the video player to watch in Full Screen mode, adjust the quality, or watch on YouTube.
Step-by-Step
Scenario: A customer comes into your store and selects a piece of merchandise that he will be taking with him today.
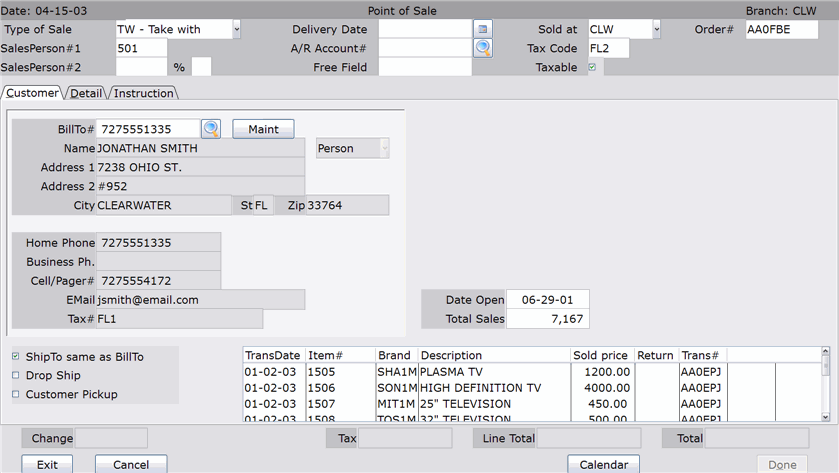
- In the Type of Sale field, select TW–Take With from the drop-down menu.
- In the Salesperson #1 field, enter the employee number of the salesperson receiving commission for this sale.
- If two salespeople are involved in the sale, enter the second salesperson’s employee number in the Salesperson #2 field. Next, enter the corresponding commission percentage for Salesperson 2 in the % field.
- In the BillTo# field, enter a valid customer number. The corresponding customer information appears.
- If the customer number is not on file, the Customer Maintenance box appears, allowing you to set up the new customer.
- To search the system for an existing customer number, click the search button.
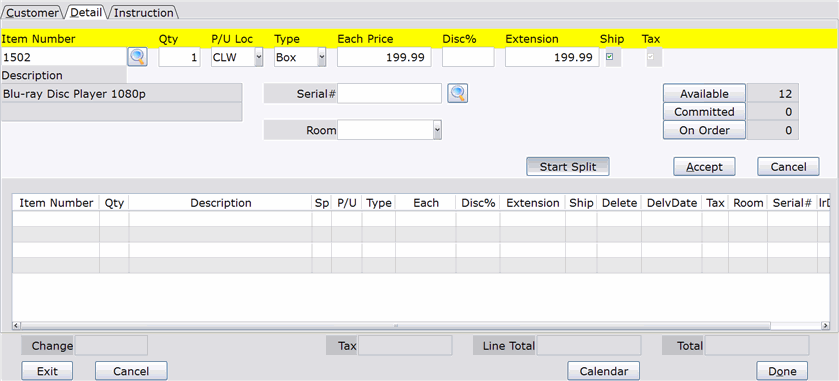
- Select the Detail tab.
- In the Item Number field, enter a valid item number and the corresponding item information appears.
- To search for an item number, click the Search button.
- In the Quantity field, accept or modify the quantity that the customer is purchasing.
- Press Tab to move through the P/U Loc, Type, Each Price, Disc%, and Extension fields, or press Enter to skip those fields.
- You can modify the information in any of these fields.
- In the Serial # field, enter the serial number of the item.
- If the item does not require entry of an A-Flag or B-Flag serial number, this field does not appear on the screen.
- Click Accept or press Enter to add the line to the transaction.
- If the system requires additional information, the cursor will move to the field where the additional information needs to be entered.
- Add more items to the transaction by repeating steps 5-9, or click Done to move to the Tender Entry box to enter payment information.
- You can also enter “-” in the Item Number field and press Enter to move to the Tender Entry box.
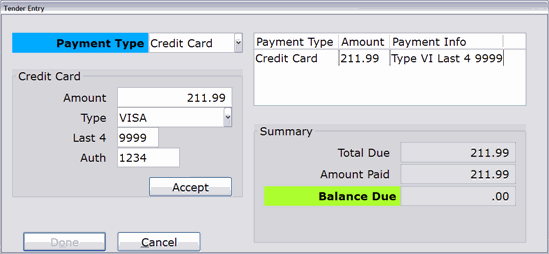
- In the Tender Entry box, select the Payment Type from the drop-down menu.
- In the Amount field, accept or modify the payment amount for the selected payment type.
- Enter the required information for the payment type. In the above example, the payment is being made with the customer’s credit card. The card type, last 4 digits of the credit card and the authorization number must be entered.
- Click Accept and the payment appears in the register. For more information on the Tender Entry Box, see the “Entering Payment Information” section of this document.
- When you finish entering all payment information, click Done.
- Depending on your how your Invoice Preferences (02-18-01, Field 8) are set up, one of the following now occurs:
- The invoice is automatically printed
- Invoice print is automatically skipped
- You can choose to print or not print the invoice


