How To: Using the Selection, Payment, and Maintenance Options (11-10)
Overview
This tutorial describes how to use the selection, payment, and maintenance options on the Disbursement Selection screen. Before using a payment option, you must enter the invoice select criteria.
Video
Table of Contents
Select to Pay
This option is used to select individual invoices for payment.
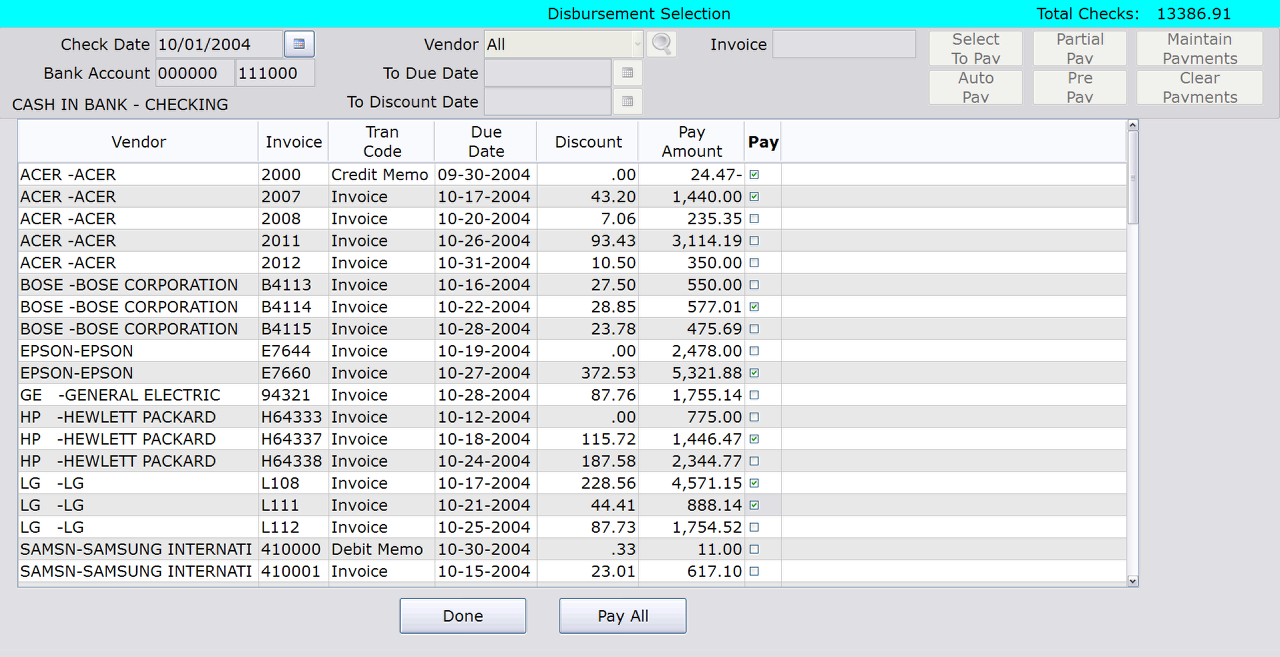
- Click the Select to Pay button. Invoices (and credit memos, debit memos, etc.) matching the selection criteria display.
- Check the ‘Pay’ box next to the invoices that you want to pay. Click the Pay All button to select all invoices for payment.
- Notice that the ‘Total Checks’ amount in the upper right corner of the screen is updated each time an invoice is selected for payment.
- When you are finished selecting invoices, click Done. The invoices are added to the Disbursement Register.
REMEMBER: You can make changes to these payments using the Maintain Payments or Clear Payments option. However, once you run the Disbursement Print selection (11-12-01), no modifications can be made.
Auto Pay
This option is used to select all invoices for payment at once.
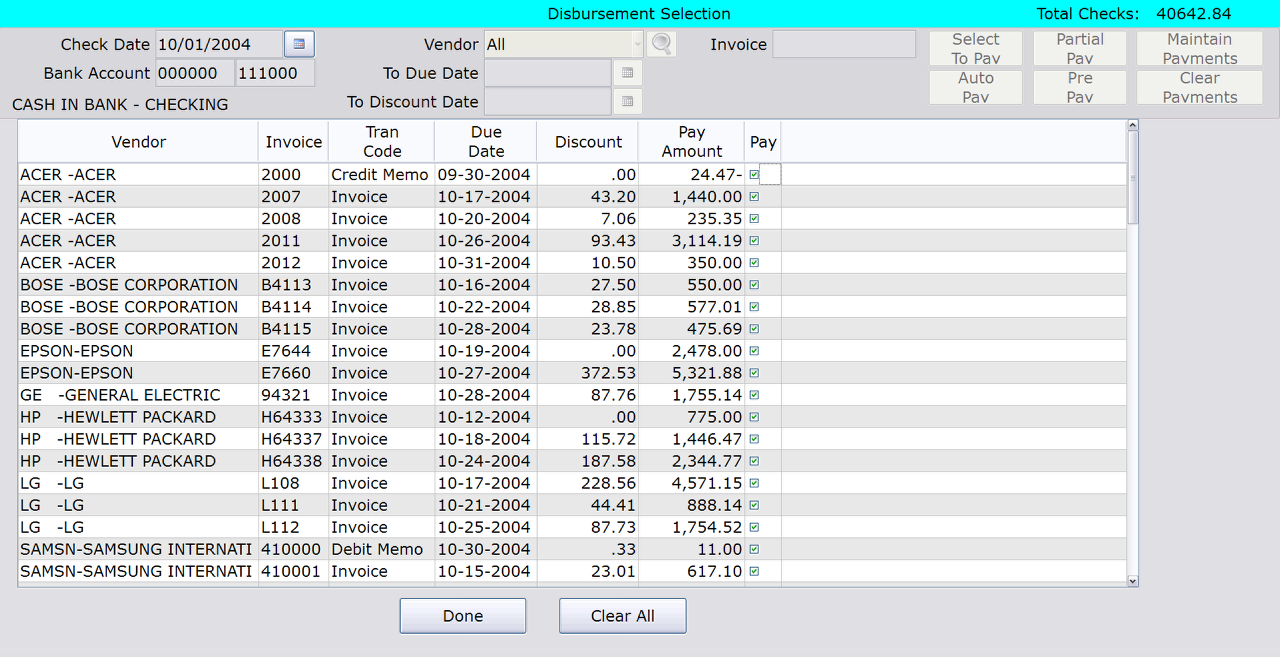
- Click the Auto Pay button. Invoices (and credit memos, debit memos, etc.) matching the selection criteria display, with the Pay button checked for each.
- Exclude any invoices for payment by unchecking the ‘Pay’ box.
- When you are finished, click Done. The invoices are added to the Disbursement Register.
- You can make changes to these payments using the Maintain Payments or Clear Payments option.
Partial Pay
This option is used to make a partial payment toward an invoice. Once the partial payment is entered, both the invoice and the payment are assigned a status of “P” (Pay). When a future transaction nets the invoice to zero, all transactions associated with the invoice move to a status of “X” (Paid). Use the Transaction Inquiry selection (11-31) to view this information in detail.
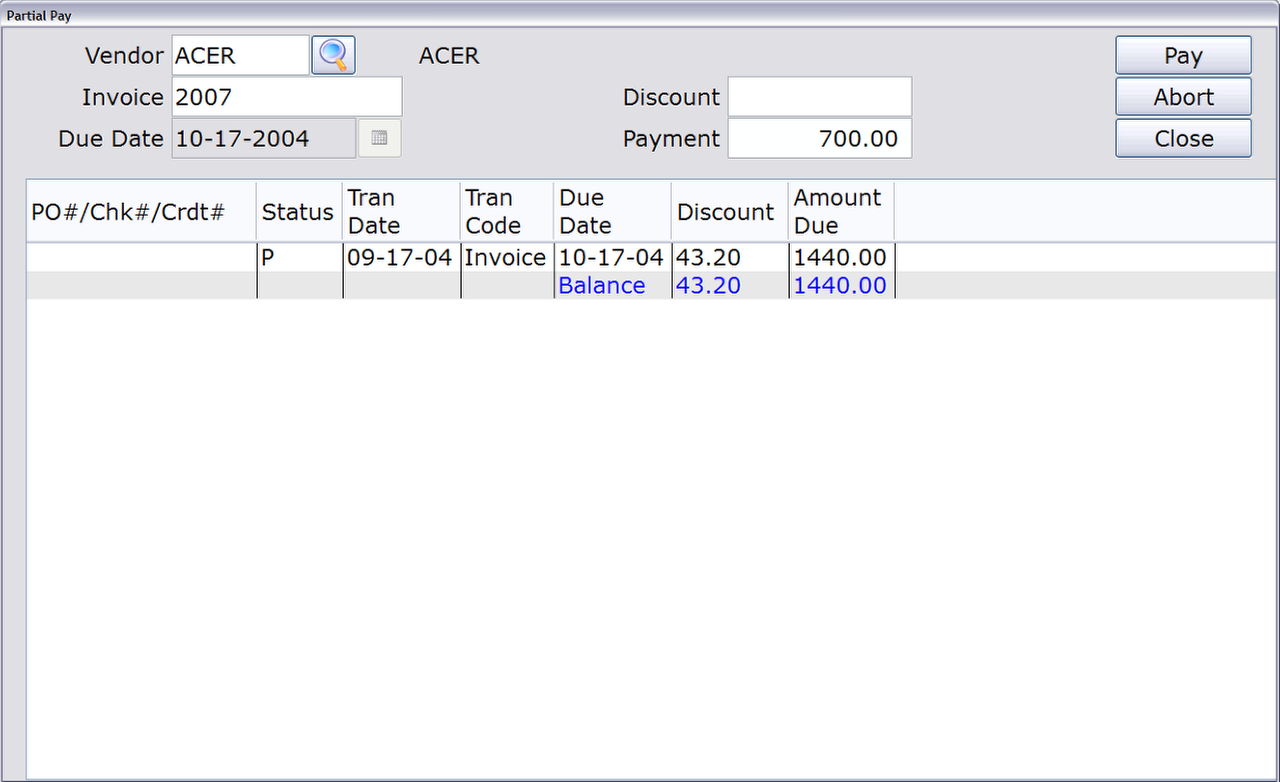
- Click the Partial Pay button. The Partial Pay window opens.
- In the ‘Vendor’ field, enter the vendor for the partial payment, or click the Search button to look one up.
- In the ‘Invoice’ field, enter the invoice number to which the partial payment is being applied. Information about the invoice then appears. This includes the Amount Due and information about any payments that were previously applied.
- If there is only one transaction for the invoice, the Due Date appears and cannot be changed.
If more than one transaction exists for the invoice (e.g. a “T” term invoice that has the same invoice number with different due dates), the cursor positions to ‘Due Date’ field. Enter the due date for the individual transaction that you want to apply a partial payment toward.
- If a discount was earned on this invoice, you can enter it in ‘Discount’ field or leave the field blank.
If there was no discount earned, the ‘Discount’ field is not accessible.
- In the ‘Payment’ field, enter the amount of this partial payment.
NOTE: If a discount was entered, the amount will pre-prompt as the Amount Due minus the discount.
- Click the Pay button to apply this partial payment.
- Click Close or Abort to cancel this payment.
- The payment is applied and the entered information is cleared. The cursor then moves to the ‘Vendor’ field for entry of additional payments.
NOTE: You cannot apply more than one partial payment to an invoice without first completing the Disbursement Process.
- When you are finished entering partial payments, click Close.
IMPORTANT: To cancel a partial payment after it has been applied (and the partial payment window has been closed), use the Maintain Payments or Clear Payments option.
Pre-Pay
The Pre-Pay option is used to pay an invoice before it has been entered in Tyler. In order to pre-pay an invoice, you must know the invoice number (which is recorded as the reference number for the payment).
Once you finish entering the pre-payment in this selection, it moves to the Disbursement Register with a status of “P.” When disbursements have been printed and updated, the status of the payment is changed to “H” (Hold).
The payment remains at a hold status until the invoice is entered (and updated) through Invoice Entry (11-01) or P/O to A/P Entry (04-20). When entering the invoice through one of these selections, the system will list all pre-payments for the vendor and ask if you want to apply one of these pre-payments to the invoice. If the pre-payment you select has a reference number different from the invoice number you are entering, the payment’s reference number is automatically changed to match the invoice number.
Once the invoice is updated:
- The status of the payment changes to “X” if the pre-payment covered the entire amount of the invoice.
- The status of the payment changes to “P” if the pre-payment only covered part of the invoice amount.
- Click the Pre Pay button.
- In the ‘Vendor’ field, enter the vendor to which the pre-payment is being made.
- Click the Search button to look up a vendor.
- In the ‘PO’ field, enter the purchase order number associated with the invoice (optional). Only a purchase order that has not been updated can be entered here.
If you enter a P/O number that does not exist or has already been updated, the message, ‘P/O Number not on File’ appears.
IMPORTANT: When a valid P/O number has been entered (there is no error message), you must press the Tab key or use the mouse to move to the next field. The Enter key is disabled for this field.
- In the ‘Invoice’ field, enter the invoice that you are pre-paying. This invoice must not exist in Tyler.
IMPORTANT: When an invoice number has been entered, you must press the Tab key or use the mouse to move to the next field. The Enter key is disabled for this field.
- In the ‘Amount’ field, enter the amount of the pre-payment.
- Click Pay.
The pre-payment is added and the ‘Total Checks’ amount at the top of the screen is updated to reflect the payment. The fields on the window are cleared for entry of additional payments.
- Repeat steps 2-6 until all pre-payments have been entered.
- Click Close.
Maintain Payments
The Maintain Payments option is used to make changes to invoices that have already been selected for payment. This includes partial payments and pre-payments.
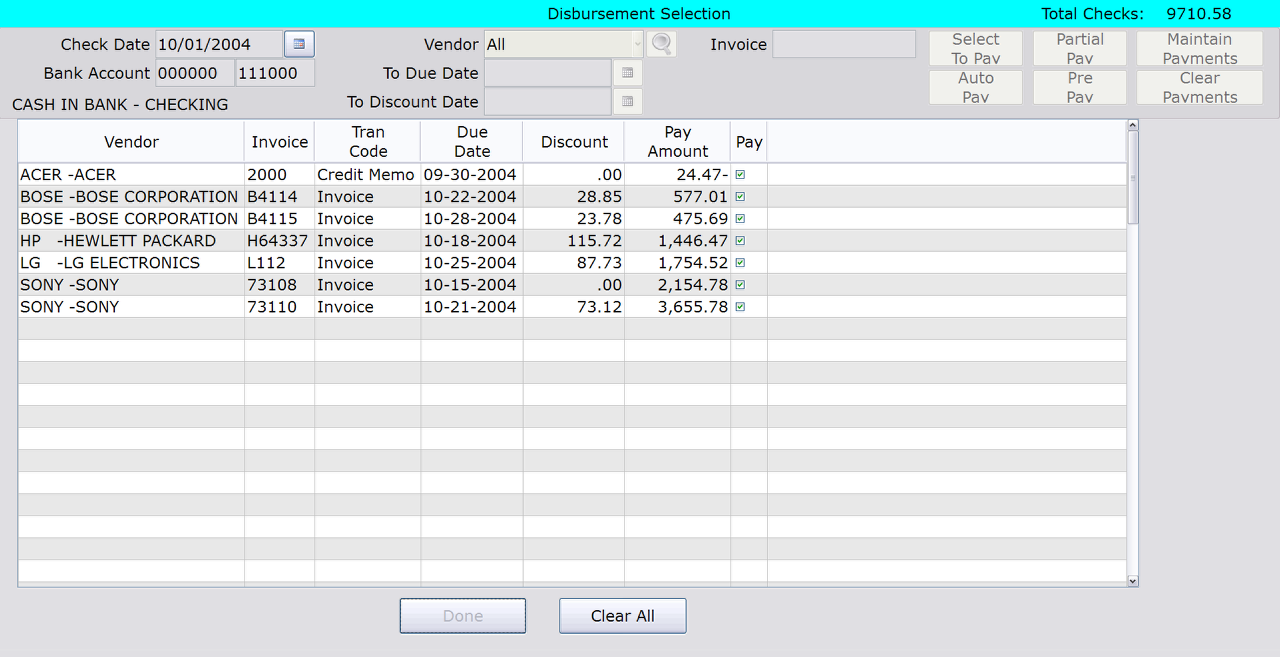
- Click the Maintain Payments button. Invoices (and debit memos, credit memos, etc.) selected for payment appear.
- To remove payments, uncheck the ‘Pay’ box to the right of the invoice, or click the Clear All button to uncheck the ‘Pay’ box for all of the invoices.
- When you have unselected all desired invoices, click Done.
Clear Payments
This option is used to clear all invoices for a single vendor.
- Click the Clear Payments button. All invoices selected for payment for the vendor appear.
- Click Done.
- Click OK at the ‘Delete ALL Payments for Vendor XXXX? prompt.
- All invoices are unselected for payment and the ‘Total Checks’ amount at the top of the screen is updated.


