How To: Setting Up Centralized Delivery Preferences (21-90-01)
Overview
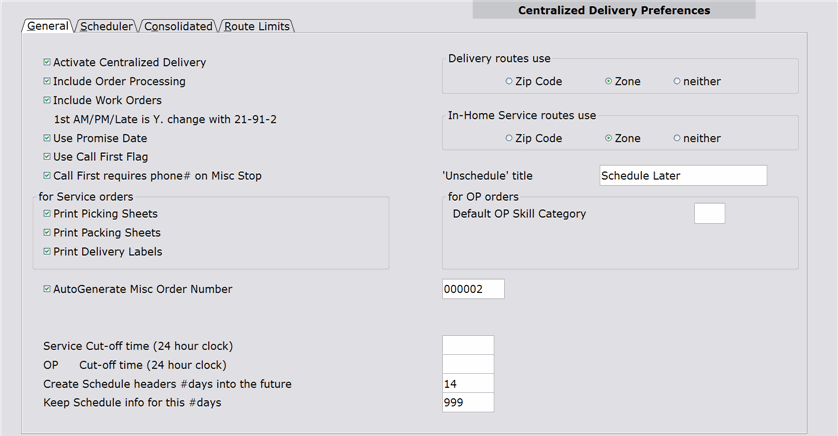
This selection is used set up preferences for Centralized Delivery. It contains four tabs: General, Scheduler, Consolidated, and Route Limits.
Table of Contents
General Tab
NOTE: This preference does not make Centralized Delivery ‘LIVE’ in POS or Order Processing. The ‘Activate Centralized Delivery Menu’ preference in OP Routing Preferences (02-08-90-02) is used for that purpose.
If this box is unchecked, you cannot schedule Order Processing deliveries using Centralized Delivery.
NOTE: Routing preferences for each of these ‘Repair at’ types are set up on the Routing Tab of Work Order General Preferences (07-90-01).
IMPORTANT: Once this preference is set and scheduling with Centralized Delivery has begun, you will no longer be able to modify this preference on this screen. Since special processing is required to change this preference, you must run the Flip First AM/PM/Late Flag selection (21-91-02).
If you need to change this preference, you must use the Flip First AM/PM/Late Flag selection (21-91-02).
If you need to change this preference, you must use the Flip First AM/PM/Late Flag selection (21-91-02).
NOTE: This field is only used with Service and Miscellaneous Entry. It does not apply to POS Entry or Order Processing.
NOTE: This field is informational only and is not used by the Scheduler when suggesting routes.
If the Call First Flag is checked, the Routing Manifest (21-03) will alert the driver to call the customer before delivery.
NOTE: This field is not used by the Scheduler when suggesting routes.
NOTE: The ‘Use Call First Flag’ preference on this screen must be checked or the ‘Call First’ field will not appear on the Miscellaneous Entry screen.
IMPORTANT:
- If you are using the Advanced Scheduler and someone does try to schedule a service call for tomorrow after today’s cut-off time, a warning message appears. If you are using a POS Terminal, you will not be able to schedule for tomorrow. If you are using a Non-POS terminal, the system will not prevent you from scheduling a service call for tomorrow. Employees should follow company procedures in this situation.
- If you are using the Quik Scheduler and try to schedule a service call for tomorrow after today’s cut-off time, ‘No Route Found’ appears at the top of the screen. However, you can access the Advanced Scheduler (by clicking the Advanced button) and if you are using a Non-POS terminal, can still schedule for tomorrow. A warning message, which you can override, will appear. If you are using a POS terminal, you will not be able to schedule for tomorrow.
EXAMPLE: Today is March 1 and we’ve specified a Service Cut-off time of ‘1600’ (4pm). After 4pm today, no one can schedule service calls for tomorrow (March 2) without receiving a warning message (Advanced Scheduler only). The system will suggest that the service call be scheduled for March 3.
To disable this feature, enter “9999” in this field.
IMPORTANT:
- If you are using the Advanced Scheduler and someone does try to schedule a service call for tomorrow after today’s cut-off time, a warning message appears. If you are using a POS Terminal, you will not be able to schedule for tomorrow. If you are using a Non-POS terminal, the system will not prevent you from scheduling a service call for tomorrow. Employees should follow company procedures in this situation.
- If you are using the Quik Scheduler and try to schedule a service call for tomorrow after today’s cut-off time, ‘No Route Found’ appears at the top of the screen. However, you can access the Advanced Scheduler (by clicking the Advanced button) if you are using a Non-POS terminal can still schedule for tomorrow. A warning message, which you can override, will appear. If you are using a POS terminal, you will not be able to schedule for tomorrow.
NOTE: If you are scheduling through POS Entry and the Advanced button is not available on the Quik Scheduler, you will not be able to schedule for tomorrow regardless of whether you are using a POS or Non-POS terminal.
EXAMPLE: Today is April 14 and we’ve specified an OP Cut-off time of ‘1730’ (5:30pm). After 5:30pm today, no one can schedule deliveries for tomorrow (April 15) without receiving a warning message (Advanced Scheduler only). The system will suggest that the delivery be scheduled for April 16.
In this field, enter the number of days (into the future) for which schedule headers will be created. For example, if you want to create schedule headers for the next two weeks, enter “14.”
Many companies create schedule headers for the next 30 days. If you have currently have deliveries that need to be scheduled beyond 30 days, you have two options:
- You can create schedule headers many days into the future (e.g. 90 days, 180 days, etc) to allow scheduling of future deliveries/installations today. For example, if a pool is sold to a customer in January, but will not be installed until May, schedule headers could be created for 6 months (180 days) allowing you to scheduling the May installation in January.
- You can initially add the order as Unscheduled and at a later time use the Unscheduled Details selection (21-23) to schedule the delivery/installation. Using the pool example above, you would add the order as Unscheduled when the pool is sold in January and then in April or May use the Unscheduled Details selection to schedule the delivery/installation.
NOTE: This preference does not prevent you from using delivery dates past the number of days entered in this field. Future delivery dates, along with ‘?’ and ‘999999’ delivery dates are added to the Unscheduled Details selection.
In this field, enter the number of days that you want to keep existing schedules. Keeping schedules is useful for customer follow up and for tracking multiple shipments/service/installs, etc.
To keep schedules forever, enter “999” (recommended).
NOTE: This preference does not affect customer history, ticket history, or Order Processing history.
If this field is left blank, ‘Unscheduled’ is used as the title.
Unscheduled orders exist in Centralized Delivery, but they have not been assigned to a route or consolidated schedule yet. The Unscheduled File, which can be viewed in Unscheduled Details (21-23) holds:
- orders that cannot be scheduled within the range of created schedule headers (see the ‘Create schedule headers # days into the future’ preference)
- orders for which the product arrival date is unknown
- orders for which the customer cannot be contacted to schedule a delivery/service date
- orders that are automatically unscheduled by POS Entry (the ‘POS always automatically Unschedules’ preference is checked) and will be reviewed and scheduled by dispatchers at a later time
For Service Orders
Delivery Routes Use
Zone
neither
Select Zone, and Delivery routes that are allowed to operate in Zones that the customer’s zip code is assigned to appear in the Scheduler. Remember that Zones are geographical areas defined by zip codes or a range of zip codes and are set up in Zone Master Maintenance (21-90-40). Zip codes are assigned to Zones in Zipcode to Zone Link (21-90-41).
Select Neither and all Delivery routes are available in the Scheduler.
Since Zipcodes and Zones help you effectively plan deliveries based on proximate geographical location, we recommend using either the Zipcode or Zone option.
In-Home Service Route Use
Zone
Neither
Select Zone, and In-Home routes that are allowed to operate in Zones that the customer’s zip code is assigned to appear in the Scheduler. Remember that Zones are geographical areas defined by zip codes or a range of zip codes and are set up in Zone Master Maintenance (21-90-40). Zip codes are assigned to Zones in Zipcode to Zone Link (21-90-41).
Select Neither and all Delivery routes are available in the Scheduler.
Since Zipcodes and Zones help you effectively plan deliveries based on proximate geographical location, we recommend using either the Zipcode or Zone option.
For OP Orders
As long as an item/product type on the order is not assigned to another skill, the skill entered in this field will automatically be assigned to the order when scheduling with the Quik Scheduler in POS Entry or Order Processing. If you are using the Advanced Scheduler in POS Entry or Order Processing, the ‘Skill Category’ field will default to the entered skill, but can be changed.
NOTE: A default Skill Category is not needed for Service because the Skill Category will always be entered on the work order.
NOTE: The ‘Skill Category’ field does not default to this skill when accessing the Scheduler through a Centralized Delivery selection. However, if you reschedule an existing entry that already has a skill assigned, the ‘Skill Category’ field will default to that skill.
For more information on skills, please see the Skill Category Maintenance section of this documentation.
Scheduler Tab
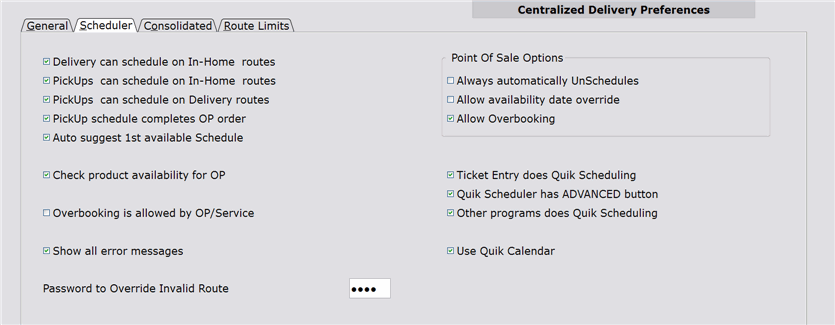
This allows a service tech to deliver a product while on a service run.
This allows a service tech to pick up a product while on a service run.
This allows a driver to pick up a product while on a delivery run.
Uncheck this box and the system assumes that an Order Processing order will be delivered using only a ‘Delivery’ Schedule Type. If you try to complete the order and exit the Scheduler without using a ‘Delivery’ Schedule Type, the message ‘Warning: There are no pending Delivery Schedules for this order’ appears.
NOTE: You can ignore the warning by clicking the Order is Completed button.
If you do not want the system to suggest a route, uncheck this box.
NOTE: You can manually view the route suggested by the system (even if this preference is unchecked) by placing the cursor in the ‘Route/Cons#’ field and pressing enter.
NOTE: This preference does not apply to the Quik Scheduler because it always suggests the best available route.
NOTE: The Quik Scheduler does not check stock availability, regardless of how this preference is set.
Uncheck this box and overbooking is not allowed when accessing the Scheduler from POS Entry, Order Processing, or Service.
NOTE: Overbooking is always allowed when the Scheduler is accessed through Centralized Delivery selections.
Uncheck this box and only select error messages will appear when using the Scheduler.
A password box appears underneath the error message if it can be overridden. Some errors (e.g. Skill Category) require that you change entries/settings on the Scheduler screen before proceeding.
NOTE: The override password is only used when the Scheduler accessed from a Centralized Delivery selection.
The following are errors can be overridden with a password:
- ‘Zipcode doesn’t link to a Zone’ (e.g. you can allow a one-time special delivery outside the normal delivery area)
- ‘Route not valid for this Zipcode/Zone’ (e.g. you can add a delivery to a route that does not normally serve this Zipcode/Zone)
- ‘Schedule type on route does not match Schedule type desired’ (e.g. you can use an In-Home Service route for a ‘Delivery’ Schedule Type without checking the ‘Delivery can schedule on In-Home routes’ preference)
You can access the Advanced Scheduler from the Quik Scheduler screen by clicking the Advanced button (if the ‘Quik Scheduler has ADVANCED button’ preference is checked.)
NOTE: If you are frequently changing the Skill Category or manually selecting routes, we do not recommend using the Quik Scheduler.
NOTE: This preference only applies to the Quik Scheduler that is accessed through POS Entry. The Advanced button always appears on the Quik Scheduler when accessed through Order Processing and Service selections.
IMPORTANT: This preference only applies if the ‘Allow Multiple Delivery Dates per Order’ preference is set to N in Order Preferences (02-08-90-01). When multiple deliveries exist, a reschedule from Order Maintenance (02-08-02) would be impossible since the Quik Scheduler only allows you to select one schedule.
NOTE: The Quik Calendar is always used by the Quik Scheduler.
Point of Sale Options
The date entered in the ‘Delivery Date’ field on the order is used as the Unscheduled Date.
Uncheck this box and the system will not let you schedule before the availability date.
For more information on availability dates, please contact Tyler.
Uncheck this box and a schedule can only be overbooked from a Non-POS Terminal.
NOTE: To overbook from Order Processing and Service, the ‘Overbooking is allowed by OP/Service’ preference must also be checked.
Consolidated Tab
Uncheck this box and you will only be able to schedule orders to a consolidated schedule through POS Entry, Order Processing, and Service.
NOTE: If you are using consolidated schedules to achieve better load balance and driving optimization, we recommend unchecking this box and letting the dispatcher assign the order to a specific route through the Finalize Consolidated Schedule selection (21-24).
Route Limits Tab
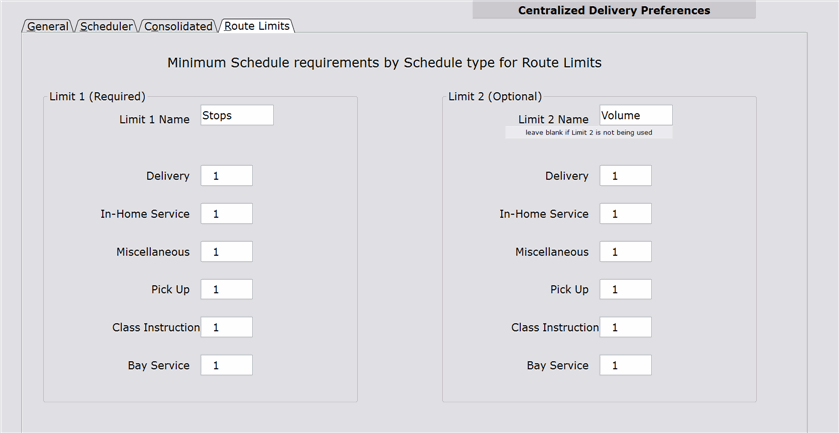
This screen is used to set up limit name(s) and limit minimums for each route type.
Limits are units of measurement, chosen by your company, that are used to determine when routes are fully booked. Common units of measurement for Limit 1 are Minutes and Stops and common units for Limit 2 are Volume and Cubits.
Both Limit 1 and Limit 2 have:
- a Limit Minimum, which is the minimum Minutes/Stops and/or Volume/Cubic required for each schedule entry for an order.
- a Limit Maximum, which is the maximum Minutes/Stops and/or Volume/Cubic that is allowed for a schedule entry before overbooking is required. Limit maximums are set up in Route Master Maintenance (21-90-21).
If you decide to use Limit 1 and Limit 2, neither of the two limits can be exceeded or you will receive a warning message during scheduling.
Limit 1
For Limit 1, companies commonly use time units such as Minutes or Stops.
When scheduling a route using the Advanced Scheduler, if you enter a Minute/Stop value less than the Limit Minimum set up on this screen, the system will display a warning, which can be overridden if necessary.
If you enter a Minute/Stop value on the Scheduler that is greater than the Limit Maximum set up in Route Master Maintenance or will take the schedule entry over the Limit Maximum, the system will warn you that schedule entry will be overbooked when it is added. If your preferences allow overbooking, you can still use that schedule entry.
NOTE: When scheduling Class Instruction, the Limit 1 Minimum might refer to the minimum length of a class period. For example, if the class must be at least 50 minutes long, enter “50” here. The maximum length of a class would be specified in Route Master Maintenance (in the field to the right of ‘Stop Name’).
The title entered here appears in Route Master Maint and on the Scheduler.
For Minutes, this could be ’15’, ’30,’ etc. For Stops, it is usually ‘1.’
Enter “0” (zero) and a minimum will not be set.
For Minutes, this could be ’15’, ’30,’ etc. For Stops, it is usually ‘1.’
Enter “0” (zero) and a minimum will not be set.
For Minutes, this could be ’15’, ’30,’ etc. For Stops, it is usually ‘1.’
Enter “0” (zero) and a minimum will not be set.
For Minutes, this could be ’15’, ’30,’ etc. For Stops, it is usually ‘1.’
Enter “0” (zero) and a minimum will not be set.
For Minutes, this could be ’15’, ’30,’ etc.
Enter “0” (zero) and a minimum will not be set.
NOTE: For Class Instruction, this value might refer to the minimum length of a class period.
For Minutes, this could be ’15’, ’30,’ etc.
Enter “0” (zero) and a minimum will not be set.
Limit 2 (Optional)
Volume or Cubic is often used as Limit 2, even though setting up a Limit 2 is not required.
When scheduling a route using the Advanced Scheduler, if you enter a Volume/Cubic value less than the Limit Minimum set up on this screen, the system will display a warning, which can be overridden if necessary.
If the sum of volumes for all schedule entries for the day exceeds the volume maximum set up in Route Master Maintenance (Field 2), the system will warn you that schedule entry is completely booked. If your preferences allow overbooking, you can still use that schedule entry.
NOTE: When scheduling Class Instruction, the Limit Minimum might refer to the minimum number of students required for the class. For example, if the class must have at least one student, enter “1” here. The maximum number of students that the class allows would be specified in Route Master Maint (Field 2).
Enter “0” (zero) and a minimum will not be set.
Enter “0” (zero) and a minimum will not be set.
Enter “0” (zero) and a minimum will not be set.
Enter “0” (zero) and a minimum will not be set.
Enter “0” (zero) and a minimum will not be set.
Enter “0” (zero) and a minimum will not be set.


