Below are descriptions for each field on the Order Maintenance screen.
Table of Contents
Click image to enlarge.
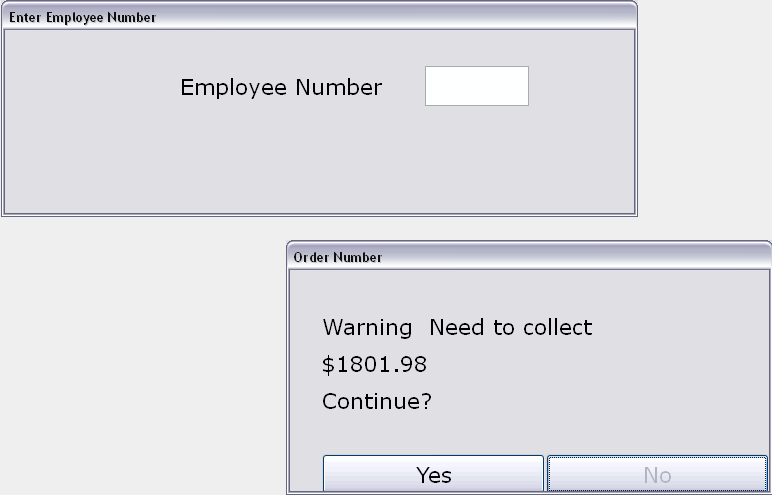
The following two message boxes appear when changes are made to an order in Order Maintenance. This information is used to create a history of changes made to the order by each employee.
Enter Employee Number / User ID
This box appears when you attempt to make a change to an order. You will need to enter your employee number or User ID before you can proceed. Your employee number or User ID, along with the changes you make, is kept in the order’s history.
Reason for Change
This box also appears when you attempt to make a change to an order. It immediately follows the Enter Employee Number/User ID box. Type an explanation of the reason for the change and press Enter.
To save time, two-letter reason codes can be set up through Order Maintenance Reasons (02-08-90-04). For example, you might create a code named ‘MO’ to represent a Manager Override.
To use a code, type it in this field and press Enter; the full description of the code appears. To accept the reason, press Enter again.
Click image to enlarge.
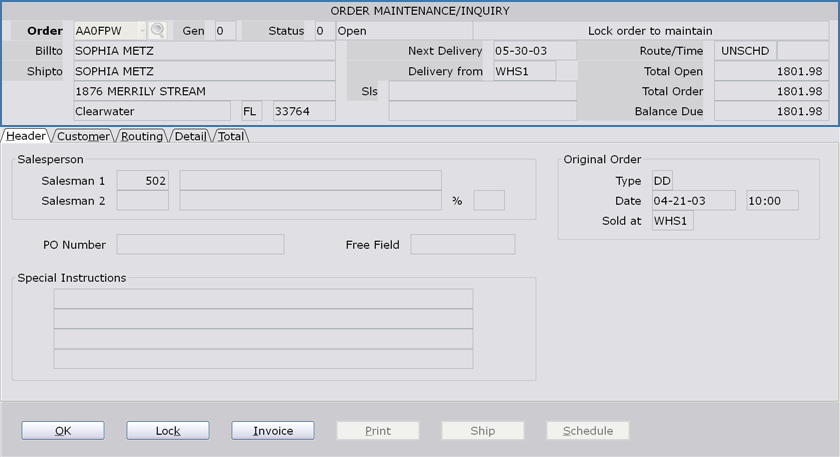
The Header Block is located at the top of the Order Maintenance screen and displays summary information for the order.
Order
Enter the Order number of interest in this field; press Enter to continue.
Using the drop-down menu, you can either initiate an order number search (by selecting “?”) or exit the program (by selecting “[Exit]”). Typing one of those two choices in the blank field does the same thing.
Order Search
Clicking the search button next to the Order field opens a dialog box that allows you to search through existing orders. You have a couple of choices in search criteria. Entries can be made to one or multiple fields in the search window.
First Name
Search for an order by the first name of a person associated with that order.
Last Name
Pull up a list of orders associated with a company name or the last name of a person affiliated with that account. Enter a full or partial name. When entering a full name, your entry has to match what is in the system exactly. If you are not finding what you are looking for, try a partial entry, even the first letter of the name only.
Key Word
Search for a key word associated with an order. This search looks to all customer information fields in the order, records, and attempts to match your entry to what is on file. You could enter a city here, a street name, even a zip code.
Customer Number
If the customer is currently on file with your company, you can enter that here. Partial entries can be used.
P.O. Number
If the customer recorded a PO number when the order was placed, enter it in this field.
Close
Used if you want to exit the search window without selecting an order.
Refresh
Pressing this button updates the order list after you have changed the entries in the search field. Pressing Enter after changing your search criteria accomplishes the same thing.
Gen
The generation for the order appears in this field. When an order is first built, the generation number is 0 (zero). The generation number increments each time part of the order is shipped and updated. For example, if there are three lines on an order and you ship and update one of those lines on generation zero of the order, the next time you access the order in Order Maintenance, you will notice the generation of the order is 1. If you then ship and update one of the two remaining lines, the next time you pull up the order in Order Maintenance the generation of the order will be 2, and so on.
If you update the entire order on generation zero, the generation number remains at 0 and does not increment.
Status
Status has 3 accompanying fields. The first displays the single-character status code. See the end of this entry for a list of all codes. The second field lists the full name of the order’s status. The final field is reserved for special information concerning the order’s status, for instance, ‘In use elsewhere’, ‘Lock order to maintain’, etc.
0-Open
An order has this status immediately after it is built or unconfirmed.
NOTE: To make changes to an order through Order Maintenance, it must have a status of 0.
1-Picking Sheet
The order changes to this status after the picking sheet is successfully printed (02-08-10).
2-Checked Out
After the order is checked out (02-08-11), it has this status.
4-Invoice
An order has this status after the invoice is printed (02-08-13).
5-Ready for Update
The order changes to this status after it is checked in (02-08-15) or after it is shipped through Quick Ship (02-08-03).
X-In History
Once the order has been shipped and updated into the transaction base files, the order has this status.
Z-Cancelled
The order has this status if it is cancelled using the CO transaction type in P/OS.
If an order is shipped through Quick Ship, the status moves from 0 to 5. Quick Ship bypasses Order Processing’s Standard/Long Method of Shipping to speed up processing.
Bill To
This field shows the name of the company or person that the order is for. The Header block displays the Bill To name only but includes the complete address information for the Ship To customer. To review the full Bill To information, see the Customer tab in this selection.
Ship To
The Ship To heading covers the group of fields listing the name of the customer receiving the order, along with their complete shipping address. The information in this section may or may not match the name listed as the Bill To customer. Whether or not the Ship To and Bill To customer are the same entity is designated on the Customer tab of this selection.
Next Delivery
If ‘Allow Multiple Delivery Dates Per Order?’ is set to N in Order Preferences (02-08-90-01), the delivery date for the entire order (all detail lines) is displayed. If that preference is set to Y, and the order has multiple delivery dates, the next scheduled delivery date is displayed.
Delivery From
This is the branch shipping the merchandise. To change this branch, select a new branch from the drop-down menu on the Routing tab.
Sls
The full name of the salesperson that made the sale on the original order is listed here. If a second salesperson participated in the sale, their name appears in the second, untitled field below this one.
Route/Time
If Centralized Delivery is licensed, both the route code and time for the delivery appear in these fields. If there is no delivery scheduled, the fields are blank.
If Centralized Delivery is not licensed, these fields are blank by default. You can add this information to the order by completing the respective fields on the Routing tab.
Total Open
The Total Open field shows the dollar value of all merchandise on the order that has not been both shipped and then updated through Order Update (02-08-16). This amount includes the tax and freight for these items.
Total Order
The amount in this field is the total dollar value of the customer’s order, including tax, freight or any other additional charges. This field remains constant; the only thing that would alter this field would be changing something on the order, like adding or removing merchandise.
Balance Due
The amount remaining for the customer to pay is displayed in this field.
Click image to enlarge.
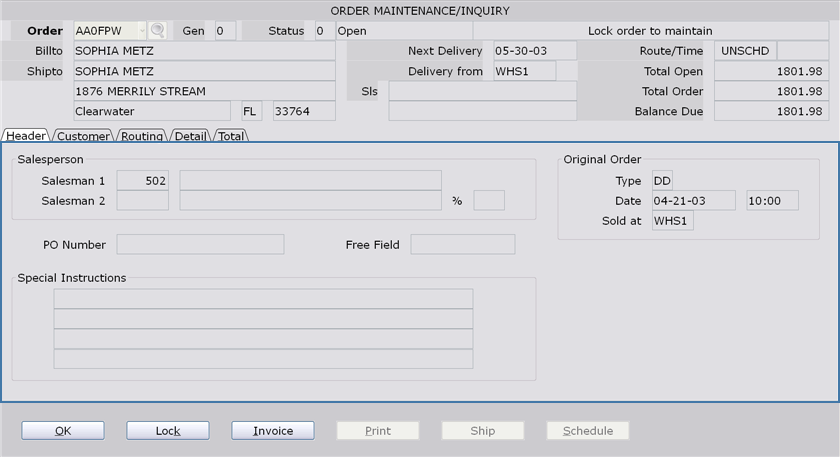
The Header tab shows the Salesperson information and any Special Instructions for the order.
Salesman group
Salesman 1
The employee number of the primary sales associate when the transaction was processed is listed here; the field is modifiable. The field to the right of it displays the name of that employee.
Salesman 2
If there was a second sales associate involved with the transaction, their employee number will be listed here. To the right of the field the employee’s name is listed.
%
This field contains the percentage of the commission that the second sales associate is to receive for the order. If the field is left blank, the commission is split equally among both sales associates.
Ungrouped
P/O Number
This field contains the customer’s P/O number if they chose to include one with the order. The P/O number is for the customer’s records and has no effect on other processing.
Free Field
This field is user-defined and can be used for a couple of different purposes:
RDB Reporting System
The Free field can be used to identify the customer in the Tyler RDB (relational database) Reporting system. For RDB purposes, the Free field is defined as five, two-character fields. To redefine this field to match your company’s needs, use the Data Dictionary (34-70).
Other
If a transaction was generated in Tyler’s Service application by a work order, the work order number will be stored in the Free field as a cross reference for the workorder number and the transaction number.
If the transaction was generated in the Rental Contract Entry, Rental Contract Returns or Rental Cash Receipts application, the rental contract number will be written into this field.
If the first character of the Free field is a %, the Bill To customer number will be used for updating the information into Customer History, rather than the Ship To customer number.
Media
Media Tracking is used to measure the effectiveness of your various advertising campaigns. From the drop-down list, select the form of advertising that brought the customer into the store (TV, Radio, Internet, Printed Media, Word of Mouth, etc.). The options that appear in this list are set up in the ‘Sales Analysis Sales Statistics Table’ selection (05-10-09). Common codes include “R” for radio and “T” for television.
The media statistics are viewed using the Media Sales Stats selection (05-10-06) and the Sales Statistics Report selection (05-10-03).
NOTE: Media Tracking is turned on/off using the ‘Media Tracking’ preference in Trans Entry Pre-Prompt (02-18-01). If the preference is set to N, the field does not appear on the Order Maintenance (or POS Entry) screen.
Special Instructions group
Special Instructions
The Special Instructions field is used to enter special information that the customer wants to include with their order. For example, directions to the customer’s residence.
Original Order group
Type
The transaction type of the original order is listed here.
Date
This is a timestamp of when the original order was processed. The two fields hold the date and time respectively.
Sold at
This field displays the Sold At branch selected at the time of the original transaction.
Click image to enlarge.
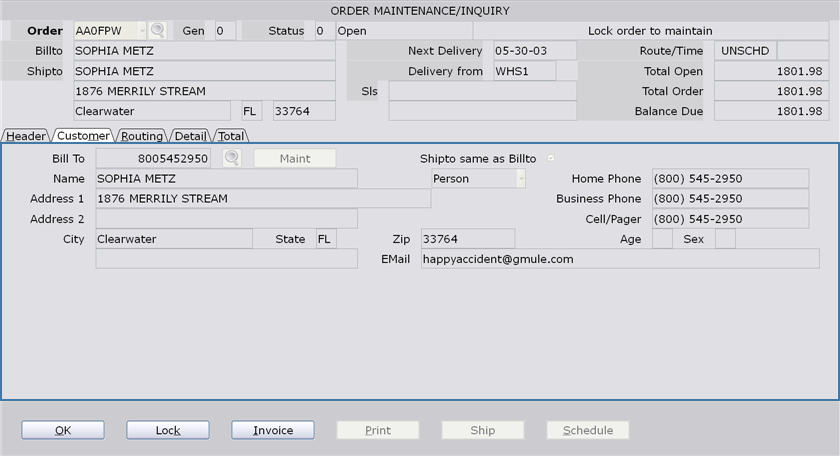
This tab displays detailed customer information for the order. The customer information is pulled from the Customer Master file and can be modified by clicking the Maint button.
Bill To
The Customer number designated as the Bill To customer is listed in this field. If you want to change the Bill To customer, enter a new number in this field. You can initiate a search by typing a “?” into the field or clicking the search button to the right of the field.
Search (Bill To)
Clicking the Search button pulls up the Customer Number Search window. Typing a “?” into the Bill To # field achieves the same thing.
Customer Name
Enter the full or partial name of the customer you are looking for. Your entry has to match, exactly, what is on file; so, if you are uncertain of how something was entered into the system, go with less information. Press Enter to process your entry.
If you want to try a different search, click back in the Customer Name field, type in a new entry and press Enter.
More Button
If the number of records pulled up by your search exceeds the number that can be displayed in the window, the more button will appear in the lower left-hand corner of the window. Press this to see the next page of results.
Selecting a Customer Record
Double clicking the desired record will select that customer for the transaction, close the search window and return you to the Customer tab, now filled out with the selected customer’s information.
Close Button
Press this to close the search window without selecting a customer.
Maint
Click this button to modify the customer’s information.
The changes made here are permanent and updated to the customer’s record in Customer Master Inquiry/Maintenance (20-01).
Ship To Same as Bill To
Depending on whether or not you unchecked this box during POS entry determines whether or not it is checked here.
Check this box if the Bill to and Ship to information is the same.
Uncheck this box and a second customer address group appears below the Bill To section to allow for entry of the Ship To information.
Name
This field displays the selected customer name, person or business.
Person/Company
Designates the customer as a company or a person.
Address 1
This is the first line of the customer’s address.
Address 2
The second line of the customer’s address, if there is one, appears in this field.
City
The city of the customer’s address.
State
Contains the state listed in the address of the customer.
Zip
The zip code of the customer is found here.
Cross Str
The Cross Street is used to help the driver find the delivery address. To add or modify a cross street, click the Maint button.
Email
The email address on file for the customer is listed here.
Home Phone
This field displays the home phone number of the bill to customer in this transaction.
Business Phone
The business phone number of the customer is found here.
Cell/Pager
The entry for a cell or pager number is found here.
Age
If you collect this type of demographic, enter the customer’s age here.
Sex
Information like this can be used in reports generated later in the Tyler system if you want to examine your customer base. The field is a one letter entry.
ShipTo Information
If the Ship To information is different from the BillTo information, it will display on this tab as well. The fields are the same as the BillTo fields.
Click image to enlarge.
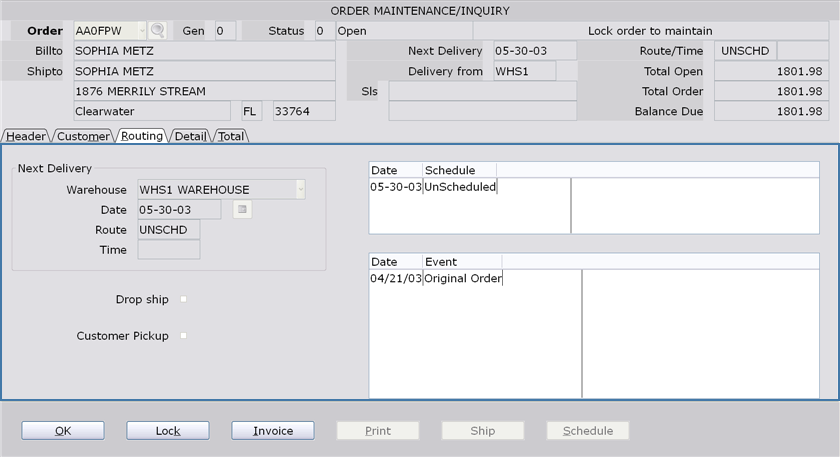
This tab shows the delivery/routing information for the order.
Next Delivery group
Warehouse
The warehouse (pickup location) designated for this order appears here.
To change the warehouse, select a different branch from the drop-down menu. The system will ask you if you want to “Change all pickup locations?” to the selected branch. Click Yes and the pickup/deliver from branch is changed on each open detail line of the order as well as in the Header block. If you click No, only the Delivery From branch in the Header block is changed to the new branch.
If you have Centralized Delivery licensed, the Scheduler will open to allow scheduling from the new branch.
This is the delivery date for the order. This field is used to change the delivery date for the order if you do not have Centralized Delivery licensed. If you try to change the date and the “Allow Multiple Delivery Dates Per Order?” (16) preference in Order Preferences (02-08-90-01) is set to Y, you will be given three options:
All
Change all detail lines to the new delivery date with this selection.
Before
This changes only the detail lines with a delivery date on or before the new delivery date.
None
This selection does not change the dates on any of the detail lines. Only the delivery date in the Header block is changed.
If you have Centralized Delivery licensed, you cannot modify the date in this field. You will need to change the date with the Centralized Delivery scheduler. Please see the “Changing the Delivery Date” section of this document for details.
Calendar
If you do not have Centralized Delivery licensed, use this button to easily select a new delivery date.
Route
If you have Centralized Delivery licensed, this field automatically populates with the route information.
Manually enter the route information in this field if you do not have Centralized Delivery licensed.
Time
This field automatically populates with the delivery time data if you have Centralized Delivery licensed.
If you do not have Centralized Delivery licensed, you can manually enter that information here.
Ungrouped
Drop Ship
Check this box if the order will be shipped directly from the Vendor.
If you have Centralized Delivery licensed, when this box is checked, the order is removed from Centralized Delivery and the system will not allow you to schedule a delivery for the order.
For more information on Drop Shipping, see the section of that title in the Special Skills section of the Point of Sale documentation.
Customer Pickup
Check this box if the customer will be picking the merchandise up instead of having it delivered to them.
If you have Centralized Delivery licensed, when you check the box, you will receive a message explaining “Order is customer pickup. Routing will be deleted. Continue?” Click Yes and the order will be removed from Centralized Delivery and the system will not allow you to schedule any deliveries for the order.
If the customer changes their mind and wants to have the merchandise delivered, uncheck the box and the Centralized Delivery Scheduler opens to allow scheduling of the delivery.
Top Box
Date
Dates listed in this column show deliveries scheduled for this order.
Schedule
A summarized description of deliveries scheduled for items on this order are listed in this column.
Bottom box
Date
The entries in this column show the dates of actions taken to the order you are working in.
Event
A description of the actions taken on an order is listed here.
Open
This the dollar amount of merchandise that has not been shipped.
Shipped
This is the dollar amount of merchandise that has been shipped.
Click image to enlarge.
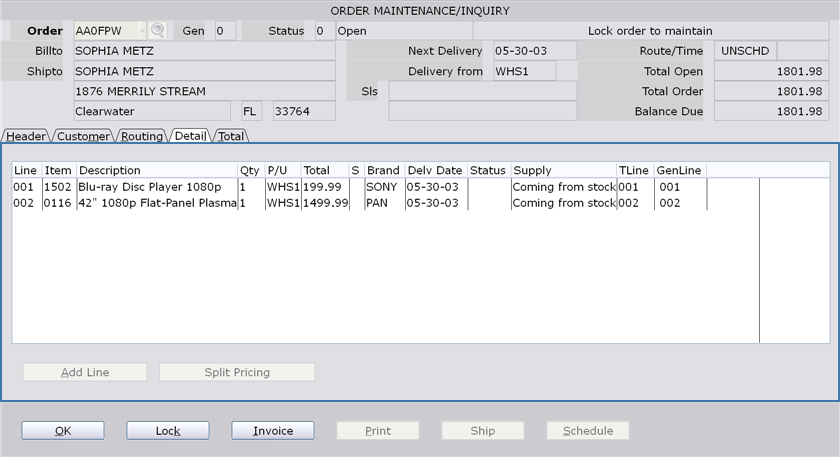
The item information for the order appears on this tab.
Detail box-Column headings
Line
The line number for each item added to the order is listed in this column.
Item
The item number associated with each detail line on an order is shown here.
Descriptions
This column shows the detailed description of each item on the order as they are listed in your Tyler system.
Qty
The quantity of the item on the detail line is listed here.
PU
The pickup location for each item on the order is shown in this column.
Total
The total value of the item(s) on the detail line; the price of the quantity selected is seen here.
S
This field indicates whether an item is part of a split sale package. The system numbers packages in the order of their creation. Consider an order where a customer was sold two split packages. When viewing that order on this tab, all items from package one would have a 1 in this column; the items from package two would show a 2.
Brand
The item’s brand displays in this column.
Delv Date
The date when the item will be delivered to the customer. If the Allow Multiple Delivery Dates preference in Order Preferences is set to N, the Delivery Date on all detail lines (and in the Header block) will be the same. If this preference is set to Y, it is possible for each detail line to have a different delivery date.
Please see the “Changing the Delivery Date” section for more information.
Status
This is the status of the detail line, not to be confused with the status of the order. A few different statuses can appear in this field:
Partial Shipped
Appears when part of a detail line with multiple quantities has been shipped. For example, a customer orders two of the same DVD player. The customer picks up one of them, but the other one is out of stock and had to be backordered.
History
Appears on the shipped line of a partial shipment (the item was shipped and updated but other detail lines on the order were backordered).
Cancelled
Appears when a line has been deleted from the order through this selection or through a CO (Cancel Order) transaction in POS Entry (02-02).
Supply
The description in this column indicates whether merchandise is coming from stock, being transferred from another branch, being ordered, or being returned. Additionally, it tells you if items are attached to a purchase order line or linked to a Service work order.
Serial#
If a serial number has been entered for the item, it appears in this field. Also, ‘**WARRANTY**’ appears in this field for Warranty Item Numbers.
TLine
This is the original transaction line number of the item.
GenLine
If the order has more than one generation, items that have been shipped and updated or deleted from the order will have a four-digit number in this field. The first digit of the number represents the generation of the order on which the item was shipped or deleted. The next three digits signify the original line number of the item.
A three-digit number appears for items that have not been shipped. This number represents the current transaction line number of the item.
Add Line
Click this button to add a new item to the order. Please see the “Adding a Line” section of this document for more information.
Split Pricing
Click this button to create a package on the fly (split sale).
Click image to enlarge.
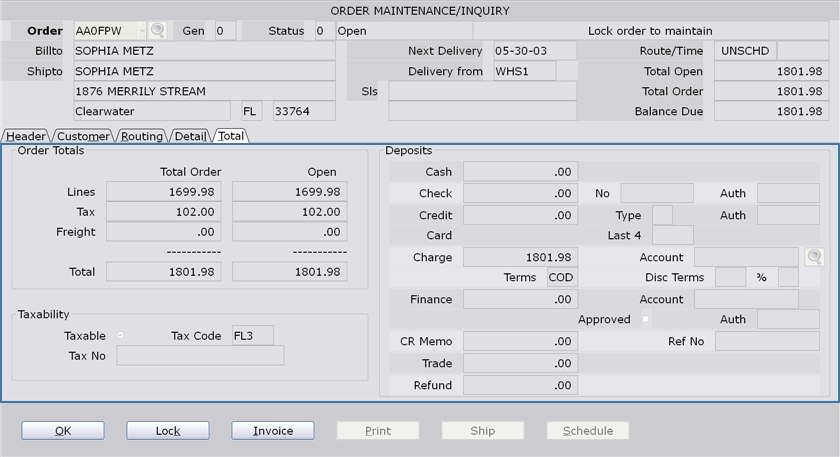
The Total Tab shows detailed monetary information for the order. The amounts shown on this screen represent payments/charges made in POS when the order was created or for lines that have been shipped and updated. Any payments that have been made in Order Processing for lines/orders that have not yet been updated through Order Update are not reflected on this screen.
Order Totals group-Total Order column
Lines
This entry shows the total value of all items on the order before tax and freight are considered.
Tax
This is the tax charged against all items on the order.
Freight
If there is a freight charge for any items on the order, they are all added up and the complete charge is listed here.
Total
This field shows the total charge to the customer for this order. Everything is included in this number.
Order totals group – Open column
Lines
The sum of all items on the order that have not been shipped and updated.
Tax
The tax owed on any unshipped items on an order can be found here.
Freight
If a freight charge applies to any items still Open on this order, this is where it is shown.
Total
This is the total owed by the customer to all Open detail lines on an order, taking into consideration taxes and freight.
Taxability group
Taxable
If the order is taxable, this box is checked.
Tax Codes
The tax code that applies to this transaction is listed in this field.
Tax No
(Tax Number) If the order is listed as non-taxable, the tax exempt number is entered in this field.
Deposits group
Cash
This field shows the total value of all cash payments made towards this order.
Check
Any checks paid towards this order are added up and the total appears in this field.
No
(Check Number) The check number for a previous check payment appears here. You can change it if necessary.
Auth
(Check Authorization Number) The check authorization number for a previous check payment appears in this field. If necessary, you can modify this number.
Credit Cards
If credit card payments have been made towards this order, the total amount appears in this field.
Type
The credit card type (VISA, Mastercard, etc.) used for the credit card payment appears in this field.
Auth
Credit Card Authorization Number) The credit card authorization number for a previous credit card payment appears here.
Last 4
This is the last four digits of the credit card number used to make a previous payment.
Charge
If an amount was charged to a customer’s A/R house account, it appears in this field.
If there is a COD amount on the order, it appears in this field and “COD” appears in the Terms field.
NOTE: If the amount in this field is currently COD and you need to change it to a charge to the customer’s house account, you can do that on this screen by entering the customer’s account number, terms, and discount terms in the appropriate fields.
Account
The customer’s A/R account number appears in this field if all or part of the transaction was charged to a house account.
If you are changing the charge from COD to a charge to a house account, enter the customer’s A/R account number in this field.
Account Search
Clicking the search button next to the A/R Account # field opens a dialog box that allows you to search through existing accounts. You have a couple of choices in search criteria. Entries can be made to one or multiple fields in the search window.
Company/Last Name
Pull up a list of accounts associated with a particular company name or the last name of a person affiliated with that account. Enter a full or partial name. When entering a full name, your entry has to match what is in the system exactly. If you are not finding what you are looking for, try a partial entry, even the first letter only of the name.
First Name
Search for an account by the first name of a person associated with an account.
Key Word
Search for a key word associated with an account. This search looks to all fields in the account records and attempts to match your entry to what is on file. You could enter a city here, a street name, even a zip code.
Close
Used if you wish to exit the search window without selecting an account.
Refresh
Pressing this button updates the account list after you have changed the entries in the search field. Pressing Enter after changing your search criteria will accomplish the same thing.
Terms
Accept, modify, or enter the terms for the A/R Account number in this field. Valid entries include:
Enter the terms for the A/R Account number in this field. Valid entries include:
Nxx
xx is the number of calendar days
Txx
T06 – 1 payment due in 60 days (N60)
T09 – 1 payment due in 90 days (N90)
T30 – 1 payment due in 30 days (N30)
T60 – 2 payments due (1st/30 days, 2nd/60 days)
T90 – 3 payments due (1st/30, 2nd/60, 3rd/90)
T12 – 4 payments due (1st/30, 2nd/60, 3rd/90, 4th/120)
T15 – 5 payments due (same as T12 plus 5th/150)
T18 – 6 payments due (same as T15 plus 6th/180)
Exx
xx is the number of days after the end of the month (01-28).
Fxx
For A/R Open, xx is the number of months that the invoice is being split into (01-36).
For A/R Revolving, xx is the number of interest free months (01-36).
Pxx (A/R Revolving only)
No payments for xx months (01-36).
Disc Terms
(Discount Terms) Accept, modify, or enter the number of days allowed for the A/R invoice discount here. Entry in this field should be in the form Dxx, where xx is the number of days that the discount is valid.
%
(Discount Percentage) The discount percentage that is applied if the specified terms are met is entered in this field.
Finance
If all or part of the order was paid by a finance contract, that amount appears in this field.
If necessary, you can add a finance amount to the order using this screen. Once the amount is entered, the corresponding Account, Approved, and Auth fields unlock to allow entry of this information.
For DD or SO transactions, if the ‘Ship Full Fin.$ in OP’ preference in A/R Master (12-20) is set to Y, the entire finance amount is interfaced to the Finance Account on the first shipment of an order. For example, if all of a $1000.00 order was financed and the amount of the first shipment was only $300.00, the full $1000.00 would interface to the Finance Account (in A/R) when the first shipment is updated.
If the preference is set to N, the amount interfaced to the Finance Account is equal to the shipment amount. For example, if all of a $1000.00 order was financed and the amount of the first shipment was $300.00, only $300.00 would interface to the Finance Account when the first shipment is updated.
Remember that amounts are not reflected in A/R until the order is updated in Order Processing and Sales Transactions.
Account
If all or part of the order was paid with a finance contract, the finance company’s account number appears here.
If you are adding a finance amount on this screen, enter a valid finance company in this field.
NOTE: The Finance amount for DD or SO transactions is reflected in the Finance Account after the first shipment for the Order has been updated through both Order Processing and Transaction Processing. The Finance amount is not prorated on partial shipments.
Approved
Check this box if the Finance Contract has been approved.
Auth
The authorization number received from the financing company is entered here.
CR Memo
If the order total is negative and is being refunded as a credit memo, the amount appears in this field. Also, if all or part of the transaction was paid with a Credit Memo, the amount appears in this field.
Ref No
If a credit memo was used to pay for all or part of the order, the corresponding reference number appears in this field. The reference number begins with the * symbol followed by the transaction number on which the credit memo was issued.
Refund
If the amount is negative and is being refunded to the customer via a check issued from the main office, the amount appears in this field.
Click image to enlarge.
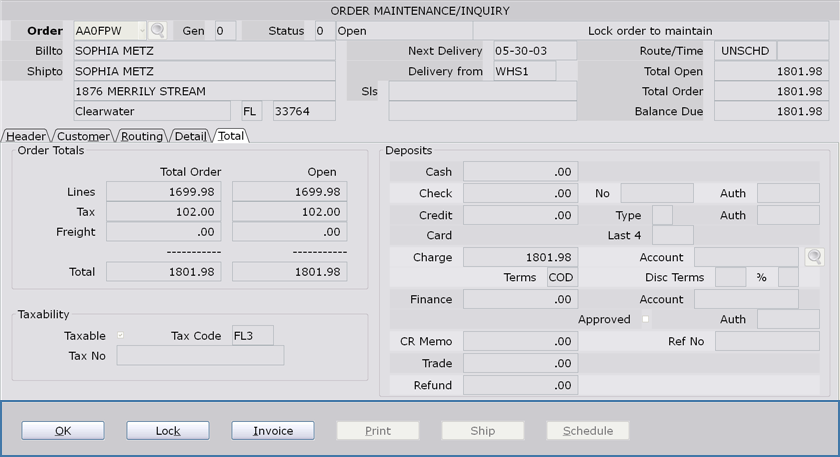
The footer block contains a number of buttons that serve various purposes within Order Maintenance.
Ok
The OK button accepts any changes made and closes the current order.
Lock
Click this button if you need to work in an Order and want to make sure that no one else is able to alter it while you have it open in Order Maintenance. With this selected, another employee could view the order but would not be able to make any changes.
Invoice
This button will print an invoice for the order.
When the invoice print box appears, you have a number of options:
Invoice Recap
Check this box to print all open and shipped lines on the invoice. Uncheck this box to print only open lines on the invoice.
No Shop (Proposal)
Check this box to print the invoice in No Shop Mode. A No Shop invoice (also known as a ‘proposal’) is similar to a Quote Ticket. However, less specific information prints on the invoice, making it more difficult for the customer to shop around for better prices. With No Shop Mode, an item’s main description does not print. Only the second description, which is usually a more generic description, is included. The title of this checkbox is defined on the Form L tab of Invoice Preferences.
Printer
Enter a valid printer ID here. To print directly to a PDF file, enter “PDF.” The Inv. Prntr #1 setting from System File Management (30-01) appears by default.
Form#
Enter the form number for the invoice. The Inv. Form #1 setting from System File Management appears by default. To print to a laser printer or PDF file, select Form L.
Second Invoice
From this window, you can also print a second invoice. If the ‘Order Maint Open Orders’ box on the General Tab of Invoice Preferences (02-18-01, Enter “Y” in Field 8) is checked, and a second invoice printer is assigned to the terminal, the second invoice automatically prints to the assigned printer. If a second invoice printer is not assigned or the ‘Order Maint Open Orders’ box is not checked, you can specify a printer for the second invoice. Make sure that the ‘Print’ box on the right side of the Invoice Print window is checked.
Print
Click this button to print a hard copy of the order.
Ship
This button is a shortcut to the Quick Ship selection.
The order must be locked to use this option.
If TMIS Security settings prevent an employee from accessing the Quick Ship selection, this button will not appear on the screen.
Schedule
If you have Centralized Delivery licensed, this button is used to schedule delivery of the items on the order.
The order must be locked to use this option.
Rebates
Click this button to view available instant rebates for items on the transaction. Please see the Instant Rebate Documentation for more information.


