Overview
Below are descriptions for each field on the Quick Ship screen.
Table of Contents

Click image to enlarge.
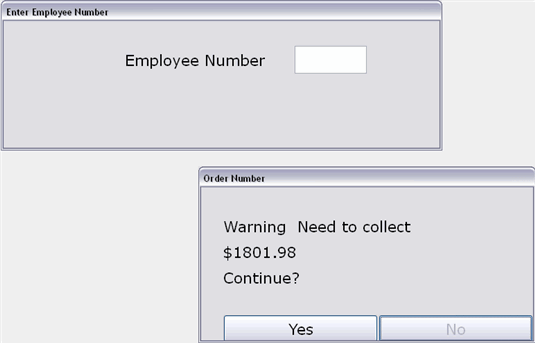
The following two message windows appear in Quick Ship.
Enter Employee Number/User ID Box
Enter Employee Number/ User ID
This message box appears when you first enter Quick Ship. You must enter your employee number or User ID before you can proceed.
Order Number Box
Warning. Need to collect $xx.xx. Continue?
When you access an order in Quick Ship for which money is still owed, this message appears. If the money is not collected before you exit Quick Ship, the order will not advance to Status 5 (Ready for Update).

Click image to enlarge.
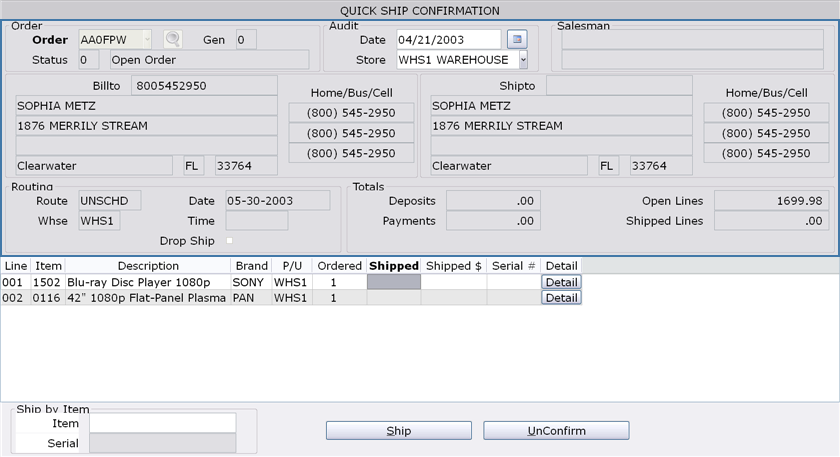
The Header Block in Quick Ship shows the customer, salesperson, and routing information along with monetary and routing details of the order.
Order Group
Order
Enter the Order number of interest in this field; press Enter to process.
Besides order number entry, this field also has a drop-down menu function. From the drop-down menu, select “?” to initiate an order number search or [Exit] to leave Order Maintenance. Also, both of these commands can be typed directly into the field (the brackets are required for [Exit]).
Search (Order)
Clicking the search button next to the Order field opens a dialog box that allows you to search through existing orders. You have a couple of choices in search criteria. Entries can be made to one or multiple fields in the search window.
First Name
Search for an order by the first name of a person associated with that order.
Last Name
Pull up a list of orders associated with a company name or the last name of a person affiliated with that account. Enter a full or partial name. When entering a full name, your entry has to match what is in the system exactly. If you are not finding what you are looking for, try a partial entry, even the first letter of the name only.
Key Word
Search for a key word associated with an order. This search looks to all customer information fields in the order records and attempts to match your entry to what is on file. You could enter a city here, a street name, even a zip code.
Customer Number
If the customer is currently on file with your company, you can enter that here. Partial entries can be used.
P.O. Number
If the customer recorded a P/O number when the order was placed, enter it in this field to track the order down.
Close
Used if you wish to exit the search window without selecting an order.
Refresh
Pressing this button updates the order list after you have changed the entries in the search field. Pressing Enter after changing your search criteria will accomplish the same thing.
Gen
(Generation) The current generation of the selected order is displayed in this field. For more information on this field, see the “Header Block” section of Order Maintenance Field Definitions.
Status
This Label covers the two fields to its right. The smaller field shows the single-character alphanumeric status code; next to that is the description of that code.
For more information on this field, see the “Header Block” section of Order Maintenance Field Definitions.
Date
This is the date that the order is actually being shipped. The default value of this date is the current Start of Day date.
NOTE: This date cannot be set to a date more than 5 days ahead of the current Start of Day date.
NOTE: The date cannot be changed on a point of sale terminal.
Calendar
Use this as an alternative to manually entering the date. Click the icon next to the field and a hovering calendar window opens; double click the day of the month that you are interested in. If you are looking for a date outside of the visible month, use the arrows in the top corners of the calendar to navigate between months.
Store
The Audit branch designated during the last work on the transaction is listed here. Use the drop-down menu to select a different branch.
Salesman Group
Salesman
Whoever was credited with the initial sale is listed in this field. There is space for a second sales associate’s name if there was one.
Bill To Group
Bill To
The Bill To customer number is listed here.
Name
The Bill To customer’s name appears in this field.
Address 1
Here you will see the address on file for the Bill To customer.
Address 2
Additional address information for the Bill To customer displays in this field.
City
The name of the city on file for the Bill To customer appears here.
State
The Bill To customer’s state appears here.
Zip Code
The Bill To customer’s zip code is listed in this field.
Home Number
The home phone number of the Bill To customer appears here.
Business Number
If the Bill To customer included a business address, it will display in this field.
Cell Number
The cell phone number listed in the Bill To customer record is displayed in this field.
Ship To Group
Ship To
The Ship To customer number is listed here. Many times it is the same as the Bill To customer.
Name
The Ship To customer’s name appears in this field.
Address 1
Here you will see the address on file for the Ship To customer.
Address 2
Additional address information for the Ship To customer displays in this field.
City
The name of the city on file for the Ship To customer appears here.
State
The Ship To customer’s state appears here.
Zip Code
The Ship To customer’s zip code is listed in this field.
Home Number
The home phone number of the Ship To customer appears here.
Business Number
If the Ship To customer included a business address, it will display in this field.
Cell Number
The cell phone number listed in the Ship To customer record is displayed in this field.
Routing Group
Route
The Delivery Route for the order appears in this field.
NOTE: Use Order Maintenance to edit this field and the other fields in the Routing Group.
Whse
(Warehouse) This field displays the location the merchandise is set to leave from to get to the customer. This could be a separate location where you store your merchandise, or if you ship out of your branch, your own location would be listed here.
Date
This is the Delivery Date for the order.
Time
The Delivery Time appears in this field.
Drop Ship
If the items on this order are being shipped directly from the vendor to the customer, this box will be checked.
For more information see the “Drop Shipping” topic in the Special Skills section of the POS documentation.
Deposits
This field shows all deposits that have been made toward the order. These include any amounts paid during the creation of the transaction in POS or through Middle Layaway payments.
Payments
This field shows the sum of all payments made toward an open order through Quick Ship (02-08-03) or Order Check-In (02-08-11).
Open Lines
The total value of all open detail lines on an order is displayed in this field.
Shipped Lines
This field shows the sum total of all shipped items on the order (for orders with a status of ‘2-Checked Out’ or higher).

Click image to enlarge.
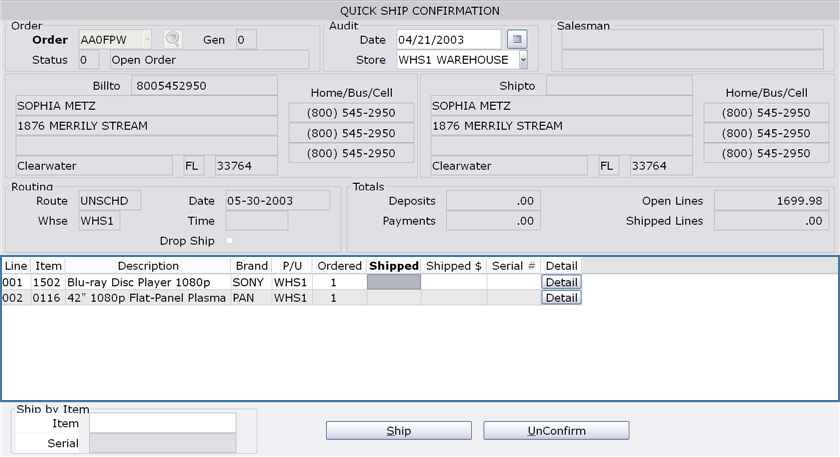
The Detail Box displays information for all open detail lines on the order.
Column headings
Line
This column shows the line number of individual items on the customer’s order. These numbers are assigned sequentially as items are added to the order, counting up from 001.
NOTE: You can quickly verify the items you are Quick Shipping using a barcode scanner. Position the cursor in the line number field of the item you want to verify and scan the barcode. Use the mouse or arrow keys to navigate between items.
Item
The item numbers of each line item in a transaction are listed in this column.
Description
The description of each line item on an order is found in this column.
Brand
In this column you find the brand code associated with the items on the order.
PU
The pick-up location (aka, warehouse) for each item is displayed in this column.
Ordered
This quantity represents the number ordered of each item on the transaction.
Shipped
The number of items that have been shipped (but not updated) appears in this field.
Shipped $
The value of the shipped items appears in this field.
Serial #
The serial number for the item (if applicable) appears here. You can enter the serial number in POS, through Order Maintenance or on this screen.
To search for a serial number, enter a ‘?’ in the field and press Enter.
NOTE: You can only search for ‘B Flag’ serial numbers here.
Details
Press the button in this column to pull up the Line Maintenance window which gives a detailed description of the items in the customer’s order. For a detailed explanation of the fields in this window, see the Order Maintenance section of this document.

Click image to enlarge.
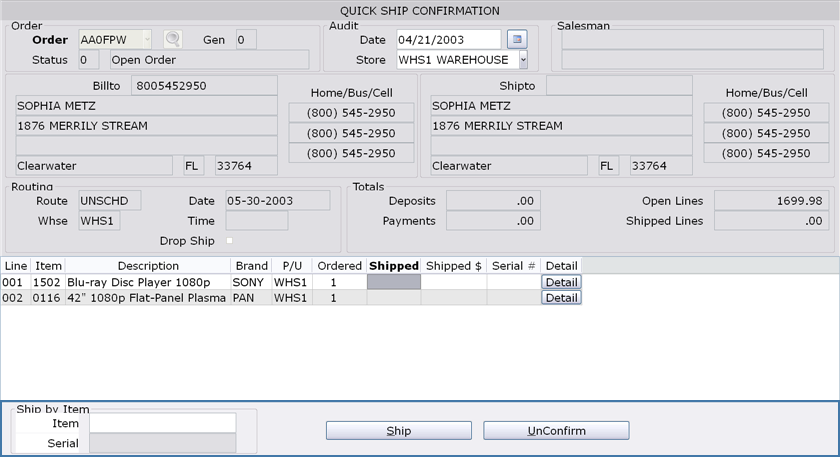
The footer block contains a number of fields and buttons that serve various purposes within Quick Ship.
Ship by Item Group
Item
This field is an alternative way to ship an item. Instead of entering the Ship quantity on an individual detail line or clicking the Ship button, you can enter the item number in this field to ship an item.
Serial
If the item entered in the above field requires a serial number, enter it here.
Buttons
Ship
Click this button to ship all lines on the order at once (instead of entering the ship quantity on each detail line one at a time). If a serial number is required, a message appears. You must either enter the serial number or backorder the line to continue.
Unconfirm
This button is used to change the status of the order to a lower status (“unconfirm” the order).
If the current status of the order is 0, when you press this button the order is exited and the status remains at 0.
If the current status of the order is 1, 2, or 4, a drop-down menu appears with options to change the status to a specific number.
NOTE: When you first access an order with a status of 5, the screen will give you the message “Order is ready for update. Order status will be changed to status 4. Continue?” When you click Yes, the status of the order is changed to 4. You can then use the Unconfirm button to change the status to a lower number.


