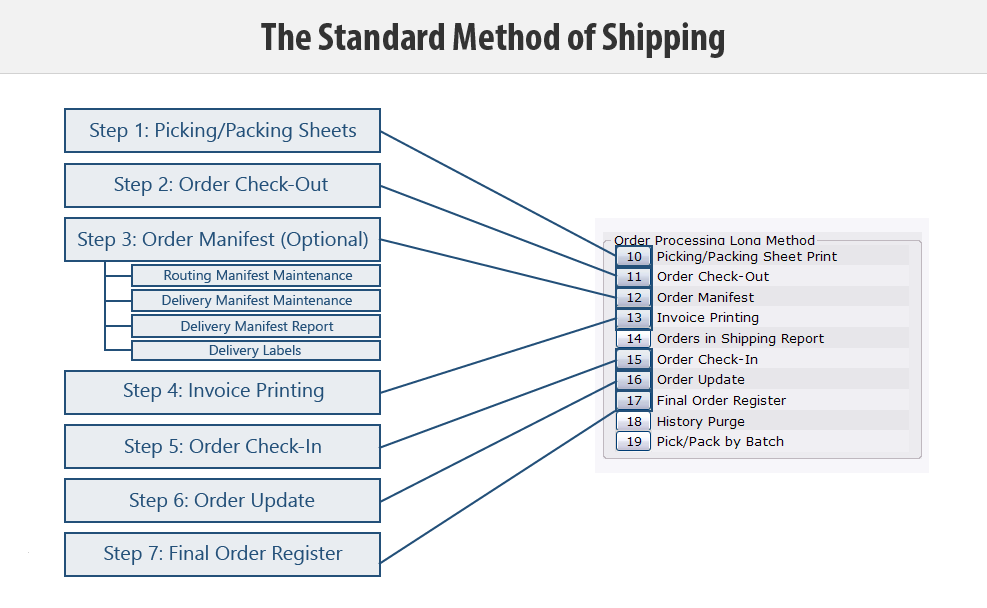
The Standard Method of Shipping (02-08)
Overview
The steps in the Standard Method of Shipping (also known as the Long Method) are described below.
Infographic
Step 1: Print Picking/Packing Sheets and Physically Pick the Merchandise.
Warehouse personnel prints the picking and packing sheets for the orders using the Picking / Packing Sheet Print selection (02-08-10).
- At the end of this step the status of the order is “1 – Picking/Packing Sheet Printed.”
- Printing the Picking and/or Packing Sheets is an optional step that is defined in Routing Preferences (02-08-90-02).
The merchandise for the orders is then physically collected from the warehouse and any items that are not available are noted on the picking sheet. The warehouse employee returns the picking sheets to the person responsible for confirming, in the system, the items that were picked and the items that were unavailable.
Step 2: Check Out the Order(s).
Picked orders are verified in the system using the Order Check-Out selection (02-08-11). Available items are shipped and unavailable items are backordered.
- At this point the Inventory Committed and Inventory Onhand numbers are reduced by the quantity shipped.
- If the ‘Invoice Print Mandatory?’ preference is set to Y in Order Preferences, the status of the order at the end of this step is “2 – Checked Out.” If the preference is set to N, the status at the end of this step is “4 – Invoice Printed.”
Step 3: Print the Routing/Delivery Manifest.
The Manifests are printed (and maintained if needed) using the Centralized Delivery Manifest selections (21-03) or Order Processing Routing/Delivery Manifest selections (02-08-12).
Step 4: Print the Invoice(s).
The invoice for the order is now printed (if required by your company) using the Invoice Printing selection (02-08-13).
It is delivered with the merchandise and contains the amount charged for each line, any backordered lines, and the terms of the sale. The driver leaves a copy with the customer and returns an initialed copy to the employee responsible for verifying delivery through Order Check-In.
- This is an optional step based on the Order Processing preferences.
Step 5: Check In the Order(s).
Delivery of the order is now confirmed through the Order Check-In selection (02-08-15).
- This is an optional step based on the Order Processing preferences.
Step 6: Update the Order(s).
Order Update (02-08-16) is run and all orders that have been shipped are updated:
- If the order has been shipped in full, this selection changes the status to X (history only).
- If the order was partially shipped (some items were backordered), this selection moves the shipped items into history, increments the generation number on the open order and resets the status to “0” (Open Order).
Additionally, this selection creates the DZ or SZ version of the sales transaction, which will appear on the daily Sales Transaction Audit.
Step 7: Print the Final Order Register (optional).
The Final Order Register (02-08-17) is printed for all orders that have been shipped.
- This is an optional step.
