How To: Printing in Tyler
Overview
This page describes how to set up your Tyler system for printing invoices, statements and reports.
Table of Contents
- Introduction
- The Setup Process
- Convergence Preferences
- Invoice Preferences
- GUI Invoice Activation
- GUI Printing Setup for A/R Statements
- GUI Printing Setup for P/O Vendor and Warehouse Copy
- Barcode Setup
Introduction to Printing
There are two types of printing methods used in the Tyler system to produce paper or PDF invoices, statements, and reports. Let’s take a look at these in more detail.
GUI Printing
You can think of GUI Printing as an enhanced form of printing. This method allows you to include graphical elements such as logos, barcodes, boxes, and shaded areas, resulting in a more aesthetically pleasing printout. GUI printing also allows you to print directly to a PDF file, making it easy to email a digital copy of the printout to someone.
GUI printing is used for printing invoices on Form M and Form L. Because of this, Form M and Form L are known as ‘GUI Invoices.’ This method is also used to print the Warehouse and Vendor Copy of Purchase Orders and if desired, can be used to print AR Statements.
A Note About Logos
Logos are a licensed option and are stored as graphics files (.png) on your network. They can include photos or informational text such as store locations, hours, and/or return policies. You can use one logo for you entire company or use different logos for each region or branch.
To begin using the logo feature, contact your marketing representative at Tyler.
Printing to a PDF
To print an invoice, statement, or other report directly to a PDF file, first create a directory/folder on your computer where the file will be saved. Then designate the folder as the default download location through the Company PDF/Export Directory (30-04) selection or the Terminal PDF/Export Directory (30-05) selection. When printing an invoice, statement, or report, enter “PDF” as the Printer ID and the PDF file is automatically saved to the specified folder.
For selections that print invoices to a printer automatically and do not require entry of a Printer ID (Point of Sale Entry, Order Maintenance, etc.), you can still print directly to a PDF by setting the Invoice Printer to “PDF” in System File Management (30-01). For details, please see the GUI Invoice Activation section of this document.
Currently, printing to PDF is available for many, but not all applications that use GUI printing.
Requirements for Using GUI Printing
The GUI printing method has a couple of basic system requirements:
- The PC that is running the Tyler system and the PC that is attached to the printer must be running Convergence version 2.345 or higher. You can download the latest version from the Software page of this site. Contact Tyler’s Hardware Support Department if you have additional questions.
- GUI invoices, statements, and reports must be printed on a laser printer or printed directly to a PDF file. They cannot be viewed in a spooler.
Non-GUI Printing
Non-GUI printing is used to print invoices, statements, and reports that are not eligible for GUI printing. All invoice forms other than M and L (Form 1, 2, 4, B, etc.) use Non-GUI printing. As a result, invoices using this method are known as ‘Non-GUI Invoices.’
The Setup Process
To successfully set up your system for GUI and Non-GUI printing, follow the steps described below.
For GUI Printing
- Configure your Convergence Preferences.
- Set up your Invoice Preferences (02-18-16).
- Activate GUI Invoices in System File Management (30-01).
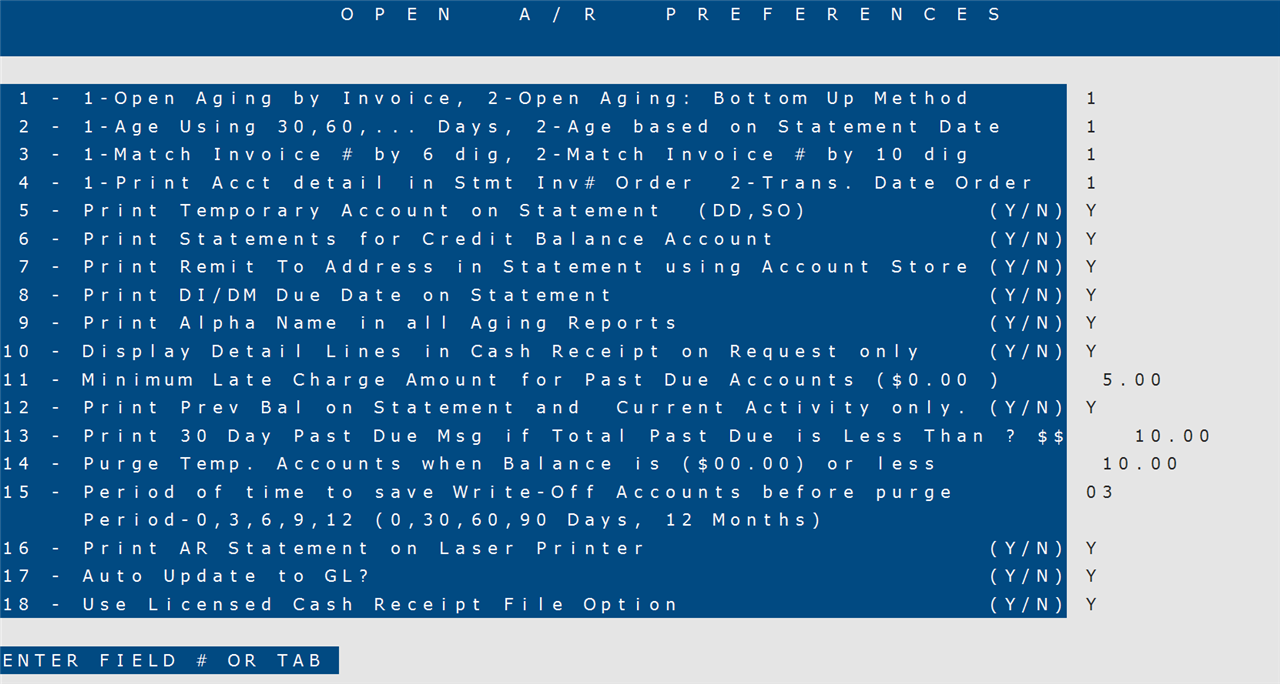
- In AR Open Preferences (12-90), set up AR Statements for GUI Printing.
- On the last screen of Purchase Order Preferences (04-90), configure the GUI Printing settings for the PO Vendor Copy and Warehouse Copy.
- Install the bar code fonts that will print on GUI Invoices (optional).
For Non-GUI Printing
- Configure your Convergence Preferences.
- Set up your Invoice Preferences (02-18-16).
Convergence Preferences
In order to successfully print GUI invoices, non-GUI invoices, and other Tyler reports, there are a number of Convergence settings that must be configured.
Accessing Convergence Preferences
In Convergence, click Setup > Preferences from the top menu.
GUI Printer Settings
The printer settings for both GUI and Non-GUI printing are described below.
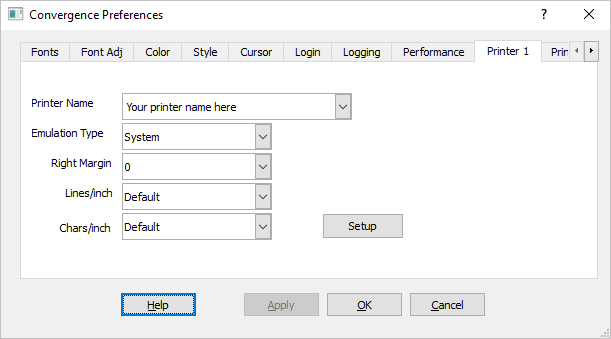
Click the Printer 1 tab and set your preferences to match the ones below (also show on the above screenshot):
System
NOTE: If you are printing Direct Mail Laser Labels (20-20-02), this field must be set to ‘HP.’
Once you have configured Printer 1, click the Printer 2 tab. For Printer 2, use all of the same settings as Printer 1 except for the printer name.
Non-GUI Printer Settings
The settings for Non-GUI printing are less specific than those for GUI printing and vary depending on the type of printer you are using. In some cases you might have to experiment with the settings until they work with your particular printer. The preferences are described below.
Font Settings
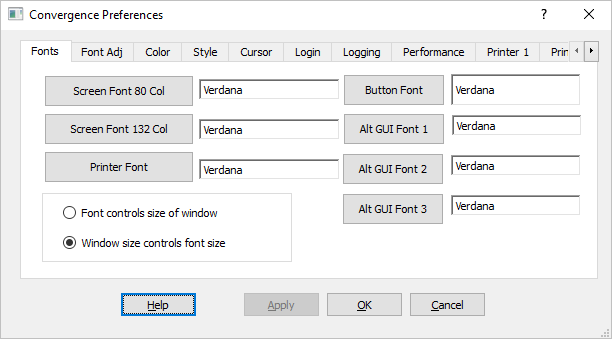
Click the Fonts tab on the Convergence preferences window.
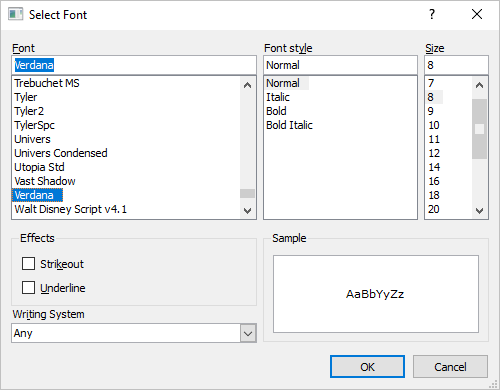
A number of Font Types appear on the screen (Screen Font 80 Col, Printer Font, Button Font, etc). To set up a font for a font type:
- Select the ‘Window size controls font size’ option.
- Click the Screen Font 80 Col button.
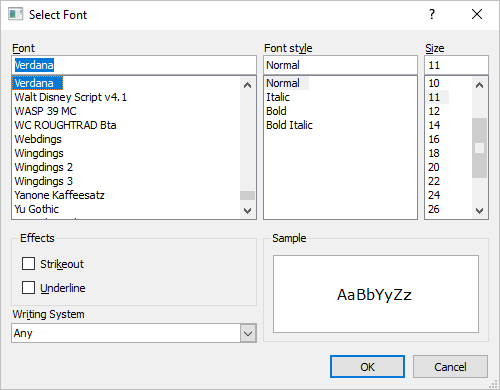
- The above screen appears.
- Select a font from the list. You can use any font, but understand that some fonts will not work with the application. Tyler recommends using Verdana.
- Ignore the Font style and Size fields, as they have no effect on printing.
- Make sure the Strikeout and Underline boxes are unchecked.
- Click OK.
- Repeat this process for all Font types described below.
NOTE: Even though some of these font types are not currently used by the system, you should specify a font for each since Tyler will be using them in the near future.
With GUI printing, the printer font is set by Tyler for most reports, except in some cases when a preference for the report allows you to change the font on that specific report (such as TP invoices).
Font Adjustment
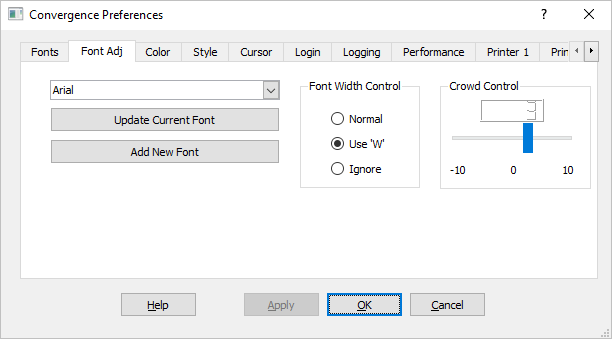
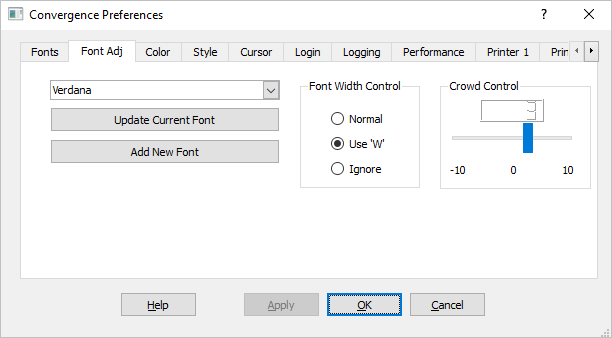
Click the Font Adj tab on the preference screen.
The preferences on this screen adjust the size and spacing of the text on Tyler screens and printouts for both GUI and non-GUI.
First you will need to add all fonts used on the Font tab to this screen.
To add a font:
- Click the Add New Font button.
- Select the font from the list. The font style and size are ignored. Make sure the Strikeout and Underline boxes are unchecked.
- Click OK.
- Click Update Current Font.
- Select an option in the Font Width Control box. These options control the width of the font. “W” allows the maximum font size and is the setting recommended by Tyler.
- Use the slider to specify a Crowd Control setting. Crowd Control is used to adjust the font to fit different size monitors (resolutions). This setting is especially useful when trying to fit a font to Tabs or Buttons. Tyler recommends setting Crowd Control to “4” when using the Verdana font. If you are using another font, experiment with the setting until you find one that works.
Style
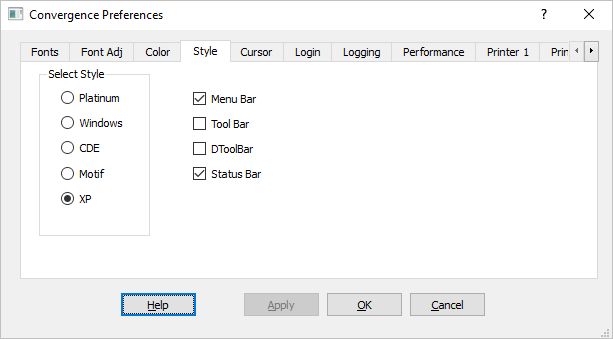
Click the Style tab on the preference screen.
In the Select Style box, click either Windows or XP. You will need to adjust these settings to work best for your system and personal preferences. Tyler has no recommendations for these preferences.
Invoice Preferences
Please view the ‘Setting Up Invoice Preferences‘ article for instructions on setting up these preferences.
GUI Invoice Activation
Before you can use GUI Printing for invoices, you must configure a number of settings in System File Management (30-01).
Activating GUI Printing for Long Method Invoice
On the first screen of System File Management, you will see the following prompt:
O/P INV (A,B,C, I, 1-9)
This is where you activate GUI printing for the Long Method Invoice, which is printed from Invoice Printing selection in Order Processing (02-08-13). Enter an “L” (for Form L) in this field. If you are on Tyler’s pre-release of 21.500, enter a “9” (for Form 9) in this field.
Configuring Each Terminal for GUI Invoice Printing
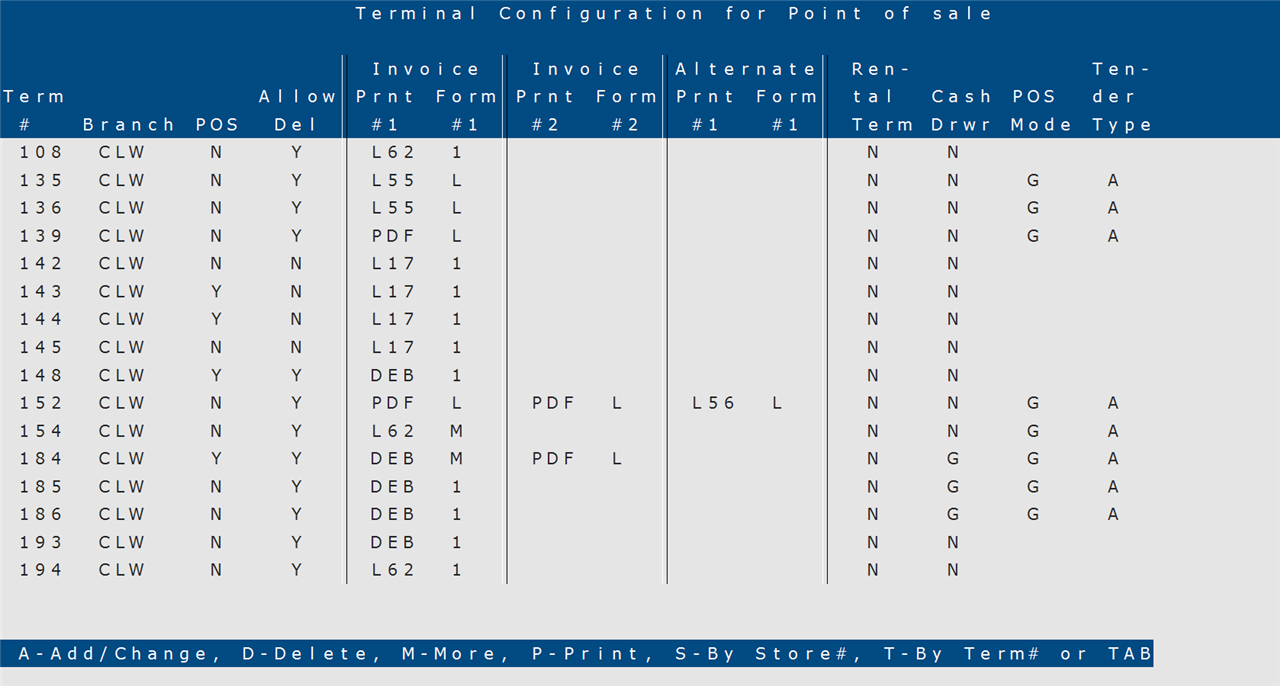
The second screen of this selection is used to set up invoice information for each terminal.
To activate GUI invoices for a specific terminal:
- Enter “A” at the prompt.
- In the Terminal # field, enter the terminal you want to add or change.
- Press Tab until you reach the Inv. Prntr #1 field. Enter the Printer ID for the Invoice 1 Printer.
- To print all invoices directly to a PDF, enter “PDF” in this field. If you choose this option, you must set up a download directory/folder for the PDF through the Company PDF Export Directory (30-04) selection or the Terminal PDF/Export Directory selection (30-05).
- In the Inv. Form #1 field (which corresponds to TP Printer 1), enter an “L.” If you are on Tyler’s pre-release of 21.500, enter a “9” in this field.
- If you are activating invoices for a second printer, tab to the Inv. Prntr #2 field (which corresponds to TP Printer 2) and repeat Step 3.
NOTE: Tyler recommends that you test the invoices on a back office terminal before activating them for the entire company.
GUI Printing Setup for A/R Statements
To access GUI Printer Preferences for A/R Statements:
- Go to AR Open Preferences (12-90).
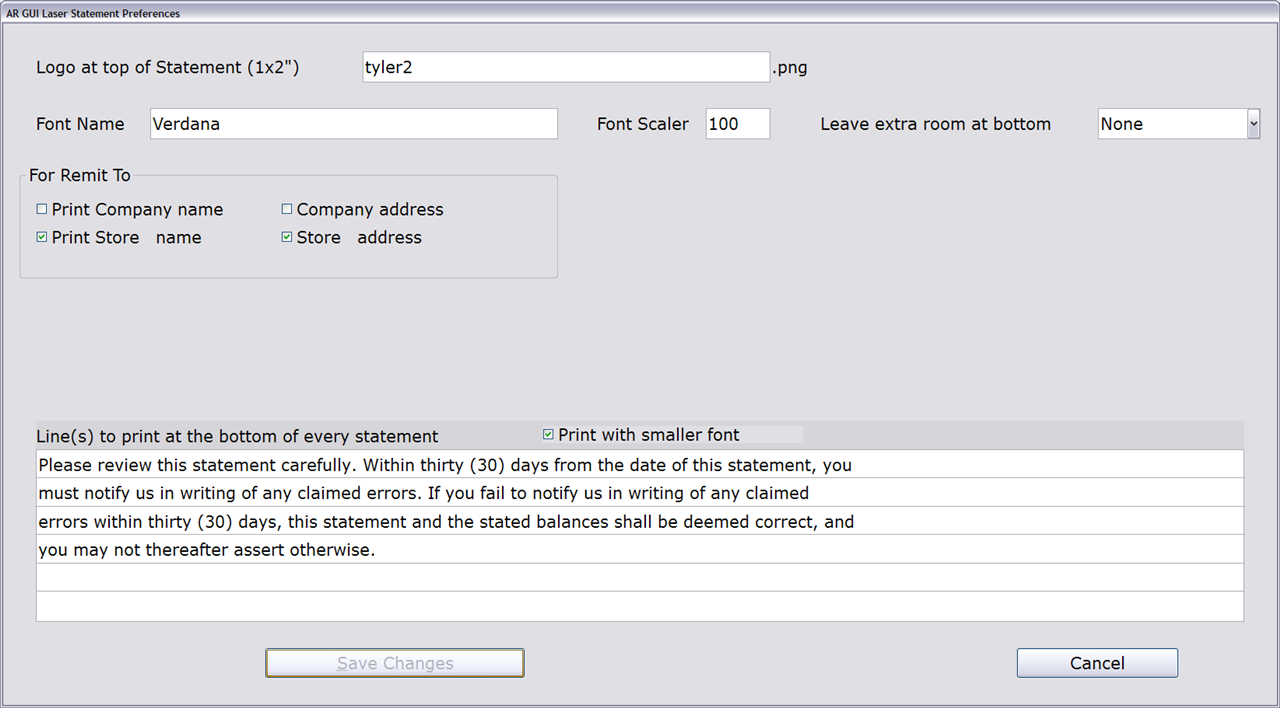
- Enter “Y” in Field 16, Print AR Statement on Laser Printer. The A/R Statements Preferences screen appears.
The following preferences are used to customize the appearance of GUI A/R Statements:
The default is Verdana. You can change it, but do so with caution. If the PC attached to the printer does not have the font or the font name is spelled differently (it’s case-sensitive) there will problems with the invoice print.If you notice that the font is printing too large or too small on the invoice or that the character spacing is too wide or too narrow, try adjusting the Font Scaler.
You can also try changing the Font Adj preferences on the Convergence setup screen. Please refer to the Convergence setup section of this document for more information.
Company Address
Print Store Name
Store Address
Print Company Name
Company Address
Print Store Name
Store Address
GUI Printing Setup for P/O Vendor and Warehouse Copy
The Vendor Copy and Warehouse Copy of the Purchase Order is now printed using GUI printing. In 21.500, a laser printer is required to print the Vendor and Warehouse Copy. Please note that no logos are printed on these audits and they are no longer viewable in a spooler.
The preferences for this print can be found on the last screen of P/O Preferences (04-90):
The default is Verdana. You can change it, but do so with caution. If the PC attached to the printer does not have the font or the font name is spelled differently (it’s case-sensitive) there will problems with the invoice print.If you notice that the font is printing too large or too small on the invoice or that the character spacing is too wide or too narrow, try adjusting the Font Scaler.
You can also try changing the Font Adj preferences on the Convergence setup screen. Please refer to the Convergence setup section of this document for more information.
If you are using a logo on the invoice or using paper with your company name already printed on it, leave this box unchecked (the logo and company name print in the same place).
Prints the P/O Bill To name in the upper left area of the invoice.
NOTE: You cannot print both the company name and bill to name on the invoice. You can print one or the other or choose to print no name on the invoice.
NOTE: This field is not available in the pre-release of 21.500.
Prints the P/O Bill To address in the upper left area of the invoice.
NOTE: You cannot print both the company address and bill to address on the invoice. You can print one or the other or choose to print no name on the invoice.
NOTE: This field is not available in the pre-release of 21.500.
One file for each P/O
One file for each run
Always Ask
When you choose to print the Vendor and/or Warehouse copy to a PDF file (by entering PDF at the Select Printer prompt), there are a three options to choose from:Select “One file for each P/O” and a separate PDF file is created for each purchase order in the Vendor and/or Warehouse copy run.
Select “One file for each run” and all purchase orders are included in one PDF file.
Select “Always ask” and the each time you run the Vendor and/or Warehouse Copy selection, the system will ask you if you want to create one PDF or separate PDFs.
Warehouse Copy
(Warehouse Copy)
(Warehouse Copy)
(Warehouse Copy)
(Warehouse Copy)
Vendor Copy
Barcode Setup for GUI Invoices
Installing the Barcode Fonts
- Download the barcode fonts (W39M.ttf and W39MC.ttf) from the Software page of this site.
NOTE: The required username and password are the same as those used to access the old ‘Clients Only’ section of the tylernet.com website. If you do not have this information, please contact us.
- Unzip the downloaded folder (‘barcode_fonts.zip’) by right-clicking on it and selecting Extract All.
- Click Extract on the next window.
- In the unzipped folder, select both fonts, right-click on them, and then click Install.

