How To: Setting Up Commission Preferences & Plans (02-90-01)
Overview
This selection is used to set up the preferences that control how commissions and spiffs are calculated and paid. Additionally, gross margin plans and stepped plans, along with plan groups are set up on this screen. Preferences for Commission Inquiry (02-28) are also specified here.
Table of Contents
Commissions Tab
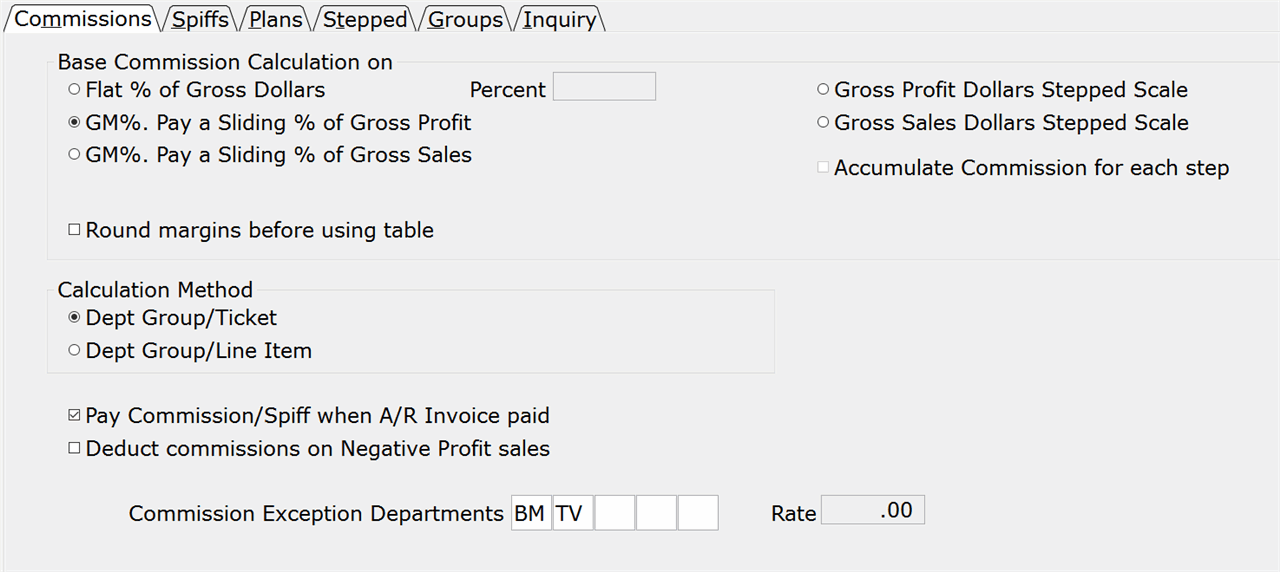
This tab is used to select the calculation methods for salesperson commissions.
Select this option to pay commissions on a set percentage of an employee’s gross sales dollars.
In the ‘Percent’ field to the right, enter the percentage for the commission calculation in ‘0.00’ format. For example, if the percentage is 7.5, enter “7.50” in the field.
GM% Pay a Sliding % of Gross Profit
Select this option to pay commissions on an employee’s gross profit using a sliding margin scale.
Use the ‘Calculation Method’ preference on this screen to specify whether items should be grouped by department before commissions are calculated.
Sliding margin scales are defined in commission plans, which are set up on the Plans tab. Each plan contains 12 groups, which are assigned to a department on Groups Tab.
GM% Pay a Sliding % of Gross Sales
Select this option to pay commissions on an employee’s gross sale amount by group using a sliding margin scale .
Use the ‘Calculation Method’ preference on this screen to specify whether items should be grouped by department before commissions are calculated.
Sliding margin scales are defined in commission plans, which are set up on the Plans tab. Each plan contains 12 groups, which are assigned to a department on Groups Tab.
Gross Profit Dollars Stepped Scale
Select this option to calculate commissions on an employee’s gross profit dollars using a stepped scale percent.
Stepped scale percentages are defined in a stepped commission plan, which is set up on the Stepped Tab of this screen.
Gross Sales Dollars Stepped Scale
Select this option to calculate commissions on an employee’s gross sales dollars using a stepped scale percent.
Stepped scale percentages are defined in a stepped commission plan, which is set up on the Stepped Tab of this screen.
Check this box and Stepped Scale commissions are calculated for each step (up to the Gross Profit/ Gross Sales Dollar amount) and then added together to arrive at the final commission amount. Please see the ‘Understanding Accumulate Commission…’ section on this page for more information.
NOTE: This is how Tyler has always calculated commissions.
Uncheck this box and the Gross Profit/Gross Sales dollar amount is multiplied by the rate for the corresponding step to arrive at the final commission amount.
EXAMPLE: If the Gross Profit/ Gross Sales dollar amount is $810, the system will first find the step (‘From Amount, To Amount’ range on the Stepped Scale tab) that this amount falls under. In this case, the step is ‘800-900,’ with a rate of 5.7. The dollar amount ($810) is then multiplied by the rate (5.7) to arrive at the commission dollar amount.
Uncheck this box and no change is made to the margin.
Select this option and the Commission Report will group the items on each transaction into their respective departments (using the settings on the Group Tab) before calculating commissions.
Dept Group/Line Item
Select this option and the Commission Report will calculate commissions on a line-by-line basis.
NOTE: When paying commissions on paid invoices (this preference is set to ‘Y’), remember to stay within a single payroll period when running Preparation for Reports. For example, if paying monthly, you might run commissions for the 1st through the 15th and the 15th through the 30th (or any other range in that month). However, you should never attempt to change the date range to include dates for a future month or prior month. Changing the date range to the next month should only occur after commissions for the current month have been processed. This will keep the unpaid prior month transactions in line. When the commission file is prepared for the next month, answer “Y” to the prompt, ‘Purge Commission Spiff File.’
Uncheck this box and the Commission Report will calculate commissions for Delivered Sales whether or not the A/R Open Invoice has been paid.
Uncheck this box and commissions will not be calculated on negative profit sales.
Enter up to 5, two-character departments for which commissions should be calculated on sales dollars using a flat percentage rate. All other departments will pay commissions using the method selected at the top of the screen.
In the ‘Rate’ field to the right, enter the percentage rate (in “0.00” format) that will be used to calculate commissions for the exception reports.
IMPORTANT: This option is not available if ‘Dept Group/Ticket’ is selected as the Calculation Method.
Understanding ‘Accumulate Commission for Each Step’
When the ‘Accumulate Commission for Each Step’ box is checked, Stepped Scale commissions are calculated for each step (up to the Gross Profit/ Gross Sales Dollar amount) and then added together to arrive at the final commission amount.
EXAMPLE:
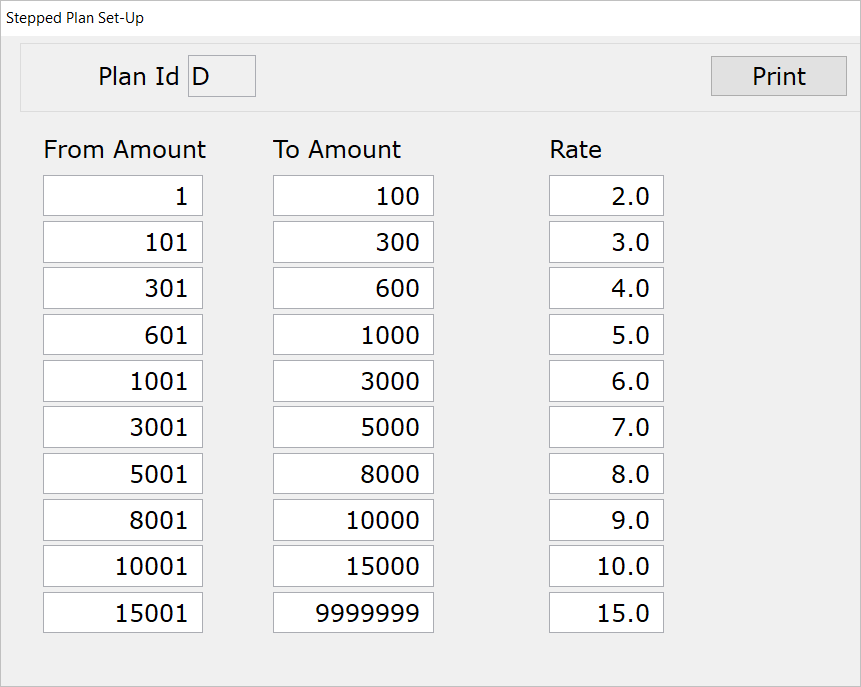
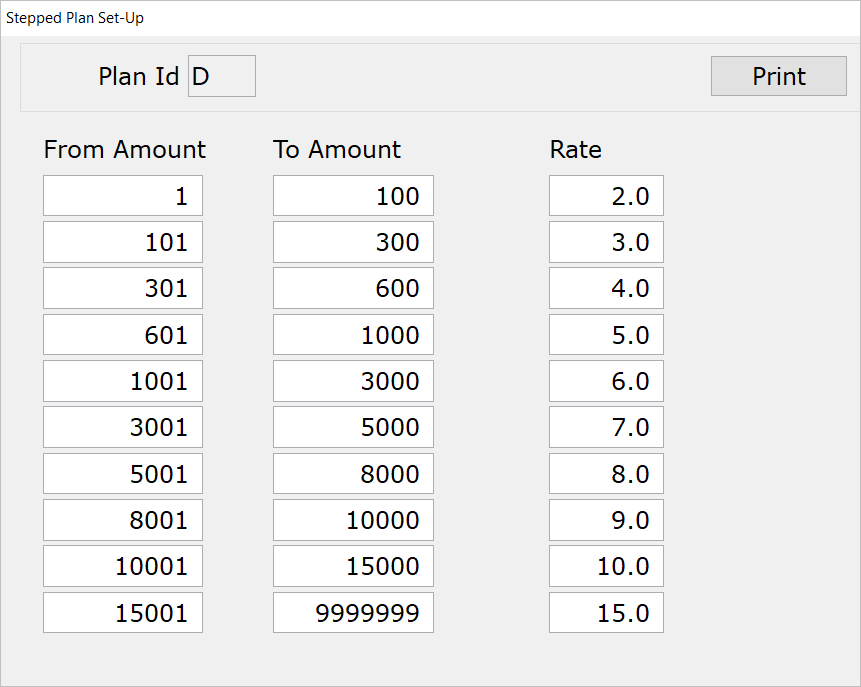
The Gross Sales dollar amount is $630. Using the table above, the system calculates commissions in the following way:
- The system starts with the To Amount for the first step, $100, and multiplies it by the rate for that step, 2.0.
- The From Amount for the next step, $101, is subtracted from the To Amount, $300, with a resulting amount of $199. This amount is then multiplied by the rate for the step, 3.0.
- The From Amount for the next step, $301, is subtracted from the To Amount, $600, with a resulting amount of $299. This amount is then multiplied by the rate for the step, 4.0.
- Since the Gross Sales dollar amount ($630) falls within the range of the next step (601-1000), this is the last step that is calculated. The system takes the From Amount, $601, and subtracts it from the Gross Sales dollar amount, $630. The resulting amount is $29, which is then multiplied by the rate for the step, 5.0.
- The amounts for each step are added together to arrive at the salesperson’s commission.
Spiffs Tab
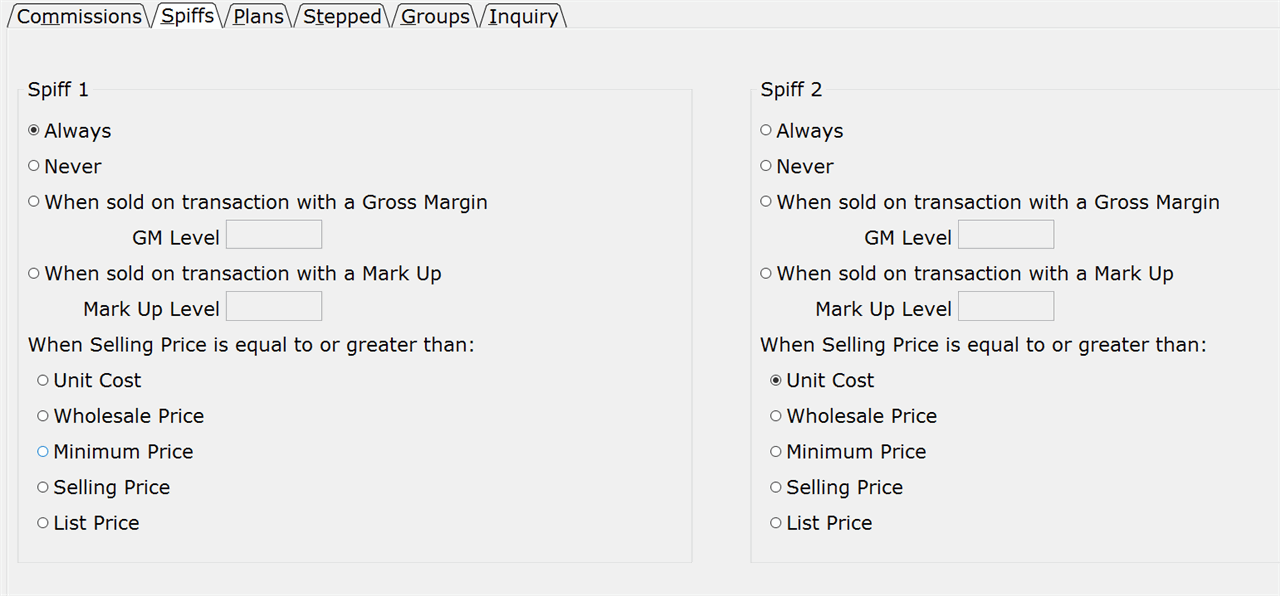
There are nine different ways to determine how and when regular spiffs (Spiff 1) and promotional spiffs (Spiff 2) should be paid. The options are the same for both types of spiffs, so the instructions are combined.
(Regular Spiff)
Spiff 2
(Promo Spiff)
Select this option and a spiff is paid on each sold item that had a spiff set up in the Inventory Master File (03-01) at the time of the sale.
Never
Select this option and a spiff is never paid on the sale of an item.
When sold on transaction with a Gross Margin
Select this option and a spiff is only paid when the transaction containing the item has a gross margin above a certain level.
The cursor moves to the ‘GM Level’ field. Enter the gross margin percentage (in “00.00%” format) that is required for the spiff to be paid.
For example, if the required gross margin is 25%, enter “25.00” in the field. Be careful because an entry of “25” will result in a required gross margin of 0.25%.
This preference applies to the entire sales staff. Any transaction which meets this gross margin level will always pay the spiff if the item had a spiff set up in the Inventory Master File at the time of the sale.
When sold on transaction with a Mark Up
Select this option and a spiff is only paid when the transaction containing the item has a markup above a certain level.
The cursor moves to the ‘Markup Level’ field. Enter the markup percent (in “00.00%” format) that is required for the spiff to be paid.
For example, if the required markup level is 35%, enter “35.00” in the field. Be careful because an entry of “35” will result in a required markup level of 0.35%.
Any transaction that meets this markup level will always pay the spiff if the item has a spiff set up in the Inventory Master File at the time of the sale.
When Selling Price is equal to or greater than:
Unit Cost
Select this option and a spiff is only paid if the item’s Selling Price on the transaction is equal to or greater than its Unit Cost, as set up in the Inventory Master File (Field 14) at the time of the sale.
Wholesale Price
Select this option and a spiff is only paid if the item’s Selling Price on the transaction is equal to or greater than its Wholesale Price, as set up in Inventory Master File (Field 16) at time of the sale.
Minimum Price
Select this option and a spiff is only paid if the item’s Selling Price on the transaction is equal to or greater than its Minimum Selling Price, as set up in Inventory Master File (Field 17) at time of the sale.
Selling Price
Select this option and a spiff is only paid if the item’s Selling Price on the transaction is equal to or greater than its Selling Price, as set up in the Inventory Master File (Field 18) at the time of the sale.
List Price
Select this option and a spiff is only paid if the item’s Selling Price on the transaction is equal to or greater than its List Price, as set up in the Inventory Master File (Field 19) at the time of the sale.
Plans Tab
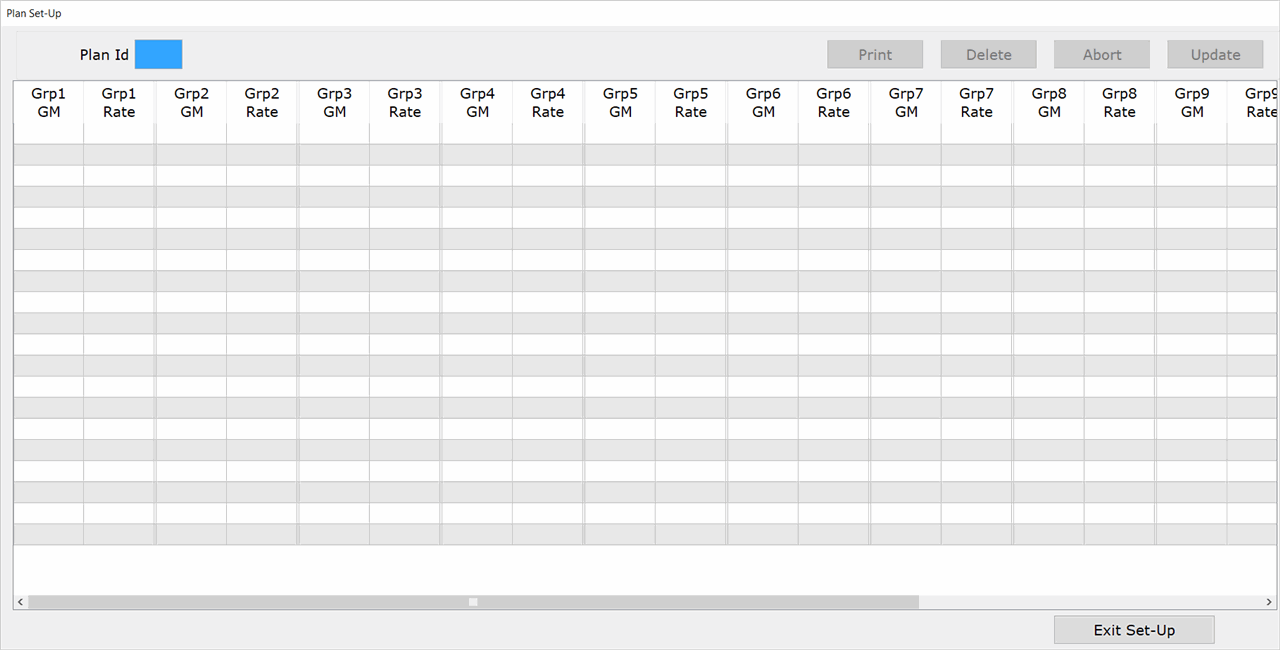
This tab is used to set up and maintain commission plans when paying commissions using a sliding scale of gross margin.
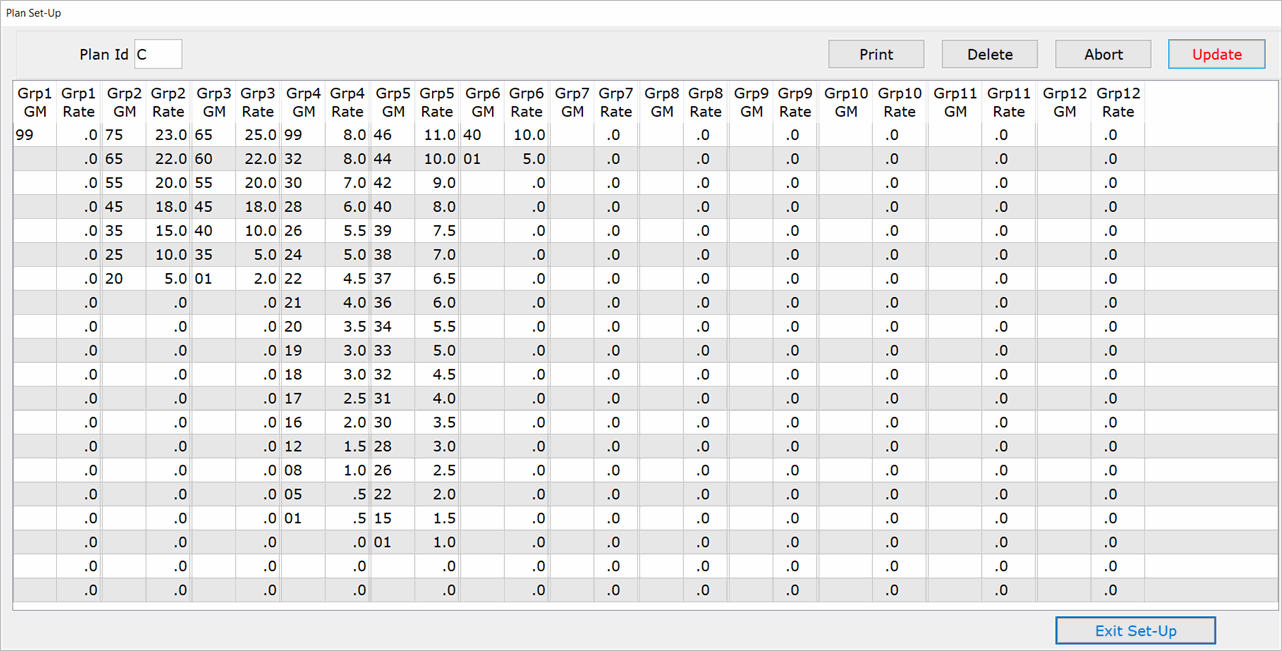
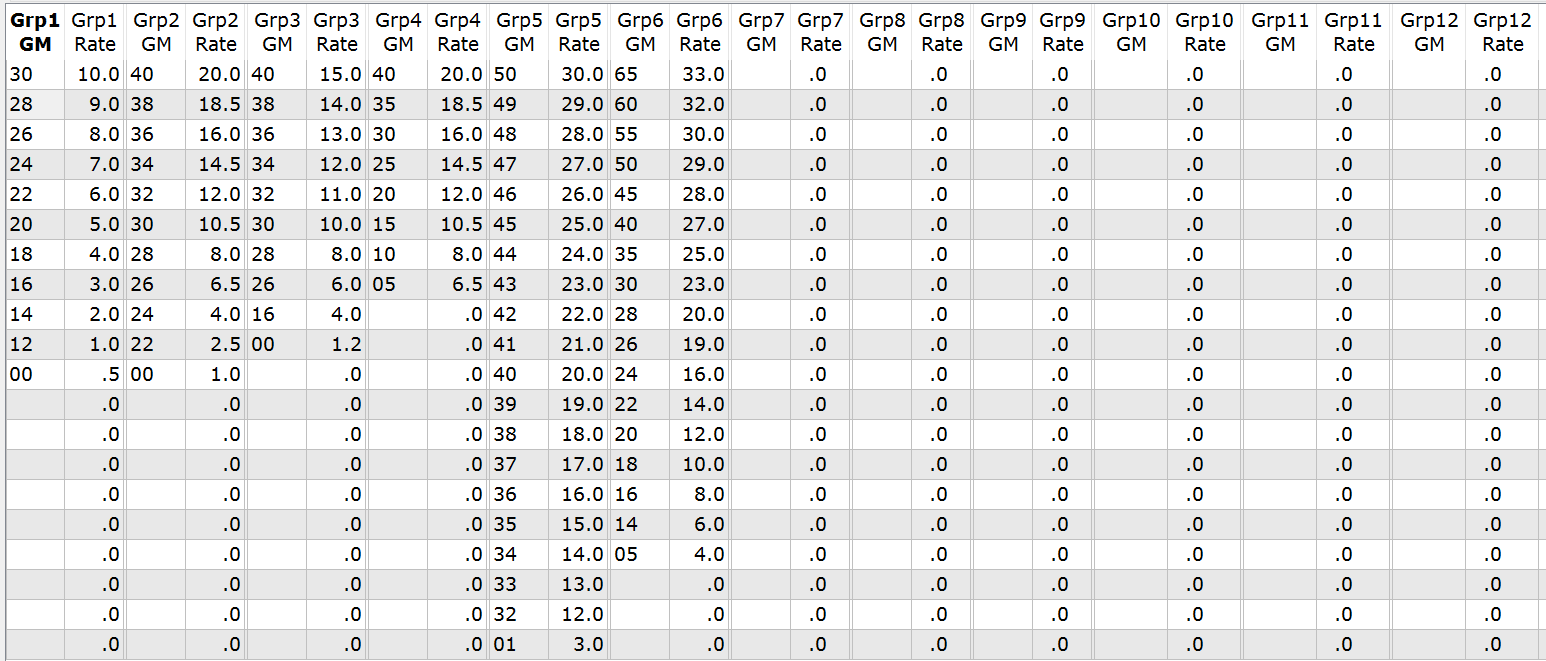
Using the plan set up in the above screenshot, when selling items assigned to Group 4, a salesperson will earn a 6% commission of the gross profit/gross sale on a transaction that has a gross margin between 28% and 29.99%. On a sale that has a gross margin between 30% and 31.99%, he will earn a 7% commission of the gross profit/gross sale.
Special Notes
- Employees are assigned to a commission plan in Field 25 (Commission Plan) of Employee Master Maintenance (10-20).
- If Field 24 (Sales Analysis Kept) in Emp. Master Maint (10-20) is set to ‘Y,’ then you should assign the employee to a commission plan. If they are not assigned to a commission plan, the default plan ‘?’ will be used for the salesperson.
- If there are no departments assigned to a specific group on the Groups Tab, that group can be left blank in this selection.
- Commission Plan “?” is the default plan and should be set up in the company’s favor.
Setting Up a Gross Margin Commission Plan
This tutorial describes how to set up a commission plan when calculating commissions using a sliding scale of gross margin.
- In the ‘Plan ID’ field, enter a one-character alphanumeric identifier for the commission plan.
- If you enter an existing ID, the information for the plan appears.
- Remember that the default plan has Commission ID of ‘?.’
- Click inside the field in the upper-left corner of the Plan Table (‘GRP1 GM’).
- Enter a gross margin breakpoint, beginning with the highest breakpoint (e.g. 99).
- In the ‘GRP1 Rate’ field, enter a commission rate for the breakpoint.
- Repeat steps 2-3 until all breakpoints have been set up. Breakpoints should be set up in descending order as you move down the table.
IMPORTANT: You do not have to set up gross margins for all 20 lines. However, you cannot leave a blank line between two Gross Margins in the same group.NOTE: While it is required that breakpoints are set up in descending order, they do not have to be sequential. For example you could set up a breakpoint for 45, 43, 41, and then skip to 36 if desired.
- At the top of the screen you have five options:
- Click ‘Update’ to save changes to the plan. The current plan closes, but the window remains open.
- The ‘Update’ text appears in red when there are changes to save.
- Click ‘Exit Set-Up’ to close the Plan Set-Up window.
NOTE: Changes are not saved unless the ‘Update’ button is clicked first.
- Click ‘Abort’ to cancel any changes to the plan and leave the Plan Set-Up window open.
- Click ‘Print’ to print the information that is displayed on the screen.
- Click ‘Delete’ to permanently delete the plan.
Stepped Tab
This tab is used to set up stepped plans when calculating commissions using a stepped scale of gross profit dollars or a stepped scale of gross sales dollars.
Special Notes
- Employees are assigned to a commission plan in Field 25 of Employee Master Maintenance (10-20).
- If the field ‘Sales Analysis Kept’ in Emp. Master Maint (10-20) is set to ‘Y,’ then you should assign the employee to a commission plan. If they are not assigned to a commission plan, the default plan ‘?’ will be used for the salesperson.
- If there are no departments assigned to a specific group on the Groups Tab, that group can be left blank in this selection.
- Commission Plan “?” is the default plan and should be set up in the company’s favor.
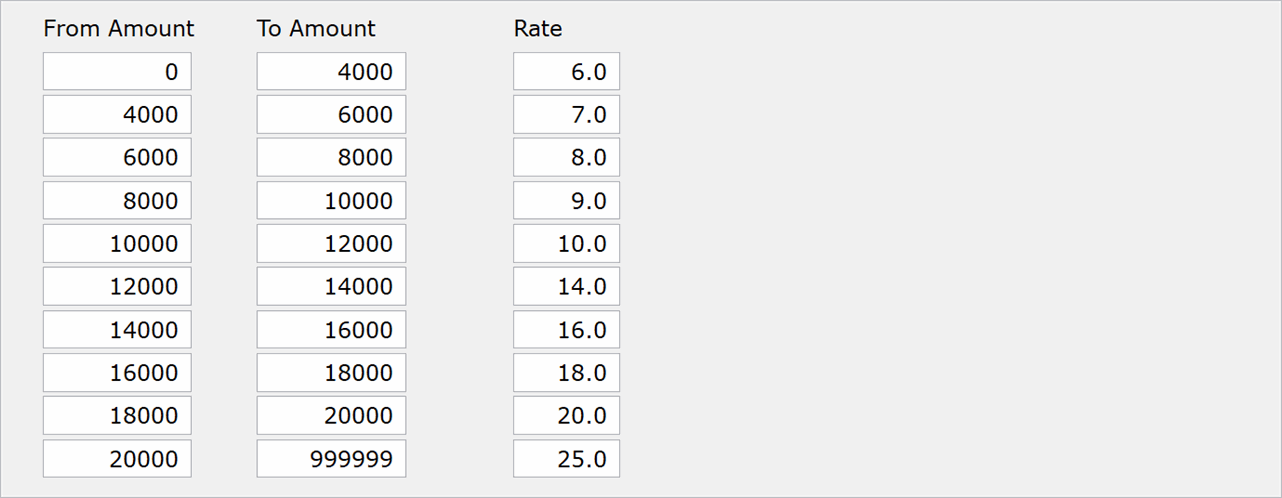
Using the plan set up in the above screenshot, a salesperson will earn 6% commission for the first 4000.00 of their gross profit, 7% commission for a gross profit of from 4,000 to 6,000, 8% commission for a gross profit from 6,000 to 8,000, and so on.
Example:
A salesperson’s total profit (not the line profit or transaction profit) is $15161.04.
Using the plan in the above screenshot:
The first $4000.00 of profit earns a 6% commission totaling $240.00.
The next $2000.00 of profit earns a 7% commission totaling $140.00.
The next $2000.00 of profit earns an 8% commission totaling $160.00.
The next $2000.00 of profit earns a 9% commission totaling $180.00.
The next $2000.00 of profit earns a 10% commission totaling $200.00.
The next $2000.00 of profit earns a 14% commission totaling $280.00.
The total commission earned for the first six levels of the table is $1200.00.
Since the total profit ($15161.04) falls between the 14,000 and 16,000 level in the table, the lower range for this level (14,000) is subtracted from the total profit. The resulting amount is $1161.04. A commission rate of 16% is then calculated for this amount, resulting in a total of $185.77.
This amount, $185.77, is then added to the total of the first six levels ($1200.00) to arrive at a total earned commission of $1385.77 for the salesperson.
Setting Up a Stepped Scale Commission Plan
This tutorial describes how to set up commission plans when calculating commissions using a stepped scale of gross profit dollars or a stepped scale of gross sales dollars.
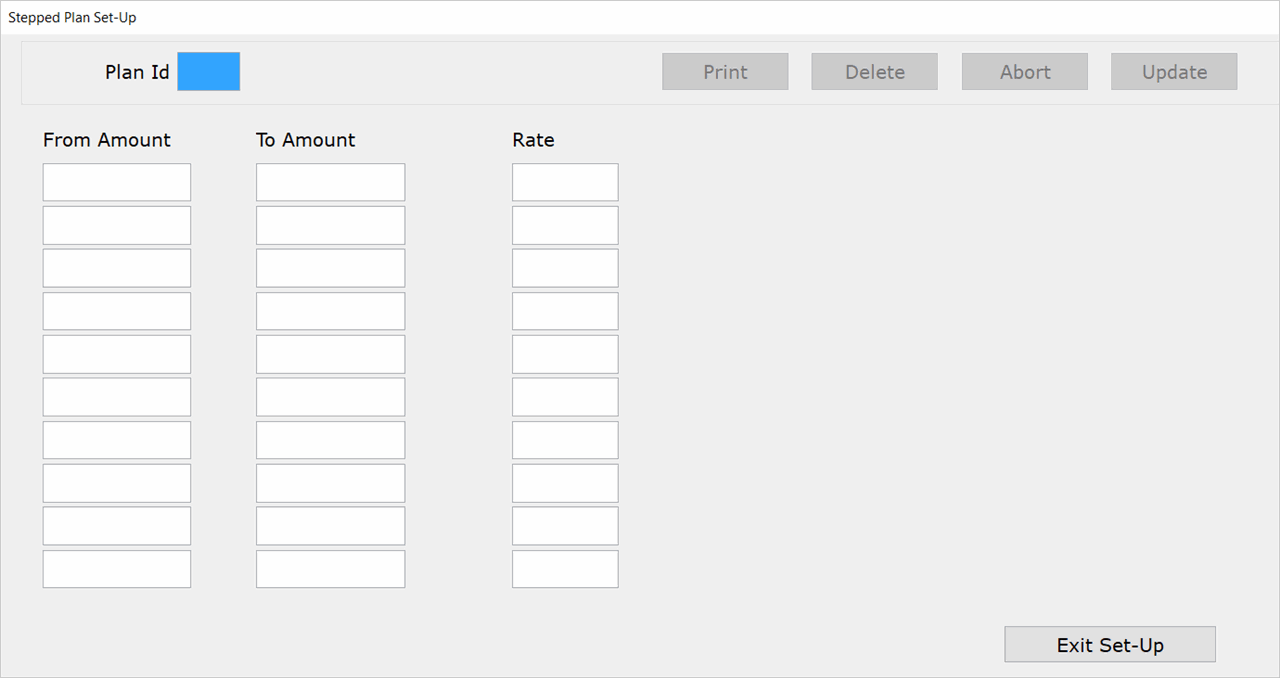
- Enter a one-character alphanumeric identifier for this commission plan. The cursor automatically moves to the ‘From Amount’ profit column in the first row.
- If you enter an existing ID, the information for the plan appears.
- Remember that the default plan has Commission ID of ‘?.’
- Enter the ‘From Amount’ (profit dollar amount) for the first row.
NOTE: The ‘From Amount’ in the first row should be ‘0’ (zero).
- Enter the ‘To Amount’ (breakpoint) for the first row.
- In the ‘Rate’ field on the first row, enter the commission percentage that will be paid for this profit dollar range.
For example, if you enter “4.0” in this field and the From and To amount range is ‘0 to 2000,’ the commission amount for the first $2000 of the salesperson’s gross profit will be calculating using a rate of 4%.
- In the ‘From Amount’ field on the next row, enter the low range of the profit dollar amount for the row.
- In the ‘To Amount’ field on the next row, enter the high range of the profit dollar amount for the row.
- In the ‘Rate’ field on the next row, enter the commission percentage that will be paid for this profit dollar range.
- At the top of the screen you have five options:
- Click ‘Update’ to save changes to the plan. The current plan closes, but the window remains open.
- The ‘Update’ text appears in red when there are changes to save.
- Click ‘Exit Set-Up’ to close the Plan Set-Up window.
NOTE: Changes are not saved unless the ‘Update’ button is clicked first.
- Click ‘Abort’ to cancel any changes to the plan and leave the Plan Set-Up window open.
- Click ‘Print’ to print the information that is displayed on the screen.
- Click ‘Delete’ to permanently delete the plan.
Groups Tab
This tab is used to assign each department in your company to one of twelve groups within a commission plan. We recommend that items with a similar gross margin, that pay a similar commission percent, be assigned to the same group.
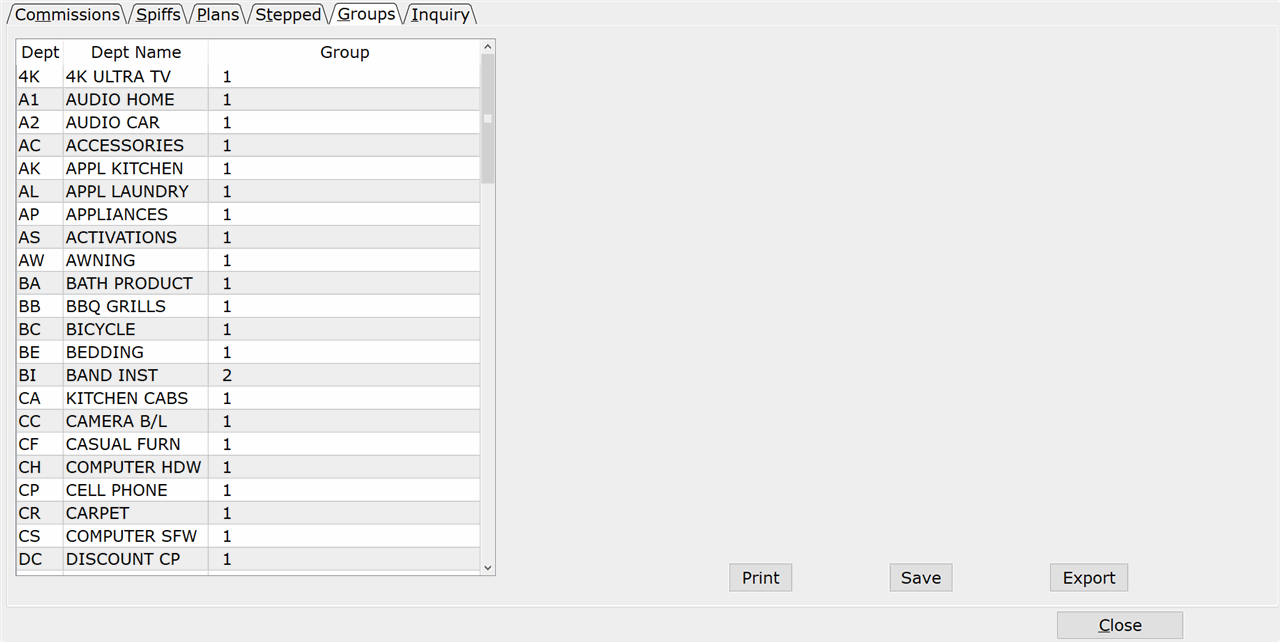
All departments in your company appear on this screen and by default they are assigned to Group 1, which is normally set up to not pay commission and is the default group used by a Special Order (SO) transaction. This should be taken into consideration when setting up your commission plans.
Assigning a Department to a Group
All departments in your company appear on this screen and by default are assigned to Group 1.
- Click inside the ‘Group’ field next to the department for which the default group is being changed.
- Enter a group number (1-12) to assign to the department.
- Click ‘Save.’
- Click the ‘Print’ button to print a group listing to a physical printer or spooler (optional).
- Click the ‘Export’ button to open the listing directly in Excel and also save it to your computer (optional).
NOTE: You must have a ‘Sales Transactions’ folder specified in Company PDF/Export Directory (30-04) or By Term PDF/Export Directory (30-05) in order for the report to open correctly in Excel.
Inquiry Tab
This tab is used to set up the preferences for the Commission Inquiry selection (02-28).
The ‘Manager’s Job Class Code’ fields at the bottom of this tab are used to identify managers. View the description for that field for more information.
The ‘Manager’s Job Class Code’ fields at the bottom of this tab are used to identify managers. View the description for that field for more information.
This field is used in conjunction with the ‘Manager can see all Salesman’ settings on this screen that allows managers to inquiry on all salespeople in the Commission Inquiry selection, even if non-manager employees are not allowed to.
Job Class Codes are user-defined codes (up to 5 characters) that are assigned to employees in Field 12 of Employee Master Maintenance (10-20).
