Overview
With the 21.500 release, Tyler has added a number of new invoice preferences, giving you more flexibility and increased control over the information that prints on your invoices. This documentation shows you how to set up those preferences.
NOTE: In order for the Invoice Preferences to display correctly, your screen resolution must be set to 1280 x 1024 pixels or higher.
A Note About Logos
Logos are a licensed option and are stored as graphics files (.png) on your network. They can include photos or informational text such as store locations, hours, and/or return policies. You can use one logo for you entire company or use different logos for each region or branch.
To begin using the logo feature, contact your marketing representative at Tyler. They will happily provide you with all the information you need to get started.
Table of Contents
Accessing Invoice Preferences
The Invoice preferences screen includes settings for both GUI and Non-GUI Invoices.
To access the Invoice Preference screen:
- Go to the Invoice Preferences selection on Sales Transactions Preference Processing Menu (02-18-16).
- The preference screen appears. You will notice a number of tabs across the top of the screen. The first tab is General Preferences, which are preferences that apply to all invoices. The rest of the tabs are preferences for a specific type of invoice.
Let’s take a look at the General Preferences first.
General Preferences
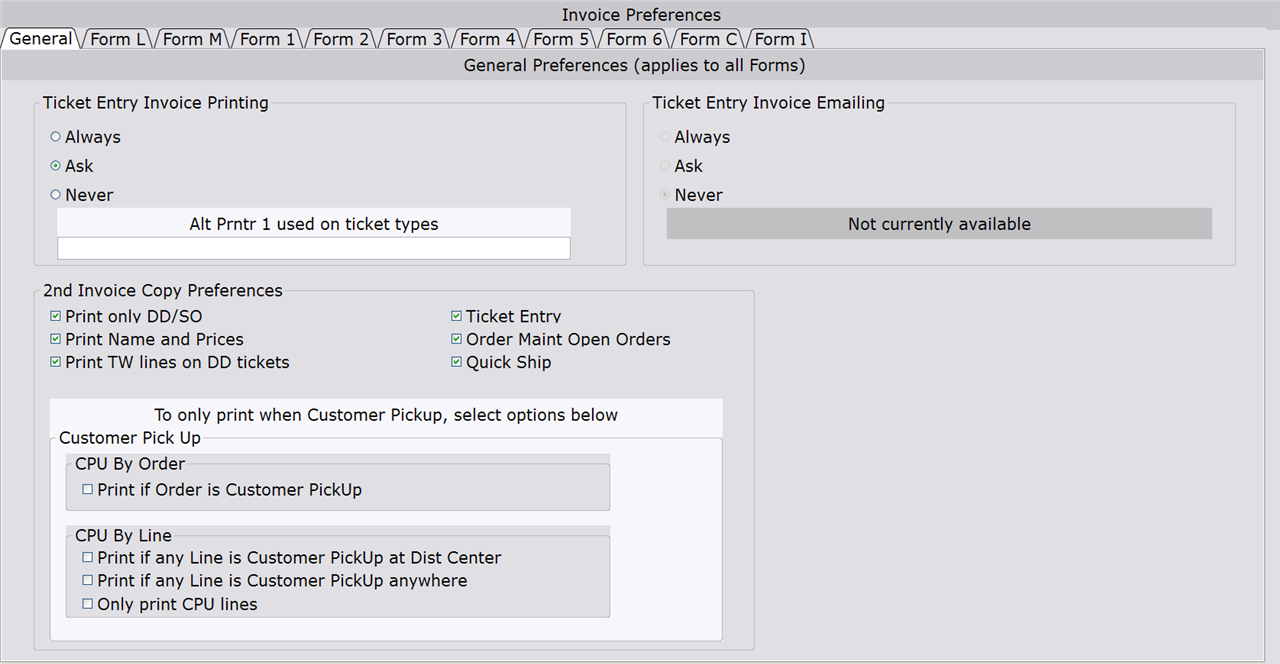
Click image to enlarge.
The following preferences apply to all invoices (GUI and Non-GUI):
Ticket Entry Invoice Printing
Always
Ask
Never
Select ‘Always’ and the invoice will always print after you enter the payment information for the transaction.
Select Ask’ and the Print Invoice box appears after entering the payment information. There you can decide whether to print or not print the invoice. If your company uses No Shop Invoices, select this option.
Select ‘Never’ and once you enter the payment information the transaction completes without printing the invoice.
Alt Prntr 1 used on Ticket Types
Enter the transaction type(s), separated by a comma, that you want to print to Alternate Printer #1 (e.g. TW, DD, ML, SO, etc.).
Before using this option, you must set up Alternate Printer #1 in System File Management (30-01).
NOTE: At this time, only invoices printed through POS Entry (02-02) can be sent to Alternate Printer #1.
Ticket Entry Invoice Emailing
Always
Ask
Never
This option is not available at this time.
2nd Invoice Copy Preferences
You have the choice of printing second invoices in:
- POS Entry (02-02)
- Order Maintenance: Open Orders Only (02-08-02)
- Quick Ship (02-08-03)
Second invoices do not print in:
- Transaction Inquiry (02-15), (02-16)
- Picking/Packing Sheet Print (02-08-10)
- Invoice Printing (02-08-13)
- Recurring Charges (02-52)
Print Only DD/SO
Check this box if only “DD” or “SO” Transactions are to be printed to a second printer.
The Inv. Prntr #2 and Inv. Form #2 fields must be set up in System File Management for each terminal that is to print a second invoice.
If this box is unchecked, all transaction types will be printed to the second printer.
Print Names and Prices
Check this box if you want to include the Bill To and Ship To names and all prices (line prices, totals, etc.) on the second invoice.
Print TW lines on DD Tickets
Check this box to print Take With lines (‘Ship’ box is checked in POS Entry) on a Delayed Delivery Order on the second invoice.
Ticket Entry
Check this box to include the second invoice when printing an invoice in POS Entry.
Order Maint Open Orders
Check this box to include the second invoice when printing an invoice for open orders in Order Maintenance (02-08-02).
If this box is checked and a second invoice printer is assigned to the terminal in System File Management (30-01), the second invoice automatically prints to the assigned printer. If a second invoice printer is not assigned, you will need to specify the printer ID and check the ‘Print’ box (on the Invoice Print window) to print the second invoice.
If this box is not checked and a second invoice printer is assigned to the terminal, the assigned printer ID appears on the Invoice Print window in Order Maintenance. You can change the printer ID or choose not to include the second invoice by unchecking the ‘Print’ box. If this box is not checked and a second invoice printer is not assigned, you will need to specify the printer ID and check the ‘Print’ box to print the second invoice.
Quick Ship
Check this box to include the second invoice when printing an invoice in Quick Ship (02-08-03).
Customer Pick Up
Use the following preferences if second invoices should only print for orders designated as Customer Pickup (CPU) or for orders that contain individual lines designated as Customer Pickup.
To designate an entire order as Customer Pickup, check the ‘Customer Pickup’ box on the Customer tab.
To designate an individual line as Customer Pickup, enter “CPUCPU” in the ‘Delivery Date’ field on the Detail tab.
IMPORTANT: The ‘Allow Multiple Delivery Dates Per Order’ preference must be set to ‘Y’ in Order Preferences (02-08-90-01) or the ‘Delivery Date’ field does not display on the POS Entry screen.
Print if Order is Customer Pickup
Check this box and the second invoice is only printed for orders that are designated as Customer Pickup (the Customer Pickup box is checked on the POS Entry Customer tab or the Order Maintenance Routing Tab).
NOTE: If this box is checked, second invoices for orders that have individual lines set as Customer Pickup also print, based on the ‘CPU By Line’ preferences below.
Print if any line is Customer Pickup at Dist Center
Check this box and the second invoice is only printed if one or more lines on the invoice are designated as Customer Pickup from the Distribution Center (‘CPUCPU’ is entered in the ‘Delivery Date’ field on the Detail tab of POS Entry).
NOTE: If this box and the ‘Print if Order is Customer Pickup’ box is checked, second invoices for orders designated as CPU also print.
Print if any line is Customer PickUp anywhere
Check this box and the second invoice is only printed if one or more lines on the invoice are designated as Customer Pickup from any branch (‘CPUCPU’ is entered in the ‘Delivery Date’ field on the Detail tab of POS Entry).
NOTE: If this box and the ‘Print if Order is Customer Pickup’ box is checked, second invoices for orders designated as CPU also print.
Only print CPU lines
Prints only the lines designated as Customer Pickup (CPU) on the invoice. Lines with an actual date in the ‘Delivery Date’ field on the Detail tab are excluded from the print.
NOTE: For orders designated as Customer Pickup, if this box is checked and the ‘Print if Order is Customer Pickup’ box is also checked, all lines print on the invoice, regardless of whether any individual lines are designated as CPU or not.
Form L
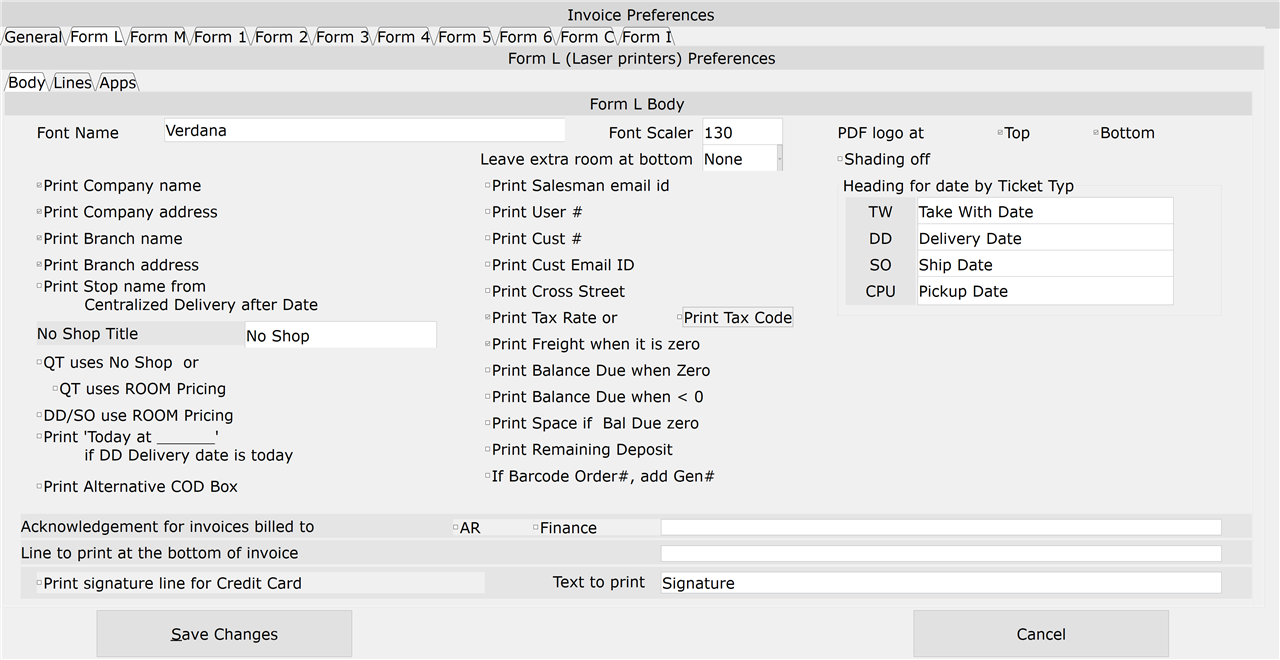
Click image to enlarge.
This screen is used to set up the General Preferences that apply to all Form L laser invoices:
Body Tab
Font Name
The default is Verdana. You can change it, but do so with caution. If the PC attached to the printer does not have the font or the font name is spelled differently (it’s case-sensitive) there will problems with the invoice print.
If you notice that the font is printing too large or too small on the invoice or that the character spacing is too wide or too narrow, try adjusting the Font Scaler. You can also try changing the Font Preferences on the Convergence setup screen. Please refer to the Convergence setup section of this document for more information.
Font Scaler
The font scaler makes all of the text on the invoice proportionally smaller or larger.
The default setting is 130% (for the Verdana font). You may need to adjust this setting to work with your system.
Leave extra room at bottom
This is the amount of white space that appears at the bottom of the page. Select None, Half Inch, or Quarter Inch.
PDF logo at (Top, Bottom)
Check the Top Logo and/or Bottom Logo box if you want the logo(s) to print on the PDF copy of the invoice. Including the logos in a PDF file drastically increases the file size (15K without vs. 1746K with), which can cause a number of problems, especially when trying to email the file.
Shading Off
Check this box and the field titles on the invoice print in white instead of gray. This is useful if you will be faxing the invoice.
Print Company Name
Prints the company name in the upper left corner of the invoice.
If you are using a logo on the invoice or using paper with your company name already printed on it, leave this box unchecked (the logo and company name print in the same place).
Print Company Address
Check this box to print the company address in the upper left corner of the invoice.
If you are using a logo on the invoice or using paper with your company name already printed on it, leave this box unchecked (the logo and company address print in the same place).
Print Branch Name
Prints the branch name in the top-center area of the invoice.
If you are using paper with the branch already printed on it, leave this box unchecked.
Print Branch Address
Check this box to print the branch address in the top-center area of the invoice.
If you are using paper with the branch address already printed on it, leave this box unchecked.
Print Stop Name from Centralized Delivery after Date
Prints the Centralized Delivery Stop Name to the right of the delivery date if the order is scheduled to a route.
For unscheduled orders, consolidated orders, orders not in the scheduler, or in cases where Centralized Delivery is not used with Order Processing, the Stop Name does not print.
If you are using RouteSmith or RouteView (licensed options), the Stop Name prints on the Packing Sheet and the Long Method Invoice.
No Shop Title
Enter the title for the checkbox that allows you to print No Shop Invoices from the Print Invoice window in POS Entry and Order Maintenance.
No Shop Invoices print a more generic description for items on the invoice, making it difficult for a customer to shop around for better prices. This generic item description is set up in the Second Description field of the Inventory Master Inq/Maint selection (03-01) for each item.
NOTE: The ‘Ticket Entry Invoice Printing’ preference on the ‘General Tab’ must be set to ‘Ask’ if you want to print No Shop Invoices.
NOTE: If this field is left blank, you cannot print No Shop Invoices through POS Entry and Order Maintenance (the checkbox will not appear on the Print Invoice window).
QT uses No Shop
Choose this option and for Quote Tickets, the No Shop box is checked by default.
QT uses ROOM Pricing
Select this option and prices on a Quote Ticket are totaled by room and do not appear on individual lines. Items that are not assigned to a room are totaled in the ‘Not Assigned’ category.
DD/SO use ROOM Pricing
Check this box and prices on a Delayed Delivery/Special Order transaction are totaled by room and do not appear on individual lines. Items that are not assigned to a room are totaled in the ‘Not Assigned’ category.
Print ‘Today at ____’ if DD Delivery Date is today
Check this box to print the text “Today at ________” on the invoice. The blank line allows the salesperson to write the time of today’s expected delivery on the invoice.
This preference is used by “We Deliver Same Day” businesses and only prints on the invoice if the delivery date is the same as today’s date.
Print Alternative COD Box
Check this box to print a smaller and wider version of the COD box.
Print Salesman Email ID
Check this box to print each salesperson’s email address on the invoice. Email addresses are set up in Emp. Master Maintenance (10-20).
Print User #
Prints the Salesperson’s User ID on the invoice.
Print Cust #
Prints the Customer Number in the upper right part of the invoice.
Print Cust Email ID
Check this box to print the customer’s email address (if there is one) on the invoice.
If the Bill To and Ship To customer are the same, only one email address prints. If the Bill To and Ship To are different, the email address for each customer prints.
Print Cross Street
Prints the Cross Street from the customer’s master file on the invoice.
Print Tax Rate
or
Print Tax Code
Check the ‘Print Tax Rate’ box to display the Tax Rate in the Sales Tax box at the bottom of the invoice.
Check the ‘Print Tax Code’ box to display the Tax Code in the Sales Tax box at the bottom of the invoice.
NOTE: You can only select one of these options. The ‘Save Changes’ option will not work if both boxes are checked.
REMEMBER: Tax rates and codes are set up in Sales Tax Table Entry (30-02-04).
Print Freight when it is zero
Prints the Freight field, even when the amount is zero.
Print Balance Due when Zero
Check this box to print $0.00 on the Balance Due line when the Balance due is less than or equal to zero.
“Balance Due” does not print for transactions paid with an A/R Open account. Access the customer’s account in A/R to view the balance.
Print Balance Due when<0
Prints the Balance Due as a negative number (instead of $0.00) when the Balance Due is less than zero.
“Balance Due” does not print for transactions paid with an A/R Open account. Access the customer’s account in A/R to view the balance.
Print Space if Bal Due zero
If you have the Print Balance Due when Zero box checked, check this box to print spaces on the invoice instead of $0.00.
“Balance Due” does not print for transactions paid with an A/R Open account. Access the customer’s account in A/R to view the balance.
Print Remaining Deposit
Prints the deposit applied toward the order and the deposit amount that is remaining.
If Barcode Order#, add Gen#
Check this box and if you are printing the order number as a barcode (the BarcodeOrder# box is checked on the TP Printer 1 and/or TP Printer 2 Form L Apps preferences screen), the generation number from the order is also included in the barcode. (e.g. AA0AAB-0, AA0AAB-1).
Heading for Date by Ticket Type: (TW, DD, SO, CPU)
These four fields allow you to create custom titles for the Delivery Date field on the invoice.
You can specify separate titles for Take With, Delayed Delivery and Special Orders along with a custom title for Customer Pickup orders.
Acknowledgement for invoices billed to (AR, Finance)
If your company requires an authorization signature for transactions paid with an AR and/or Finance account, check the respective boxes.
In the empty box to the right of AR and Finance check boxes, enter the text that should appear to the left of the signature line on the invoice. If the box is left blank, no text prints next to the signature line.
Line to print at the bottom of the invoice
This field allows you to add custom text that will be printed at the bottom of all invoices (below the credit card signature line, if one is being printed).
This line is supplemental and does not affect any message lines already set up in the Message Line On Invoice selection (02-18-09).
Print signature line for Credit Card
Check this box and on transactions that contain a credit card payment, a blank line prints at the bottom of the invoice for the customer’s signature.
If there is an entry in the ‘Line to print at bottom of invoice’ field, the credit card signature line prints above that line.
Text to print
Enter the text that will print to the left of the credit card signature line. If this field is left blank, ‘Customer Signature’ is printed next to the signature line.
This preference is only applicable if the ‘Print signature line for Credit Card’ option is checked.
Lines Tab
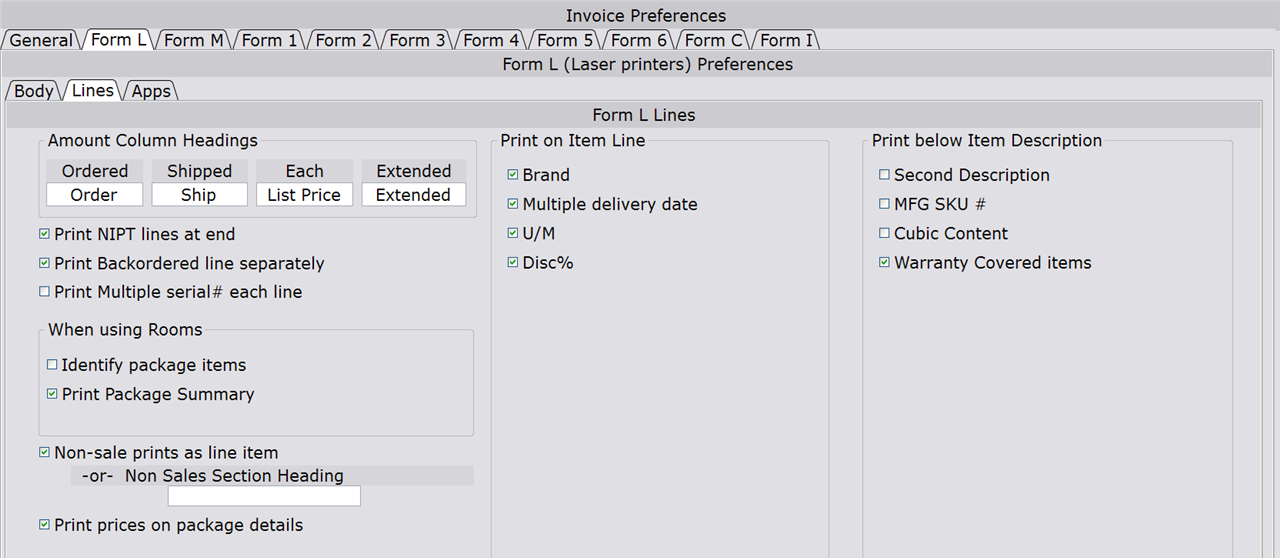
Click image to enlarge.
Amount Column Headings (Ordered, Shipped, Each, Extended)
These four fields allow you to create your own titles for the amount columns on the invoice.
If you decide to create new titles for these fields, you might have to adjust them to fit into the allocated space on the invoice.
Print NIPT lines at end
Check this box to print Non-Inventory Product Type items below the last non-package item on the invoice.
Print Backordered line separately
Prints backordered detail lines in a separate section on the invoice (Long Method Invoices Only).
Print Multiple serial# each line
This preference is designed to shorten the length of invoices that contain multiple quantities of serial number items.
Check this box and when multiple quantities of a serial number item are ordered, up to three serial numbers will print on the same line.
If this box is unchecked, a new item line (item number, description, price, etc.) is printed for each serial number.
IMPORTANT: If rooms are specified on the invoice, this preference is ignored, and multiple quantity serial numbers are automatically printed on individual lines.
Non-sale prints as line item
Check this box to print non-sale, non-inventory items (product type begins with ‘@’ and ends with ‘%’) the same as regular inventory items.
If this box is not checked, the product type description prints below the regular inventory lines without the item number.
Non Sales Section Heading
Specify a title to print on the invoice to distinguish the non-sale, non-inventory items from the regular inventory items.
This box is only used when the Non-sale Prints as Line Item preference is unchecked.
Print Prices on Package Details
Check this box to print the prices of items in a package on the invoice. The total price of the package does not print.
Uncheck this box and only the total price of the package prints.
NOTE: If the ‘Print Detail Lines of Packages on Invoice’ prompt in System File Management (30-01) is set to N, the total price of the package prints on the invoice regardless of how this preference is set.
When Using Rooms
The following two preferences only apply when package items are assigned to a room.
Identify package items
Check this box and ‘*’ along with the number of the package prints to the right of package items on the invoice. (i.e. ‘*2’ would indicate that the item is part of package “2”).
Print Package Summary
Check this box to include a summary box at the bottom of the invoice that groups items by package, instead of by room.
Print on Item Line
Brand
Check this box to print the Brand ID for each item.
Multiple Delivery Date
Prints the delivery date on each line of the invoice for orders that have multiple delivery dates (‘Allow Multiple Delivery Dates’ preference must be set to Y in Order Preferences (02-08-90-01)).
In some cases, the description field may be truncated to create room for the printing of the delivery date.
U/M
Click this box to print an item’s Unit of Measure.
Disc%
Check this box to print the ‘Disc%’ column on the invoice. All line discounts (which are entered using the ‘Disc%’ field in POS Entry) appear next to the applicable items.
For TW, DD and SO transactions, ‘Amount you saved on this order’ prints in the payment section of the invoice to show the customer how much was saved with the discount.
NOTE: Due to the complex nature of partial shipments, the ‘Amount you saved on this order’ box does not print on DZ or SZ transactions.
NOTE: To enable the ‘Disc%’ field in POS Entry, the ‘Allow Line Discount%’ preference in Trans Entry Pre-Prompt (02-18-01) must be set to Y.
Print Below Item Description
Second Description
Prints the item’s second description (if applicable) on the invoice.
MFG SKU #
(Field 26 of 03-01)
Check this box to include the information in Field 26 of Inventory Inq/Maint (03-01).
Pattern Match
(Field 28 of 03-01)
Prints the information in Field 28 of Inventory Master Inq/Maint.
Warranty Covered Items
Check this box and “Warranty covers the following items” (followed by the individual item information) prints on each warranty line.
If unchecked, the “(Covered)” prints underneath each item that is covered by the warranty.
Apps Tab
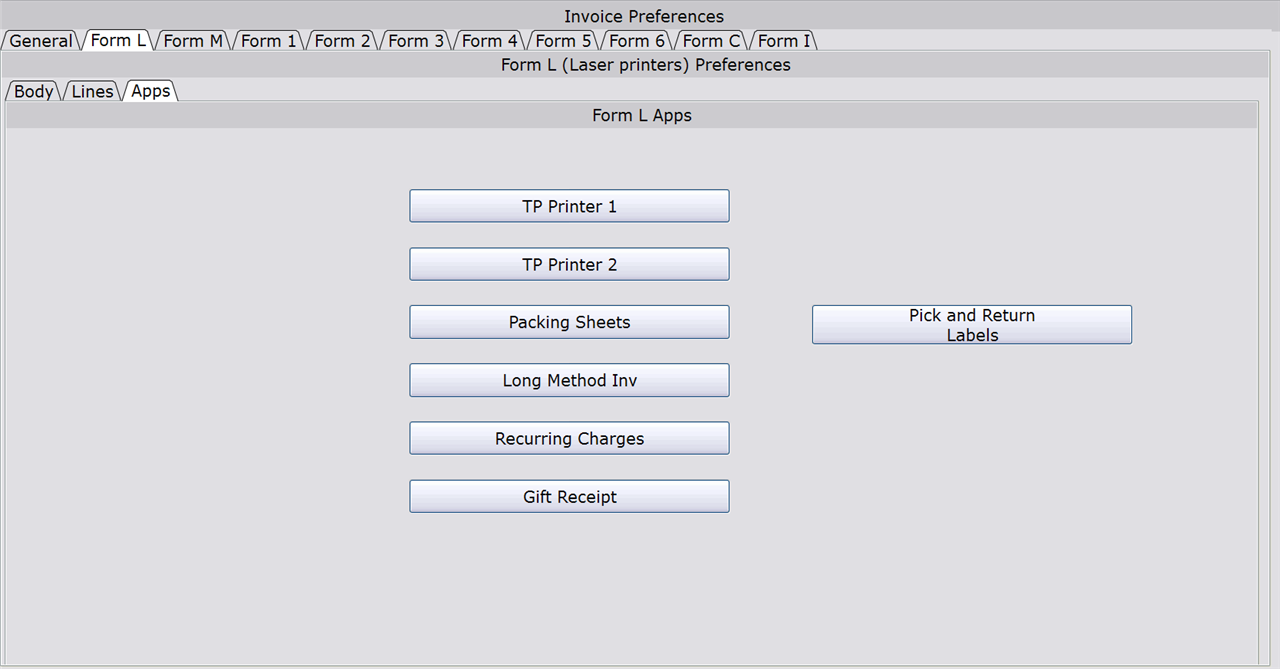
Click image to enlarge.
A number of applications use Form L invoices and chances are that you don’t want to use the exact same preferences for each application. This screen is used to set up preferences specific to each application that uses Form L.
Logo File Names
The ‘Logo at top of Invoice’ and ‘Logo at Bottom’ fields are used to enter the filename of the .png logo(s) that you submitted to Tyler (if you have not yet created and submitted your logo(s), please contact us for instructions).
For Tylernet Clients, the names of the top and bottom logos are entered as ‘sxxxx_top_logo’ and ‘sxxxx_bot_logo’ respectively, where ‘xxxx’ is your Tyler account number.
For Standalone Clients, the names of the top and bottom logos are entered as ‘txxxx_top_logo’ and ‘txxxx_bot_logo’ respectively, where ‘xxxx’ is your Tyler account number.
If you have created separate logos for each region, insert ‘?R’ in the name (e.g. ‘sxxxx_?R_top_logo’, ‘sxxxx_?R_bot_logo).
If you have created separate logos for each branch, insert ‘?Z’ in the name (e.g. ‘sxxxx_?Z_top_logo’, ‘sxxxx_?Z_bot_logo).
NOTE: If you are using Bottom Text Load for Form L (02-18-15) to import your bottom logo to Tyler, please refer to that documentation for instructions on what to enter in the ‘Logo at Bottom’ field.
TP Printer 1 and 2
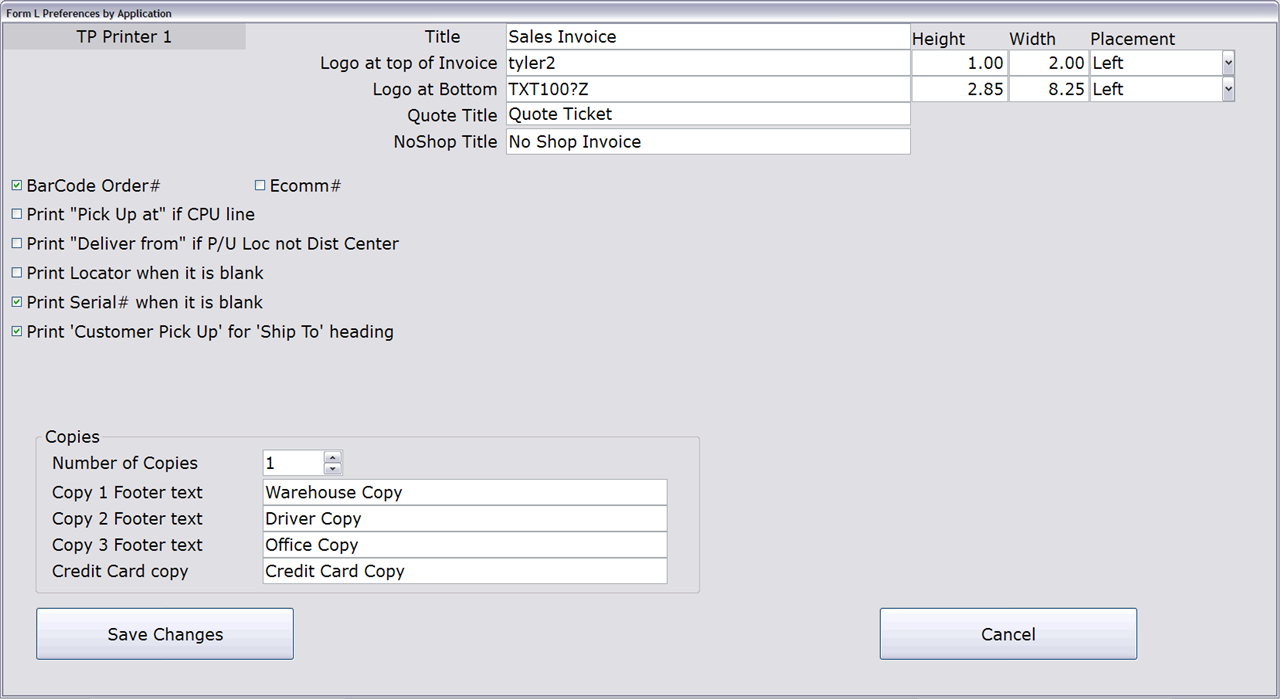
Click image to enlarge.
TP Printer 1 and TP Printer 2 are the invoices printed from POS Entry (02-02), Transaction Inquiry (02-15), Order Maintenance (02-08-02), Quick Ship (02-08-03), and Invoice Printing (02-08-13). The printer assignments are maintained in System File Management (30-01).
TP Printer 1 and TP Printer 2 have the same preferences. The TP Printer 1 preferences apply to invoices printed from Inv. Prntr #1 (in System File Management) and the TP Printer 2 preferences apply to invoices printed from Inv. Prntr. #2.
Title
Enter a title for the invoice.
*Logo at top of Invoice (1×2″)
This is the file name of the 1×2″ logo that will print in the upper-left part of the invoice.
For more information, please see the Logo File Names section of this document.
*Logo at Bottom
(User Defined x 8.25″)
This is the file name of the logo that will print on the bottom of the invoice. The width of the logo is fixed at 8.25″, but you will need to specify a height for the image.
If you want text (no image) to print at the bottom of the invoice, use the Bottom Text Load for Form L selection (02-18-15), which allows you to upload a tab delimited spreadsheet file containing the bottom text. Please see the Sales Transactions documentation for additional information.
For more information, please see the Logo File Names section of this document.
Height
You may enter a custom height for your top and bottom logos.
Width
You may enter a custom width for your top and bottom logos.
Placement
Select the placement of your logo (left, right or center). Changing the placement may help with logo appearance.
Quote Title
(TP Printer 1 only)
Enter the title that will print at the top of Quote Tickets.
If this field is left blank, no title will print on the invoice.
No Shop Title
(TP Printer 1 only)
Enter the title that will print at the top of No Shop invoices.
If this field is left blank, no title will print on the invoice.
BarCode Order#
Prints the order number in WASP 39 barcode, a 3/9 scannable bar code. This allows you to scan the Order# for returns, customer pick-ups, etc.
To use this option you will need to install the bar code font on the PC running the Tyler application and the PC attached to the printer you are using. Please contact Tyler support to obtain the bar code font.
Ecomm#
Check this box and the Ecommerce number prints in barcode form on the invoice (if the order is designated as an Ecommerce order).
To be considered an Ecommerce order, the Free Field of the transaction (in POS Entry/Order Maintenance) must contain the text ‘ECOM’ and the Ecommerce number must appear in the ‘P/O#’ field.
Print “Pick Up at” if line is CPU
Prints ‘Pick Up At XXXX Store’ if the merchandise is being picked up by the customer (CPU) at a location other than the sold at store or distribution center.
Print “Deliver from” if P/U Loc is not Dist Center
Check this box to print “Deliver From XXXX Store” on the invoice if the Pickup Location is a branch other than the Distribution Center.
Print Locator when it is blank
Check this box and if no locator number has been specified for an item, ‘Loc#_________’ prints below the item description, allowing you to write in the locator number.
If this box is unchecked, no locator field prints for items with unspecified locator numbers.
Print Serial# when it is blank
Check this box and if no serial number has been specified for an item, ‘Serial#_________’ prints below the item description, allowing you to write in the serial number.
If this box is unchecked, no serial number field prints for items with unspecified serial numbers.
Print ‘Customer Pick Up’ for ‘Ship To’ heading
(TP Printer 1 only)
For DD or SO transactions that are designated as ‘Customer Pickup’ (the ‘Customer Pickup’ box is checked on the POS Customer tab or the Order Maintenance Routing tab) the heading for the ‘Ship To’ box is changed to ‘Customer Pickup.’
Copies
Number of Copies
Specify the number of copies you want to print. You can print up to three copies simultaneously.
This replaces multi-part forms for those who used to print on dot matrix printers.
Copy 1 Footer text
Copy 2 Footer text
Copy 3 Footer text
You can print different information in the footer of each copy of the invoice. For example, Copy 1 could be labeled “Customer Copy”, Copy 2 could be labeled as “Office Copy”, and Copy 3 could be labeled as “Warehouse Copy”.
Credit Card copy
(TP Printer 1 only)
To include a Credit Card copy, enter a description in this field (e.g. ‘Credit Card Copy’). In order for this copy to print, all or part of the customer’s transaction must be paid with a credit card.
If this field is left blank, no Credit Card copy will print, even if there is payment with a credit card on the transaction.
Packing Sheets
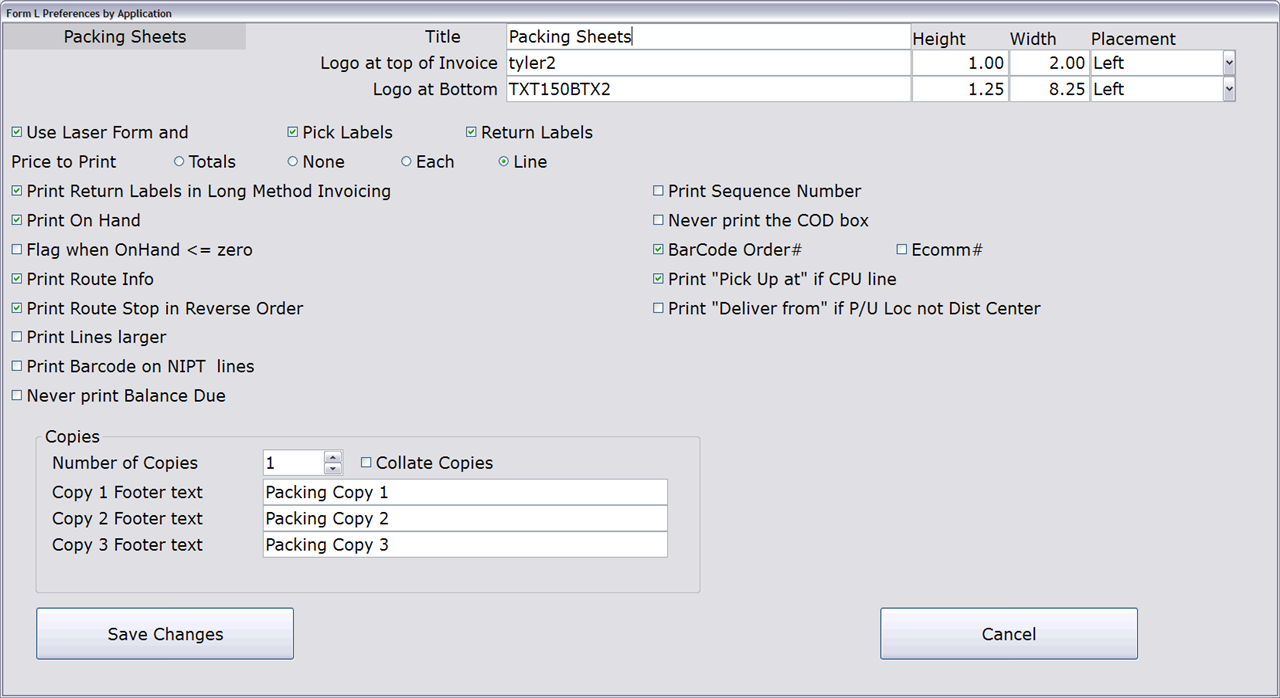
Click image to enlarge.
Packing Sheets are printed from the Packing Sheets selection in Order Processing (02-08-10). The following preferences apply only to Packing Sheets.
Title
Enter a title for the invoice.
*Logo at top of Invoice (1×2″)
This is the file name of the 1×2″ logo that will print in the upper-left part of the packing sheet.
For more information, please see the Logo File Names section of this document.
*Logo at Bottom
(User Defined x 8.25″)
This is the file name of the logo that will print on the bottom of the packing sheet. It can include text and/or a line for the customer to sign upon receipt of delivered products. The width of the logo is fixed at 8.25″, but you will need to specify a height for the image.
If you want text (no image) to print at the bottom of the invoice, use the Bottom Text Load for Form L selection (02-18-15), which allows you to upload a tab delimited spreadsheet file containing the bottom text. Please see the Sales Transactions documentation for additional information.
For more information, please see the Logo File Names section of this document.
Height
You may enter a custom height for your top and bottom logos.
Width
You may enter a custom width for your top and bottom logos.
Placement
Select the placement of your logo (left, right or center). Changing the placement may help with logo appearance.
Use Laser Form and:
IMPORTANT: This box must be checked in order for packing sheets to print in GUI format.
Pick Labels
Check this box to print datamax labels (to apply to products being packed) when the Packing Sheet prints.
NOTE: The ‘Use Laser Form’ box must be checked to use this option.
Return Labels
Check this box and return labels are printed during Picking/Packing Sheet print (02-08-10).
NOTE: Return Labels are not printed if you print the Picking/Packing Sheets by Individual Order (Option 2). You must print them for a date range in order for the Return Labels to print.
NOTE: The ‘Use Laser Form’ box must be checked to use this option.
Price to print:
Totals
None
Each
Line
Select one of the following prices to print on the packing sheets.
Totals
Prints the Shippable Amount totals, but not the prices by line.
None
No prices are printed.
Each
Prints the Each Price by line, along with the Shippable Amount totals.
Line
Prints the Line Price (Extension) by line, along with the Shippable Amount totals.
Print Return Labels in Long Method Invoicing
Check this box and return labels are printed during Invoice Printing (02-08-13).
NOTE: If this box and the ‘Return Labels’ box is checked, return labels print during Picking/Packing Sheet Print and Invoice Printing.
NOTE: The ‘Use Laser Form’ box must be checked to use this option.
Print OnHand
Prints the quantity on hand for the items.
Flag when OnHand <= zero
Check this box and ‘**’ will print next to every line where the Quantity Onhand is less than or equal to zero. This is useful if you pick from the packing sheet (instead of the picking sheet) and want to quickly see unavailable items.
Print Route Info
Prints the prices (subtotals, totals) and routing information (from Centralized Delivery, Order Processing, RouteSmith, RouteView) at the bottom of the packing sheets.
Print Route Stop in Reverse Order
By default, the system prints orders on the Packing Sheet in Route Stop order, starting with Route Stop 1 and continuing to the last Route Stop (up to 24).
Check this box to print in reverse order, starting with orders for the last Route Stop and finishing with orders for the first Route Stop.
Route Stops are set up in Centralized Delivery.
Print Lines larger
Check this box to use a larger text size for the item lines on the invoice.
Print Barcode on NIPT lines
Check this box to print the barcode for Non-Inventory Product Type items.
Never print Balance Due
Check this box and the Balance Due field never prints on the Packing Sheet. Use this option if customer payments are applied after shipping.
Print Sequence Number
Prints the Sequence Number on the Packing Sheets.
Never print the COD box
Check this box and the COD box never prints on the Packing Sheet. Use this option if customer payments are applied after shipping.
BarCode Order#
Prints the order number in WASP 39 barcode, a 3/9 scanable bar code. This allows you to scan the Order# for returns, customer pick-ups, etc.
To use this option you will need to install the bar code font on the PC running the Tyler application and the PC attached to the printer you are using. Please contact Tyler support to obtain the bar code font.
Ecomm#
Check this box and the Ecommerce number prints in barcode form on the invoice (if the order is designated as an Ecommerce order).
To be considered an Ecommerce order, the Free Field of the transaction (in POS Entry/Order Maintenance) must contain the text ‘ECOM’ and the Ecommerce number must appear in the ‘P/O#’ field.
Print “Pick Up at” if CPU Line
Prints “Pick Up At XXXX Store” if the merchandise is being picked up by the customer (CPU).
Print “Deliver from” if P/U Loc is not Dist Center
Check this box to print “Deliver From XXXX Store” on the invoice if the Pickup Location is a branch other than the Distribution Center.
Copies
Number of Copies
Specify the number of copies you want to print. You can print up to three copies simultaneously.
This replaces multi-part forms for those who used to print on dot matrix printers.
Collate Copies
Select this option to print all copies for an order one after the other. For example, copy 1, 2, and 3 for order “AA0AAA” will print followed by copy 1, 2, 3 for order “AA0AAB”, etc.
If this box is unchecked, copy 1 for all orders will print followed by copy 2 for all orders, etc.
Copy 1 Footer text
Copy 2 Footer text
Copy 3 Footer text
You can print different information in the footer of each copy of the invoice. For example, Copy 1 could be labeled “Customer Copy”, Copy 2 could be labeled as “Office Copy”, and Copy 3 could be labeled as “Warehouse Copy”.
Pick and Return Labels

Click image to enlarge.
Return Label Options
These preferences apply to Return Labels, which are printed during Picking/Packing Sheet Print if the ‘Return Labels’ box on this screen is checked.
Return Date
Check this box to print the date that the item was returned on the label.
Barcode Returned Item
Prints the barcode for the returned item.
B-flag Serial
Prints the B-Flag Serial Number of the item (if applicable).
Pick Label Options
These preferences apply to Pick Labels, which are Datamax labels that print during Picking/Packing Sheet Print if the ‘Pick Labels’ box on this screen is checked.
Delivery Date
Check this box to print the Delivery Date of the merchandise on the label.
Print CPU
Prints “CPU” on the label if the item is a customer pickup.
Other Label Options
This preference applies to both Return Labels and Pick Labels.
Print Sold At Store
Check this box to print the Sold at Store on the label.
Long Method Invoice
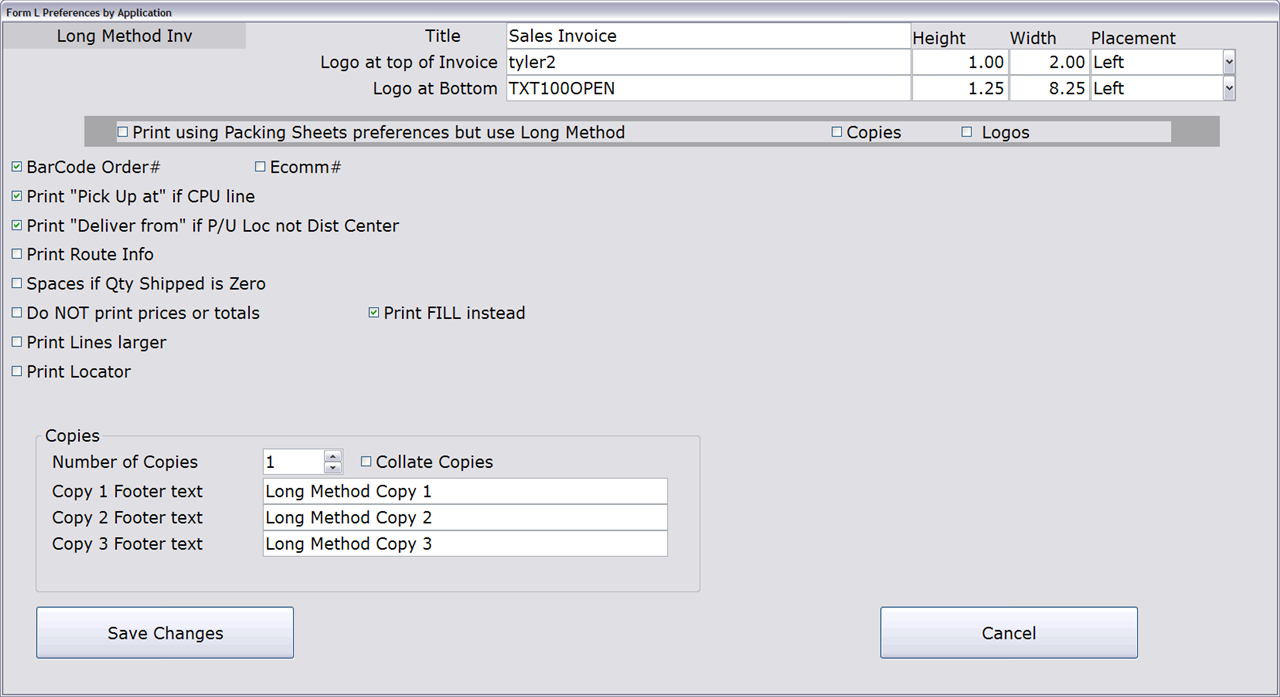
Click image to enlarge.
Long Method Invoices are printed from the Invoice Printing selection in Order Processing (02-08-13). The following preferences apply only to Long Method Invoices.
Title
Enter a title for the invoice.
Logo at top of Invoice (1×2″)
This is the file name of the 1×2″ logo that will print in the upper-left part of the invoice.
For more information, please see the Logo File Names section of this document.
Logo at Bottom
(User Defined x 8.25″)
This is the file name of the logo that will print on the bottom of the invoice. The width of the logo is fixed at 8.25″, but you will need to specify a height for the image.
If you want text (no image) to print at the bottom of the invoice, use the Bottom Text Load for Form L selection (02-18-15), which allows you to upload a tab delimited spreadsheet file containing the bottom text. Please see the Sales Transactions documentation for additional information.
For more information, please see the Logo File Names section of this document.
Height
You may enter a custom height for your top and bottom logos.
Width
You may enter a custom width for your top and bottom logos.
Placement
Select the placement of your logo (left, right or center). Changing the placement may help with logo appearance.
Print using Packing Sheets preferences but use Long Method (Copies, Logos)
Check this box to use the Packing Sheet preferences instead of the preferences on this screen. All preferences on this screen are ignored (unless the Copies and/or Logos boxes are checked–see below).
Check the ‘Copies’ box (in addition to the ‘Print using Packing Sheets preferences but use Long Method’ box) to use the Copies preferences on this screen but use the Packing Sheet preferences for everything else.
Check the ‘Logos’ box (in addition to the ‘Print using Packing Sheets preferences but use Long Method’ box) to use the Logos specified on this screen but use the Packing Sheet preferences for everything else.
If both the ‘Copies’ and ‘Logos’ boxes are checked, the Logos and Copies preferences on this screen are used and the preferences on the Packing Sheets screen are used for everything else.
BarCode Order#
Prints the order number in WASP 39 barcode, a 3/9 scanable bar code. This allows you to scan the Order# for returns, customer pick-ups, etc.
To use this option you will need to install the bar code font on the PC running the Tyler application and the PC attached to the printer you are using. Please contact Tyler support to obtain the bar code font.
Ecomm#
Check this box and the Ecommerce number prints in barcode form on the invoice (if the order is designated as an Ecommerce order).
To be considered an Ecommerce order, the Free Field of the transaction (in POS Entry/Order Maintenance) must contain the text ‘ECOM’ and the Ecommerce number must appear in the ‘P/O#’ field.
Print “Pick Up at” if CPU line
Prints “Pick Up At XXXX Store” if the merchandise is being picked up by the customer (CPU).
Print “Deliver from” if P/U Loc is not Dist Center.
Check this box to print “Deliver From XXXX Store” on the invoice if the Pickup Location is a branch other than the Distribution Center.
Print Route Info
Prints the routing information (from Centralized Delivery, Order Processing, RouteSmith, RouteView) at the bottom of the invoice.
Spaces if Qty Shipped is Zero
Check this box and the quantity for backordered lines prints as a “blank.”
If this box is unchecked, the backordered quantity prints as a “0.”
Do NOT print prices or totals
Check this box and no prices, totals, or payments will print on the invoice.
Print FILL instead
If the ‘Do NOT print prices or totals’ preference is checked, a blank line is printed on the invoice so you can fill in the price.
Print Lines larger
Check this box to use a larger text size for the item lines on the invoice.
Print Locator
Check this box and if no locator number has been specified for an item, ‘Loc#_________’ prints below the item description, allowing you to write in the locator number.
If this box is unchecked, no locator field prints for items with unspecified locator numbers.
Copies
Number of Copies
Specify the number of copies you want to print. You can print up to three copies simultaneously.
This replaces multi-part forms for those who used to print on dot matrix printers.
Collate Copies
Select this option to print all copies for an order one after the other. For example, copy 1, 2, and 3 for order “AA0AAA” will print followed by copy 1, 2, 3 for order “AA0AAB”, etc.
If this box is unchecked, copy 1 for all orders will print followed by copy 2 for all orders, etc.
Copy 1 Footer text
Copy 2 Footer text
Copy 3 Footer text
Copy 1 Footer text You can print different information in the footer of each copy of the invoice. For example, Copy 1 could be labeled “Customer Copy”, Copy 2 could be labeled as “Office Copy”, and Copy 3 could be labeled as “Warehouse Copy”.
Recurring Charges
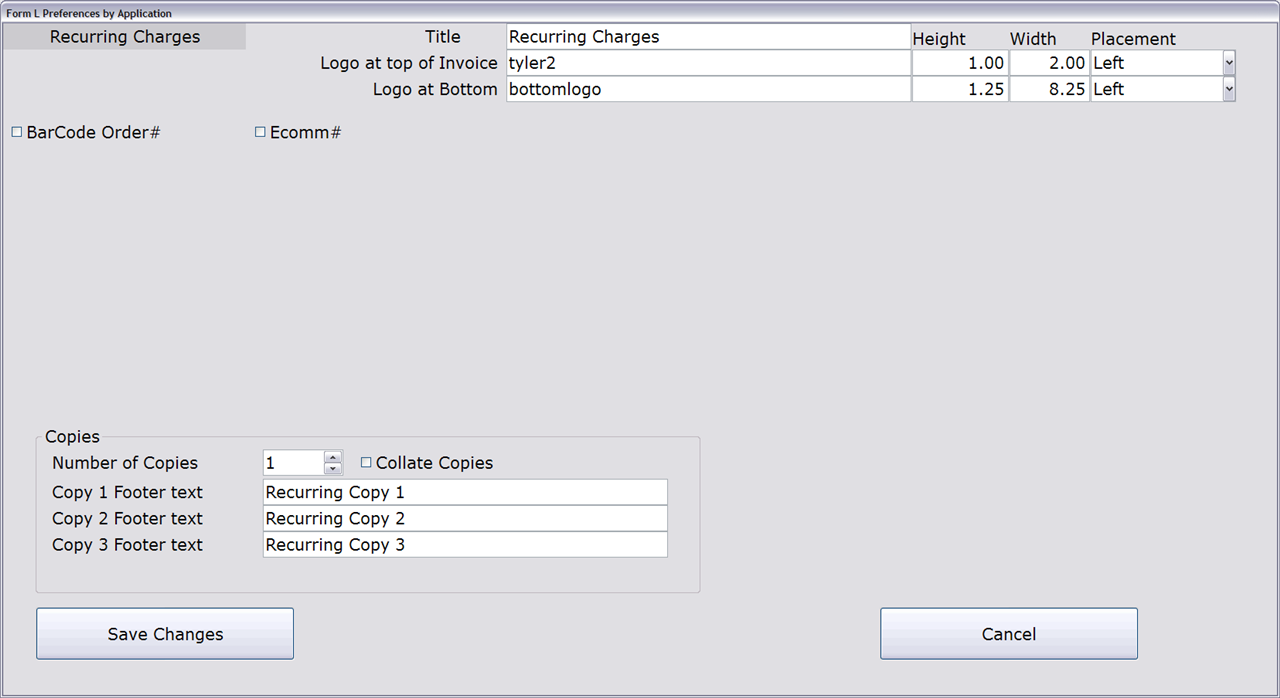
Click image to enlarge.
Recurring Charges Invoices are printed from the Recurring Charges licensed option selection in Sales Transactions (02-52-02). To use GUI printing for these invoices, enter “L” (“9” for 21.500 pre-release) in the Enter Form# field of the Recurring Charges selection.
The following preferences apply only to Recurring Charges Invoices.
Title
Enter a title for the invoice.
Logo at top of Invoice (1×2″)
This is the file name of the 1×2″ logo that will print in the upper-left part of the invoice.
For more information, please see the Logo File Names section of this document.
Logo at Bottom
(User Defined x 8.25″)
This is the file name of the logo that will print on the bottom of the invoice. The width of the logo is fixed at 8.25″, but you will need to specify a height for the image.
If you want text (no image) to print at the bottom of the invoice, use the Bottom Text Load for Form L selection (02-18-15), which allows you to upload a tab delimited spreadsheet file containing the bottom text. Please see the Sales Transactions documentation for additional information.
For more information, please see the Logo File Names section of this document.
Height
You may enter a custom height for your top and bottom logos.
Width
You may enter a custom width for your top and bottom logos.
Placement
Select the placement of your logo (left, right or center). Changing the placement may help with logo appearance.
BarCode Order#
Prints the order number in WASP 39 barcode, a 3/9 scannable bar code. This allows you to scan the Order# for returns, customer pick-ups, etc.
To use this option you will need to install the bar code font on the PC running the Tyler application and the PC attached to the printer you are using. Please contact Tyler support to obtain the bar code font.
Ecomm#
Check this box and the Ecommerce number prints in barcode form on the invoice (if the order is designated as an Ecommerce order).
To be considered an Ecommerce order, the Free Field of the transaction (in POS Entry/Order Maintenance) must contain the text ‘ECOM’ and the Ecommerce number must appear in the ‘P/O#’ field.
Copies
Number of Copies
Specify the number of copies you want to print. You can print up to three copies simultaneously.
This replaces multi-part forms for those who used to print on dot matrix printers.
Collate Copies
Select this option to print all copies for an order one after the other. For example, copy 1, 2, and 3 for order “AA0AAA” will print followed by copy 1, 2, 3 for order “AA0AAB”, etc.
If this box is unchecked, copy 1 for all orders will print followed by copy 2 for all orders, etc.
Copy 1 Footer text
Copy 2 Footer text
Copy 3 Footer text
You can print different information in the footer of each copy of the invoice. For example, Copy 1 could be labeled “Customer Copy”, Copy 2 could be labeled as “Office Copy”, and Copy 3 could be labeled as “Warehouse Copy”.
Gift Receipt
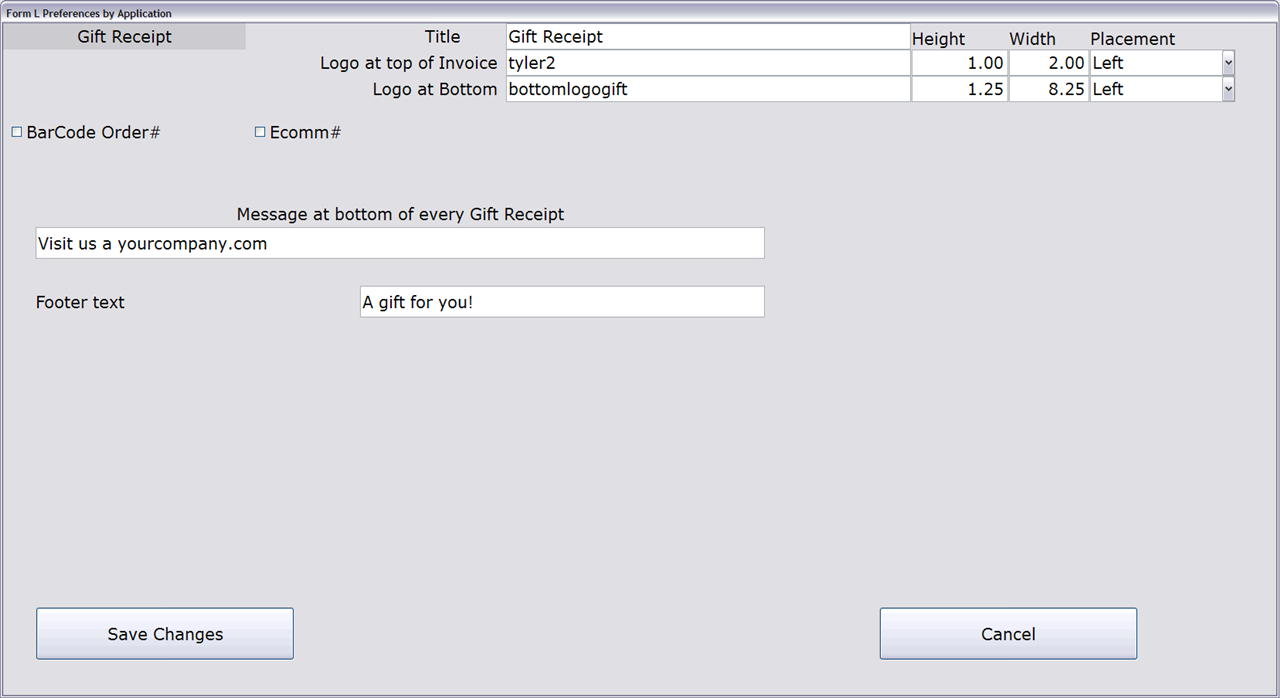
Click image to enlarge.
Gift Receipts print along with regular invoice prints in POS entry (02-02). They also print in Transaction Inquiry (02-15) and Quick Ship (02-08-03).
To print a Gift Receipt for a transaction:
1. Make sure the ‘Allow Gift Receipt?’ preference is set to Y in the Trans Entry Pre-Prompt selection.
2. In Point of Sale, click the Instruction tab.
3. Check the Print Gift Receipt box.
4. Enter a message to print on the gift receipt in the Message box.
The following preferences are used to customize the appearance of Gift Receipts:
Title
Enter a title for the gift receipt.
Logo at top of Invoice (1×2″)
This is the file name of the 1×2″ logo that will print in the upper-left part of the gift receipt.
For more information, please see the Logo File Names section of this document.
Logo at Bottom
(User Defined x 8.25″)
This is the file name of the logo that will print on the bottom of the gift receipt. The width of the logo is fixed at 8.25″, but you will need to specify a height for the image.
If you want text (no image) to print at the bottom of the invoice, use the Bottom Text Load for Form L selection (02-18-15), which allows you to upload a tab delimited spreadsheet file containing the bottom text. Please see the Sales Transactions documentation for additional information.
For more information, please see the Logo File Names section of this document.
Height
You may enter a custom height for your top and bottom logos.
Width
You may enter a custom width for your top and bottom logos.
Placement
Select the placement of your logo (left, right or center). Changing the placement may help with logo appearance.
BarCode Order#
Prints the order number in WASP 39 barcode, a 3/9 scanable bar code. This allows you to scan the Order# for returns, customer pick-ups, etc.
To use this option you will need to install the bar code font on the PC running the Tyler application and the PC attached to the printer you are using. Please contact Tyler support to obtain the bar code font.
Ecomm#
Check this box and the Ecommerce number prints in barcode form on the invoice (if the order is designated as an Ecommerce order).
To be considered an Ecommerce order, the Free Field of the transaction (in POS Entry/Order Maintenance) must contain the text ‘ECOM’ and the Ecommerce number must appear in the ‘P/O#’ field.
Message at bottom of every Gift Receipt
Allows you to create a custom message to include at the bottom of every gift receipt.
Footer text
Enter any information you would like included in the footer of the gift receipt.
Form M
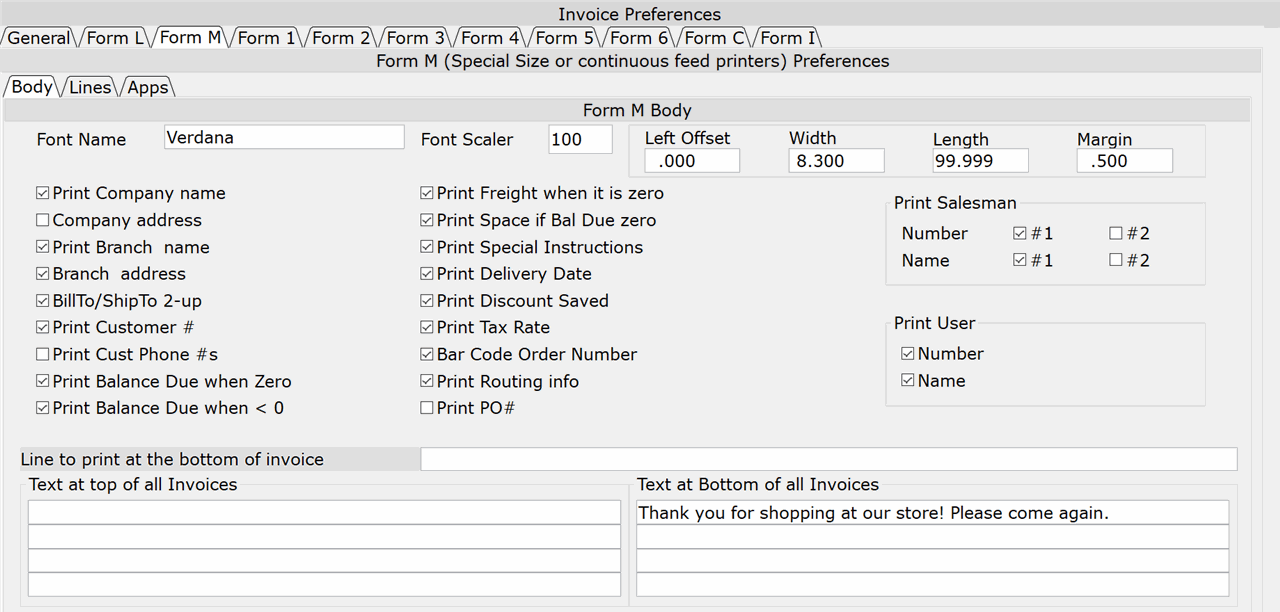
Click image to enlarge.
Body Tab
Font Name
The default is Verdana. You can change it, but do so with caution. If the PC attached to the printer does not have the font or the font name is spelled differently (it’s case-sensitive) there will problems with the invoice print.
If you notice that the font is printing too large or too small on the invoice or that the character spacing is too wide or too narrow, try adjusting the Font Scaler. You can also try changing the Font Adj preferences on the Convergence setup screen. Please refer to the Convergence setup section of this document for more information.
Font Scaler
The font scaler makes all of the text on the invoice proportionally smaller or larger.
The default setting is 100% (for the Verdana font). You may need to adjust this setting to work with your system.
Left Offset
This is the distance that the text is printed from the left edge of an 8.5” by 11” sheet of paper.
If your paper stock is 4” wide, the printer will center it in the tray. In this case, enter 2.25 in this field.
If you are using a continuous paper feed, set this field to 0.
The recommended setting is .000.
Width
Enter the width of the paper. The recommended setting is 8.300.
Length
Enter the length of the paper (height). Enter 99.999 for a continuous roll.
The recommended setting is 99.999.
Margin
The value entered here defines the left, right, and bottom (length) margin for the invoice.
The recommended setting is .500.
Print Company Name
Prints the company name in the top-center area of the invoice.
If you are using a logo on the invoice or using paper with your company name already printed on it, leave this box unchecked (the logo and company name print in the same place).
Company Address
Check this box to print the company address in the top-center area of the invoice.
If you are using a logo on the invoice or using paper with your company name already printed on it, leave this box unchecked (the logo and company address print in the same place).
Print Branch Name
Prints the branch name in the top-center area of the invoice.
If you are using paper with the branch already printed on it, leave this box unchecked.
Branch Address
Check this box to print the branch address in the top-center area of the invoice.
If you are using paper with the branch address already printed on it, leave this box unchecked.
BillTo/ShipTo 2-up
Prints the BillTo and ShipTo customer information side by side (horizontally). Due to space constraints, the text prints smaller than normal.
If unchecked, the information is printed vertically.
Print Customer #
Check this box to print the customer number.
Print Cust Phone #s
Prints the customer phone numbers on the invoice.
Print Balance Due when Zero
Check this box to print $0.00 on the Balance Due line when the Balance due is equal to zero.
“Balance Due” does not print for transactions paid with an A/R Open account. Access the customer’s account in A/R to view the balance.
Print Balance Due when
Prints the Balance Due as a negative number (instead of $0.00) when the Balance Due is less than zero.
“Balance Due” does not print for transactions paid with an A/R Open account. Access the customer’s account in A/R to view the balance.
Print Freight when it is Zero
Prints the Freight field, even when the amount is zero.
Print Space if Bal Due is Zero
If you have the Print Balance Due when Zero box checked, check this box to print spaces on the invoice instead of $0.00.
“Balance Due” does not print for transactions paid with an A/R Open account. Access the customer’s account in A/R to view the balance.
Print Special Instructions
Prints any special instructions for the transaction.
Print Delivery Date
Prints the order’s delivery date.
Print Discount Saved
Prints the amount that was saved by using the discount.
Print Tax Rate
Check this box to display the Tax Rate in the Sales Tax box at the bottom of the invoice.
REMEMBER: Tax codes are set up in Sales Tax Table Entry (30-02-04).
Bar Code Order Number
Prints the order number in WASP 39 barcode, a 3/9 scannable bar code. This allows you to scan the Order# for returns, customer pick-ups, etc.
To use this option you will need to install the bar code font on the PC running the Tyler application and the PC attached to the printer you are using. Please contact Tyler support to obtain the bar code font.
Print Routing Info
Check this box to include the delivery information (warehouse, date, route, time).
Print PO #
Check this box to include the PO #.
Print Salesman
Number #1, #2
Name #1, #2
Check the appropriate ‘Number’ boxes to print the employee number of Salesperson 1 and/or Salesperson 2.
Check the appropriate ‘Name’ boxes to print the name (from the ‘Invoice Name’ field of Emp. Master Maint (10-20)) for Salesperson 1 and/or Salesperson 2.
Print User
Number
Name
Check the ‘Number’ box to print the user number of the person entering the transaction.
Check the ‘Name’ box to print the user name (from the ‘Invoice Name’ field of Emp. Master Maint (10-20)) of the person entering the transaction.
Line to Print at the Bottom of Invoice
This field allows you to add a line of text that will be printed at the bottom of the invoice.
Text at top of all Invoices
This field allows you to add custom text that will be printed at the top of all invoices.
This line is supplemental and does not affect any message lines already set up in the Message Line On Invoice selection (02-18-09).
Text at bottom of all invoices
This field allows you to add custom text that will be printed at the bottom of all invoices.
This line is supplemental and does not affect any message lines already set up in the Message Line On Invoice selection (02-18-09).
Lines Tab
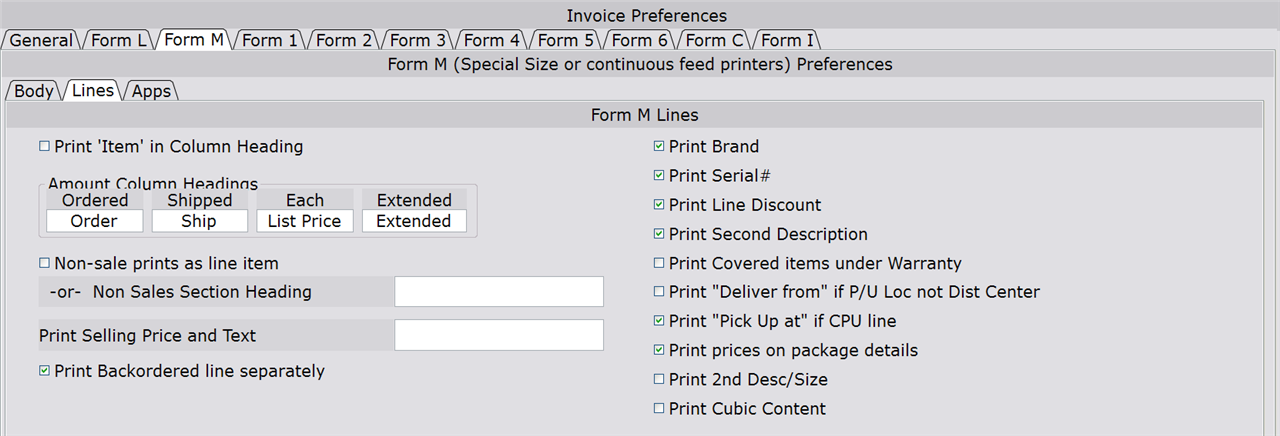
Click image to enlarge.
Print ‘Item’ in Column Heading
Check this box to print ‘Item’ in the column heading instead of ‘Item Number.’
Amount Column Headings (Ordered, Shipped, Each, Extended)
These four fields allow you to create your own titles for the amount columns on the invoice.
If you decide to create new titles for these fields, you might have to adjust them to fit into the allocated space on the invoice.
Non-sale Prints as Line Item
Check this box to print non-sale, non-inventory items (product type begins with ‘@’ and ends with ‘%’) the same as normal items.
If this box is not checked, the product type description prints on the invoice without the item number. You can use the next preference (Non Sales Section Heading) to set up a section heading to easily identify these non-sale, non-inventory items on the invoice.
Non Sales Section Heading
This preference is only used if the above preference (Non-sale Prints as Line Item) is unchecked.
Enter a section heading to easily identify non-sale, non-inventory items on the invoice.
Print SELLING.PRICE and Text
Enter text in this field to print along with the value in Field 18 of Inventory Master Inq/Maint.
Print Backordered line separately
Prints backordered detail lines in a separate section on the invoice when printing through Quick Ship.
Print Brand
Check this box to print the brand for each item.
Print Serial #
Prints item serial numbers.
Print Line Discount
Prints the amount discounted for each line.
Print Second Description
Prints the item’s second description (taken from Inventory Inq/Maint).
Print Covered Items under Warranty
Check this box and “Warranty covers the following items” prints on each warranty line.
Print “Deliver from” if P/U Loc is not Dist Center
Check this box to print “Deliver From XXXX Store” on the invoice if the Pickup Location is a branch other than the distribution center.
Print “Pick Up At” if CPU line
Prints “Pick Up At XXXX Store” if the merchandise is being picked up by the customer (CPU) at a location other than the sold at store or distribution center.
Print prices on package details
Check this box to print the prices of items in a package on the invoice. The total price of the package does not print.
Uncheck this box and only the total price of the package prints.
NOTE: If the ‘Print Detail Lines of Packages on Invoice’ prompt in System File Management (30-01) is set to N, the total price of the package prints on the invoice regardless of how this preference is set.
Print 2nd Desc/Size
(Field 27 of 03-01)
Check this box to print the information in Field 27 of Inventory Master Inq/Maint.
Print Pattern Match
(Field 28 of 03-01)
Prints the information in Field 28 of Inventory Master Inq/Maint.
Apps: TP Printers
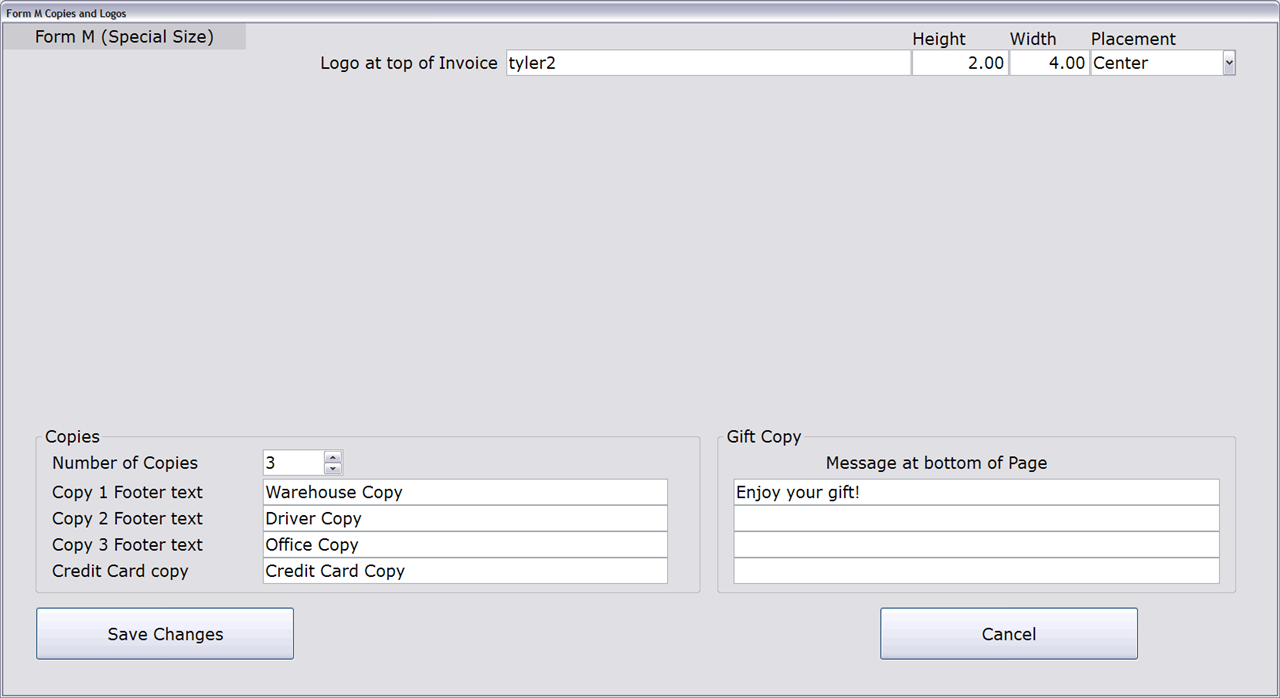
Click image to enlarge.
These preferences are used to specify the logo and copy preferences for Form M and are accessed by clicking the Copies and Logos button.
Logo at top of Invoice
This is the file name of the logo that will print in the upper-left part of the invoice.
For more information, please see the Logo File Names section of this document.
Height
Enter the height of the top logo.
Width
Enter the width of the top logo.
Placement
Select the placement of the top logo from the drop-down list. Options include: Left, Center, and Right.
Copies
Number of Copies
Specify the number of copies you want to print. You can print up to three copies simultaneously.
This replaces multi-part forms for those who used to print on dot matrix printers.
Copy 1 Footer text
Copy 2 Footer text
Copy 3 Footer text
You can print different information in the footer of each copy of the invoice. For example, Copy 1 could be labeled “Customer Copy”, Copy 2 could be labeled as “Office Copy”, and Copy 3 could be labeled as “Warehouse Copy”.
Credit Card copy
To include a Credit Card copy, enter a description in this field (e.g. ‘Credit Card Copy’). In order for this copy to print, all or part of the customer’s transaction must be paid with a credit card.
If this field is left blank, no Credit Card copy will print, even if there is payment with a credit card on the transaction.
Gift Copy
Message at bottom of every Gift Receipt
Enter the message that prints at the bottom of each Gift Receipt.
A Gift Receipt is printed by checking the ‘Print Gift Receipt’ box on the Instruction tab of POS Entry (02-02). Additionally, the ‘Allow Gift Receipt’ preference in Trans Entry Pre-Prompt must be set to ‘Y.’
Form 1

Click image to enlarge.
The following preferences apply only to Non-GUI Invoice Form 1:
Print Tax Code
Check this box to print the Tax Code on the invoice.
Use Form Feed at end of invoice
Check this box to form feed the invoice after the print.
Damaged Heading
Enter the description that will print next to items designated as ‘Damaged.’
Print signature line for Credit Card
Check this box and on transactions that contain a Credit Card payment, a blank line prints at the bottom of the invoice for the customer’s signature.
Text to print
Enter the text that will print to the left of the Credit Card signature line. If this field is left blank, ‘Customer Signature’ is printed underneath the signature line.
This preference is only applicable if the ‘Print signature line for Credit Card’ option is checked.
Form 2
Click image to enlarge.
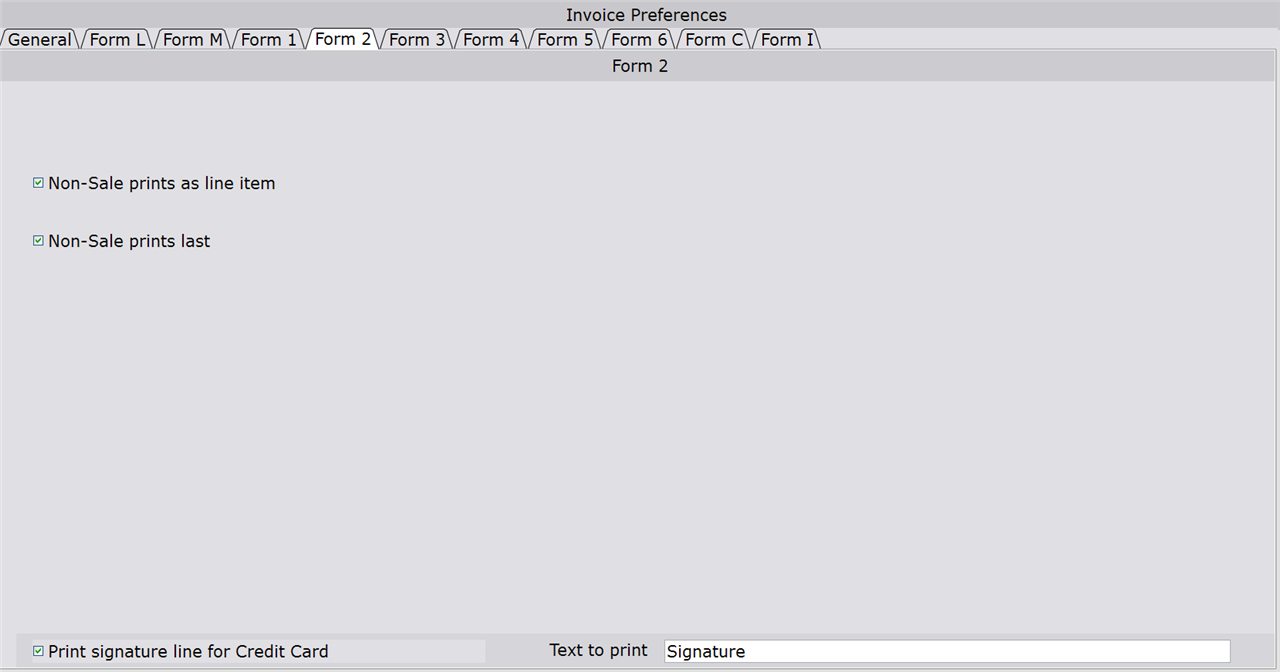
The following preferences apply only to Non-GUI Invoice Form 2:
Non-sale prints as line item
Check this box to print non-sale, non-inventory items (product type begins with ‘@’ and ends with ‘%’) the same as normal items.
If this box is not checked, the product type description prints on the invoice without the item number.
Non-sale prints last
Prints non-sale items last on the invoice, regardless of the order that they were entered.
Print signature line for Credit Card
Check this box and on transactions that contain a Credit Card payment, a blank line prints at the bottom of the invoice for the customer’s signature.
Text to print
Enter the text that will print to the left of the Credit Card signature line. If this field is left blank, ‘Customer Signature’ is printed underneath the signature line.
This preference is only applicable if the ‘Print signature line for Credit Card’ option is checked.
Form 3
Click image to enlarge.
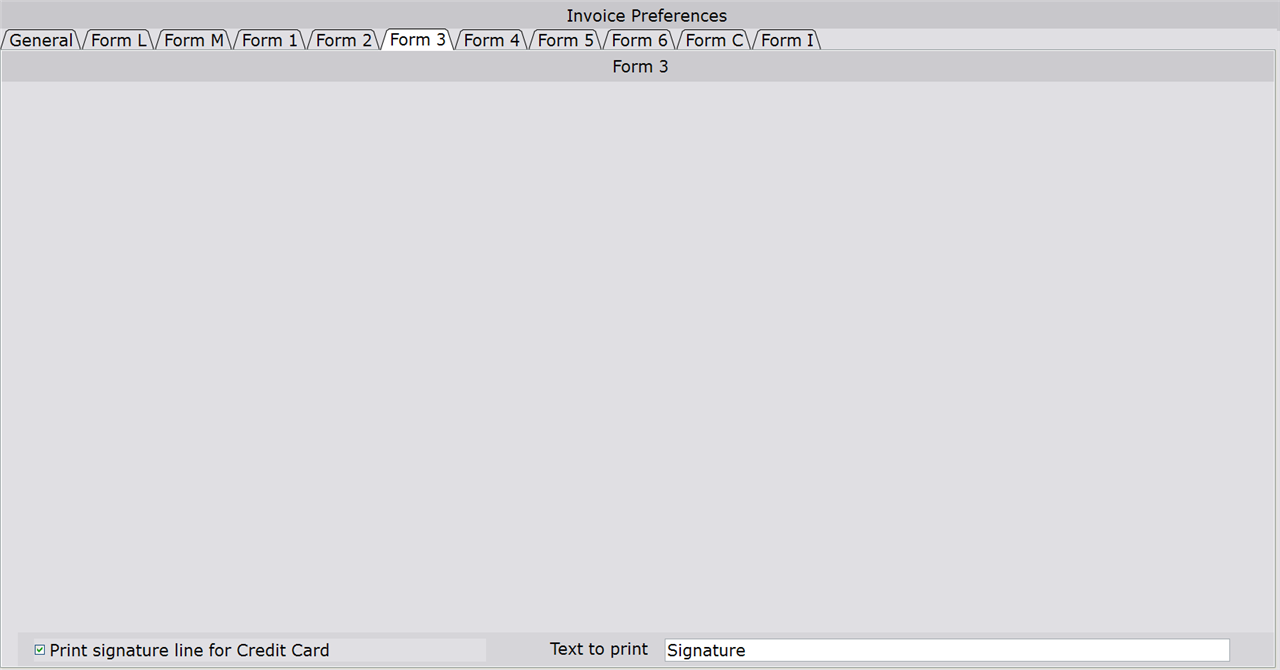
The following preferences apply only to Non-GUI Invoice Form 3:
Print signature line for Credit Card
Check this box and on transactions that contain a Credit Card payment, a blank line prints at the bottom of the invoice for the customer’s signature.
Text to print
Enter the text that will print to the left of the Credit Card signature line. If this field is left blank, ‘Customer Signature’ is printed next to the signature line.
This preference is only applicable if the ‘Print signature line for Credit Card’ option is checked.
Form 4
Click image to enlarge.
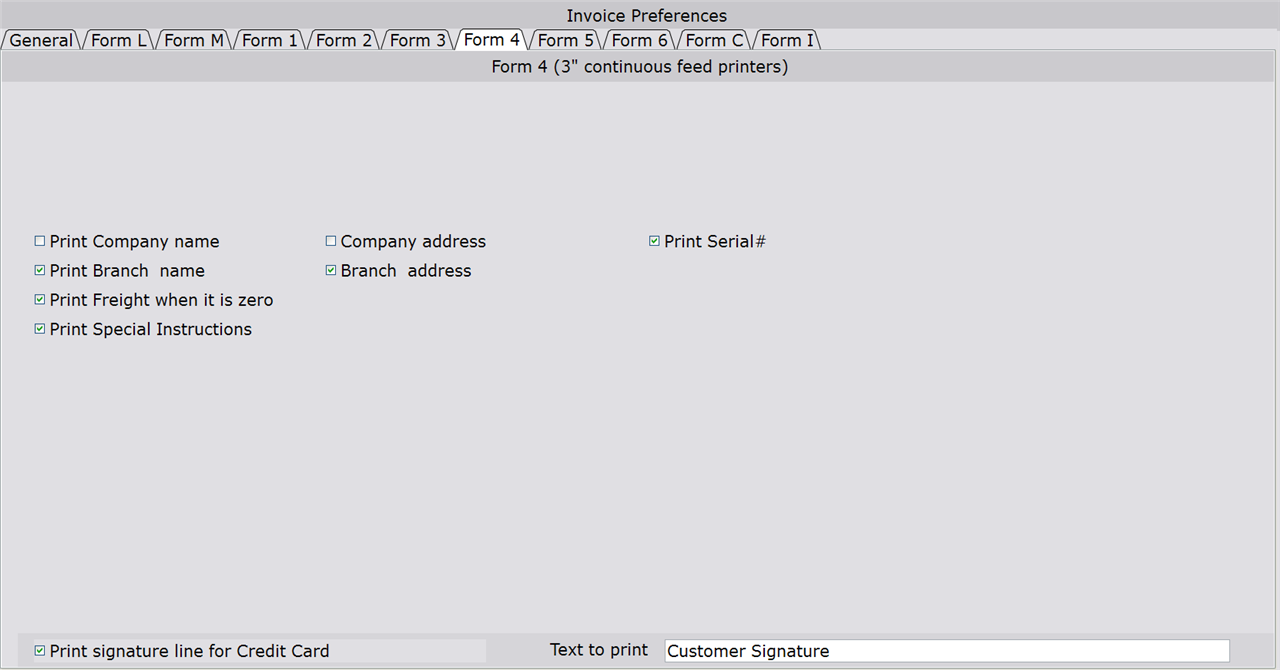
The following preferences apply only to 3″ continuous feed invoices (Non-GUI Invoice Form 4):
Print Company Name
Prints the company name on the top of the invoice.
Company Address
Check this box to print the company address on the top of the invoice.
Print Branch Name
Prints the branch name on the top of the invoice.
Branch Address
Check this box to print the branch address on the top of the invoice.
Print Freight when it is zero
Prints the Freight field, even when the amount is zero.
Print Special Instructions
Prints any special instructions for the transaction.
Print Serial #
Check this box to print the serial number for an item. If the serial number is short enough, it will print on the amounts line. If not, it will print on a separate line.
Print signature line for Credit Card
Check this box and on transactions that contain a Credit Card payment, a blank line prints at the bottom of the invoice for the customer’s signature.
Text to print
Enter the text that will print to the left of the Credit Card signature line. If this field is left blank, ‘Customer Signature’ is printed underneath the signature line.
This preference is only applicable if the ‘Print signature line for Credit Card’ option is checked.
Form 5
Click image to enlarge.
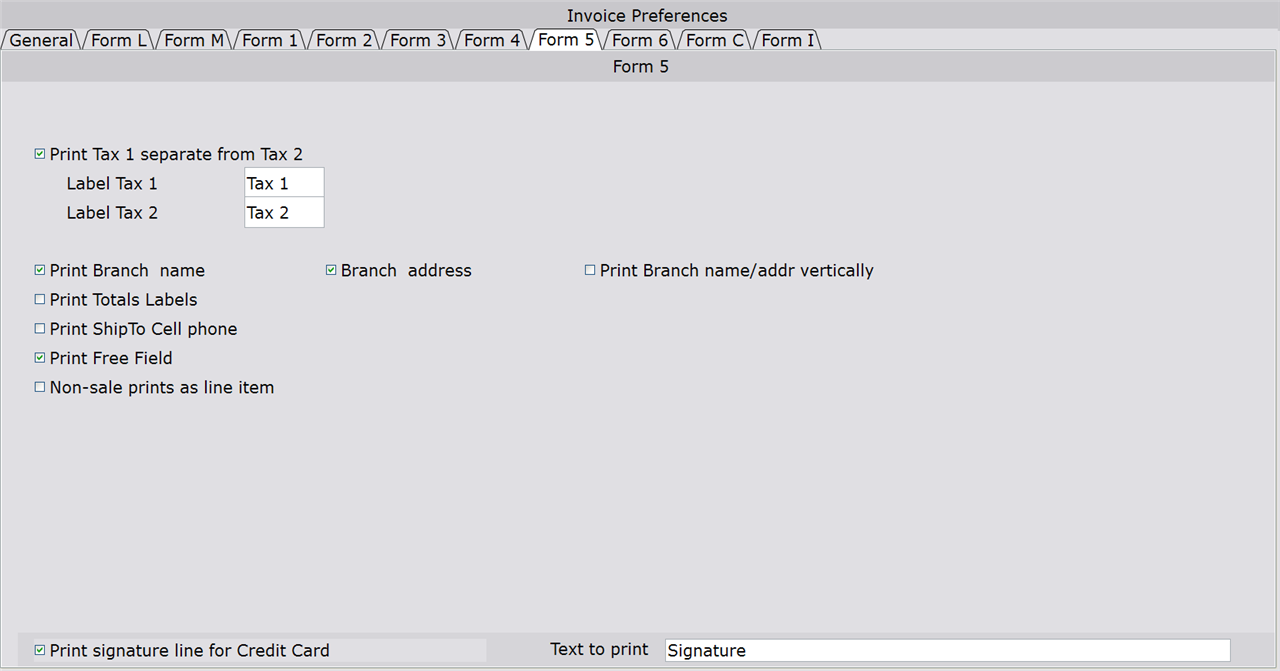
The following preferences apply only to Non-GUI Invoice Form 5:
Print Tax 1 separate from Tax 2
If you have a Level 1 and Level 2 tax set up in Sales Tax Tables Entry (30-02-04), check this box to show the calculated tax amounts for each level on the invoice.
Label Tax 1
If the ‘Print Tax 1 separate from Tax 2’ box is checked, enter a label for Tax 1 in this field. The text entered here prints next to the Tax 1 amount on the invoice.
Label Tax 2
If the ‘Print Tax 1 separate from Tax 2’ box is checked, enter a label for Tax 2 in this field. The text entered here prints next to the Tax 2 amount on the invoice.
Print Branch name
Check this box to print the branch name at the top of the invoice.
Branch address
Prints the branch address at the top of the invoice.
Print Branch name/addr vertically
Prints the branch name and branch address vertically (instead of horizontally).
IMPORTANT: When printing a new batch of Form 5 invoices (with this option checked), you must print a test/dummy invoice on the first page of the batch. This allows the system to properly align the invoice(s) for vertical printing.
Print Totals Labels
Check this box to print ‘Cr. Card,’ ‘Charge,’ and ‘Other’ next to the respective total amounts on the invoice.
Print ShipTo Cell phone
Prints the cell phone number of the Ship To Customer.
Print Free Field
Prints the contents of the Free Field.
Non-sale prints as line item
Check this box to print non-sale, non-inventory items (product type begins with ‘@’ and ends with ‘%’) the same as normal items.
If this box is not checked, the product type description prints on the invoice without the item number.
Print signature line for Credit Card
Check this box and on transactions that contain a Credit Card payment, a blank line prints at the bottom of the invoice for the customer’s signature.
Text to print
Enter the text that will print to the left of the Credit Card signature line. If this field is left blank, ‘Customer Signature’ is printed underneath the signature line.
This preference is only applicable if the ‘Print signature line for Credit Card’ option is checked.
Form 6
Click image to enlarge.
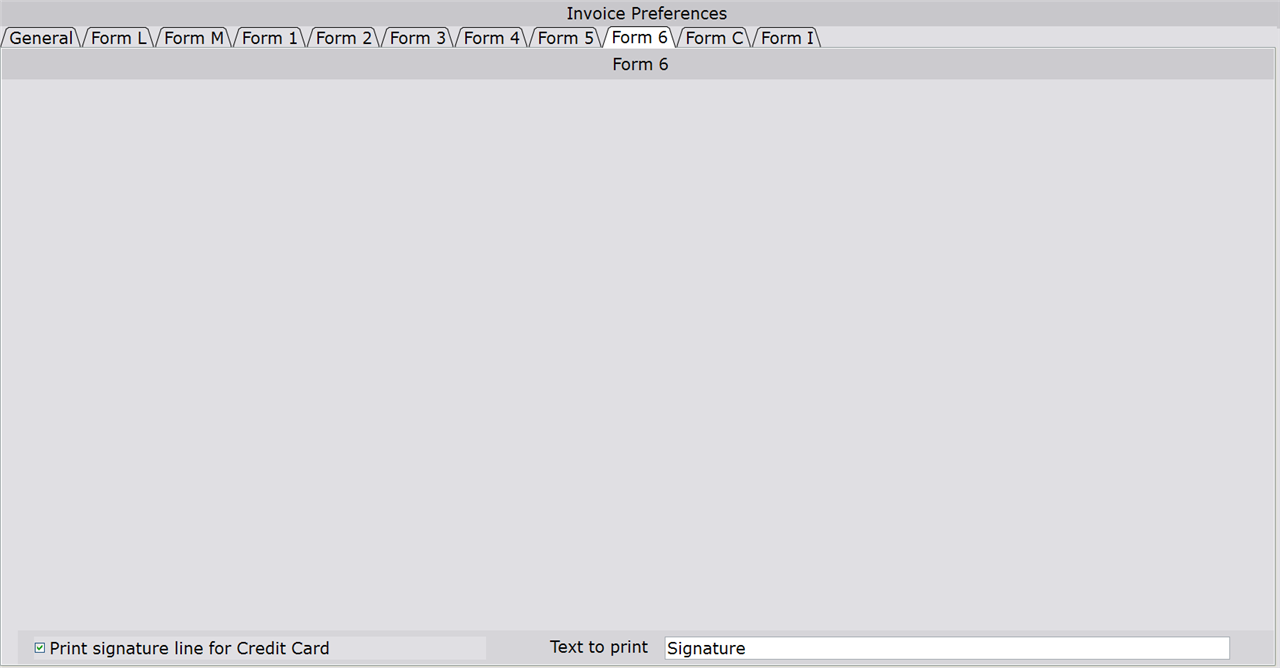
The following preferences apply only to Non-GUI Invoice Form 6:
Print signature line for Credit Card
Check this box and on transactions that contain a Credit Card payment, a blank line prints at the bottom of the invoice for the customer’s signature.
Text to print
Enter the text that will print to the left of the Credit Card signature line. If this field is left blank, ‘Customer Signature’ is printed underneath the signature line.
This preference is only applicable if the ‘Print signature line for Credit Card’ option is checked.
Form C
Click image to enlarge.
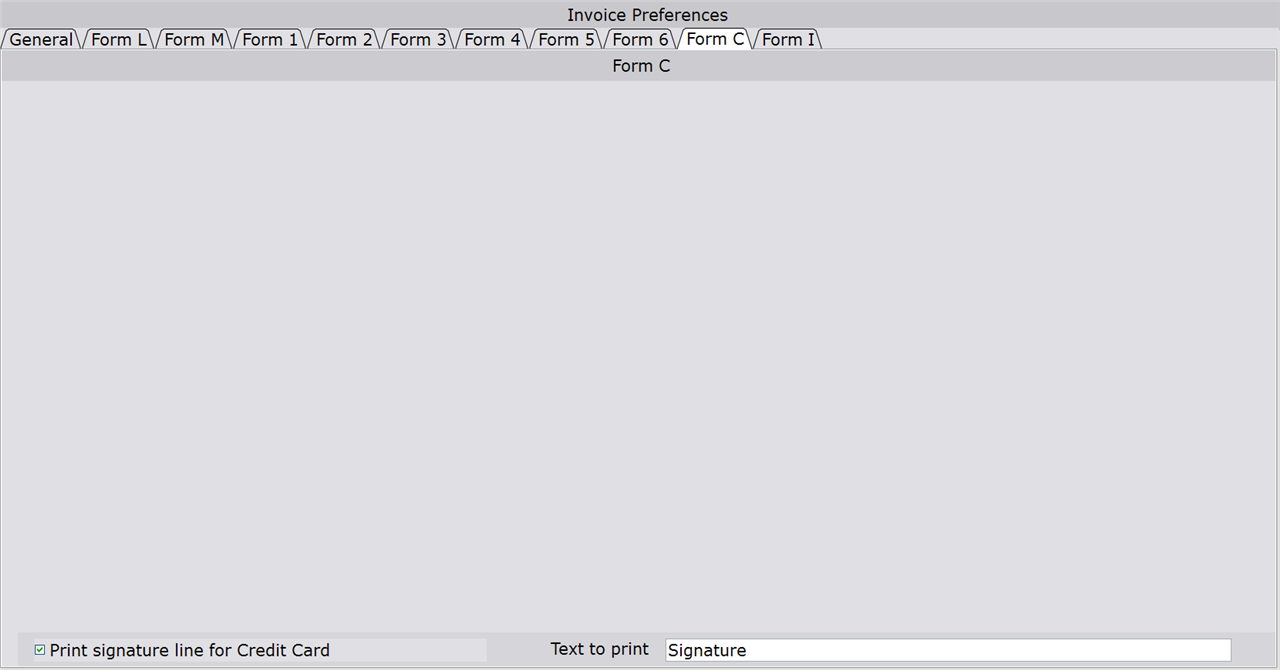
The following preferences apply only to Non-GUI Invoice Form C:
Print signature line for Credit Card
Check this box and on transactions that contain a Credit Card payment, a blank line prints at the bottom of the invoice for the customer’s signature.
Text to print
Enter the text that will print to the left of the Credit Card signature line. If this field is left blank, ‘Customer Signature’ is printed next to the signature line.
This preference is only applicable if the ‘Print signature line for Credit Card’ option is checked.
Form I
Click image to enlarge.
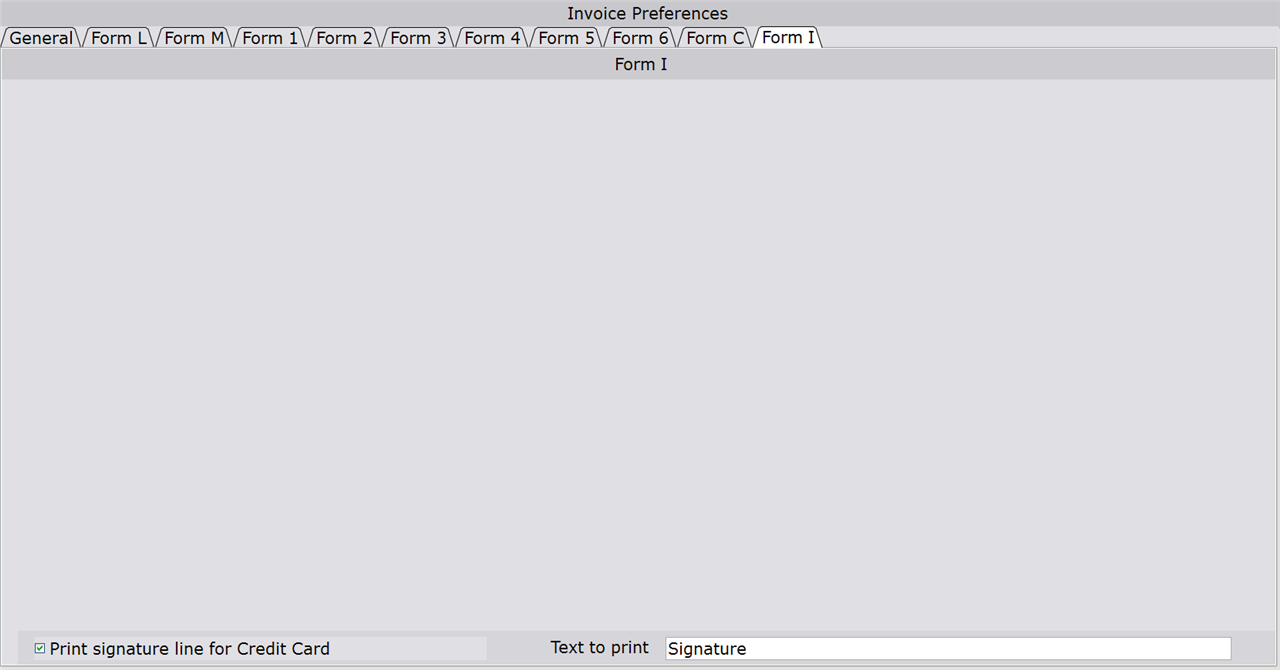
The following preferences apply only to Non-GUI Invoice Form I:
Print signature line for Credit Card
Check this box and on transactions that contain a Credit Card payment, a blank line prints at the bottom of the invoice for the customer’s signature.
Text to print
Enter the text that will print to the left of the Credit Card signature line. If this field is left blank, ‘Customer Signature’ is printed next to the signature line.
This preference is only applicable if the ‘Print signature line for Credit Card’ option is checked.


