The Sales Transactions Update Process (02)
Overview
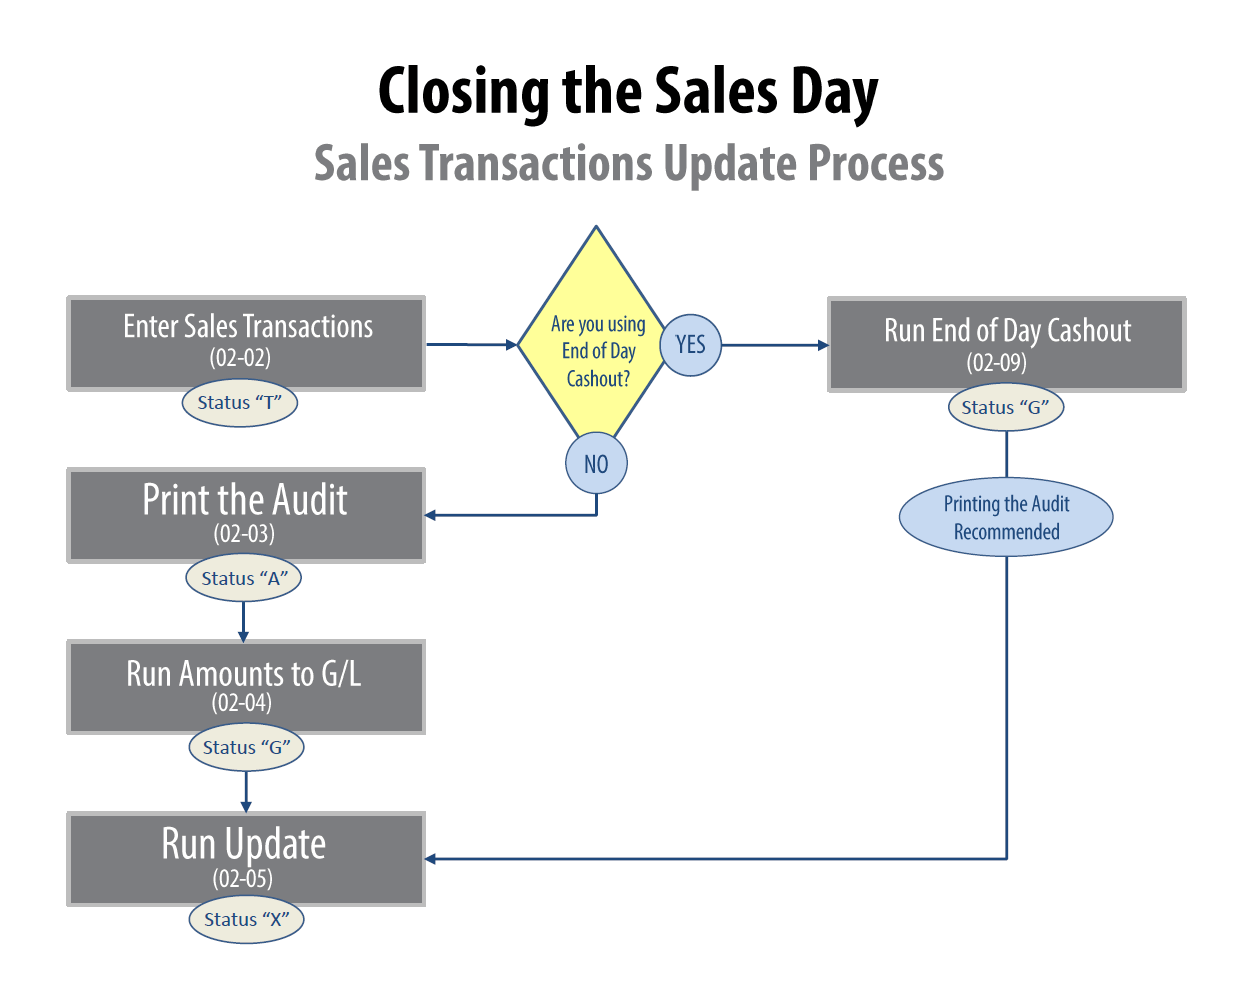
With Tyler, sales transactions for each branch/day must follow a specific process from the time of entry in POS (02-02) to the time of Transaction Update (02-05). This tutorial describes how to complete the Sales Transactions Update Process, also known as Closing the Sales Day.
Infographic
Step 1. Enter Transactions through POS Entry.
First, transactions are entered through POS Entry. You can enter transactions for the current month or for the next month. (e.g. if the current month is January, you can enter transactions for February). When the first transaction is completed for a branch/day, the processing status code for that branch/day is set to ‘T.’
Step 2. Print the Transaction Audit.
Next, you need to print the Transaction Audit (02-03) for the branches/days that you want to move to the next step of the update process.
Before printing the Audit:
- Verify that shipped orders for the day are updated (through Order Update (02-08-16)). If orders are not updated, they will be excluded from the audit.
- Confirm that all completed work orders are updated through Service Audit/Update (07-05).
Once the audit print is started for the branches/days, the processing status becomes ‘I’ for those branches/days.
When the status of a branch/day is ‘I,’ you cannot:
- Enter a new transaction for that branch/day
- Change an order in Order Maintenance (02-08-02) for that audit branch/day (if the ‘Write DX Transactions’ preference in Order Preferences (02-08-90) is set to Y)
The printed audit will either be in balance or out of balance. If it is in balance, the status for the branch/day is set to ‘A’ and you can proceed to the next step in the update process. If it is out of balance, the status for the branch/day is set to ‘O’ and you must correct the transactions and a print another audit before moving to the next step of the process.
Step 3. Run Amounts to G/L.
Once the processing status for a branch/day is set to ‘A,’ you need to run Amounts to G/L (02-04). This selection verifies that all G/L amounts for a branch/day are in balance. If the amounts are in balance, the status of the branch/day is set to ‘G.’ If the amounts are out of balance, the errors must be fixed before you can move to Step 4 (Update).
4. Run Transaction Update.
The final step in the process is running Transaction Update (02-05). When a branch/day with a status of ‘G’ is selected for update, the processing status is set to ‘U,’ meaning the update process is currently in progress.
When update is run to completion, the status for the branch/day is set to ‘X.’ It is important to remember that even if a branch/day is set to an ‘X’ status, you can still print the audit for that branch/day.
